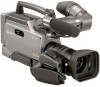
Sony DSR 250 Operating Instructions - Page 3
Table of contents - review
 |
UPC - 027242579514
View all Sony DSR 250 manuals
Add to My Manuals
Save this manual to your list of manuals |
Page 3 highlights
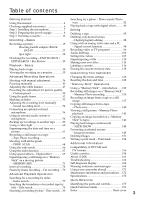
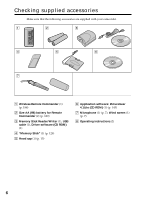
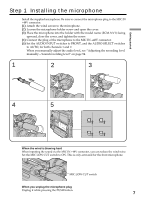
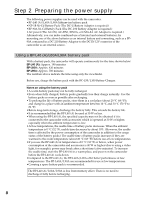
Table of contents Getting started Using this manual 4 Checking supplied accessories 6 Searching for a photo - Photo search/Photo scan 82 Playing back a tape with digital effects ......... 84 Step 1 Installing the microphone 7 Step 2 Preparing the power supply 8 Step 3 Inserting a cassette 13 Recording - Basics Recording a picture 15 Shooting backlit subjects (BACK LIGHT 27 Spot light 28 Checking the recording - END SEARCH / EDITSEARCH / Rec Review 29 Playback - Basics Playing back a tape 30 Viewing the recording on a monitor 35 Editing Dubbing a tape 85 Dubbing only desired scenes - Digital program editing 88 Using with an analog video unit and a PC - Signal convert function 94 Recording video or TV programs 96 Audio dubbing 100 Setting time values 105 Superimposing a title 110 Making your own titles 114 Labeling a cassette 116 Erasing the cassette memory data 118 Customizing Your Camcorder Advanced Recording Operations Changing the menu settings 120 Shooting with manual adjustment 36 Resetting the date and time 128 Focusing manually 45 "Memory Stick" Operations Adjusting the white balance 47 Presetting the adjustment for picture quality - Custom preset 50 Using the guide frame 52 Marking an Index 53 Adjusting the recording level manually - Sound recording level 54 Connecting an optional external microphone 56 Using an external audio system or microphone 58 Backing up recordings to another tape ......... 59 Using a video light 60 Superimposing the date and time on a picture 61 Recording a still image on a tape - Tape Photo recording 62 Shooting with all the pixels - PROG. SCAN 64 Using a "Memory Stick" - introduction ...... 129 Recording still images on a "Memory Stick" - Memory Photo recording 134 Recording an image from a tape as a still image 137 Copying still images from a tape - Photo save 140 Viewing a still picture - Memory Photo playback 142 Copying an image recorded on a "Memory Stick" to tapes 146 Playing back images continuously - SLIDE SHOW 148 Preventing accidental erasure - Image protection 149 Deleting images 151 Writing a print mark - Print mark 154 Additional Information Using the wide mode 66 Compatibility of DVCAM and Using the fader function 67 DV formats 156 Using special effects - Digital effect 69 Usable cassettes 158 Superimposing a still image in a "Memory About i.LINK 161 Stick" on a moving picture Troubleshooting 162 - MEMORY MIX 71 Self-diagnosis display 168 Interval recording 74 Warning indicators and messages 169 Frame by frame recording - Cut recording ... 76 Using your camcorder abroad 171 Advanced Playback Operations Searching for a recording by index - Index search 77 Maintenance information and precautions ... 172 Specifications 176 Quick Reference Searching the boundaries of recorded tape by Identifying the parts and controls 177 title - Title search 79 Quick Function Guide 191 Searching a recording by date - Date search ... 80 Index Back cover 3
-
 1
1 -
 2
2 -
 3
3 -
 4
4 -
 5
5 -
 6
6 -
 7
7 -
 8
8 -
 9
9 -
10
-
11
-
12
-
13
-
14
-
15
-
16
-
17
-
18
-
19
-
20
-
21
-
22
-
23
-
24
-
25
-
26
-
27
-
28
-
29
-
30
-
31
-
32
-
33
-
34
-
35
-
36
-
37
-
38
-
39
-
40
-
41
-
42
-
43
-
44
-
45
-
46
-
47
-
48
-
49
-
50
-
51
-
52
-
53
-
54
-
55
-
56
-
57
-
58
-
59
-
60
-
61
-
62
-
63
-
64
-
65
-
66
-
67
-
68
-
69
-
70
-
71
-
72
-
73
-
74
-
75
-
76
-
77
-
78
-
79
-
80
-
81
-
82
-
83
-
84
-
85
-
86
-
87
-
88
-
89
-
90
-
91
-
92
-
93
-
94
-
95
-
96
-
97
-
98
-
99
-
100
-
101
-
102
-
103
-
104
-
105
-
106
-
107
-
108
-
109
-
110
-
111
-
112
-
113
-
114
-
115
-
116
-
117
-
118
-
119
-
120
-
121
-
122
-
123
-
124
-
125
-
126
-
127
-
128
-
129
-
130
-
131
-
132
-
133
-
134
-
135
-
136
-
137
-
138
-
139
-
140
-
141
-
142
-
143
-
144
-
145
-
146
-
147
-
148
-
149
-
150
-
151
-
152
-
153
-
154
-
155
-
156
-
157
-
158
-
159
-
160
-
161
-
162
-
163
-
164
-
165
-
166
-
167
-
168
-
169
-
170
-
171
-
172
-
173
-
174
-
175
-
176
-
177
-
178
-
179
-
180
-
181
-
182
-
183
-
184
-
185
-
186
-
187
-
188
-
189
-
190
-
191
-
192
 |
 |