Sony DSR 250 Operating Instructions - Page 105
Setting time values - reset
 |
UPC - 027242579514
View all Sony DSR 250 manuals
Add to My Manuals
Save this manual to your list of manuals |
Page 105 highlights
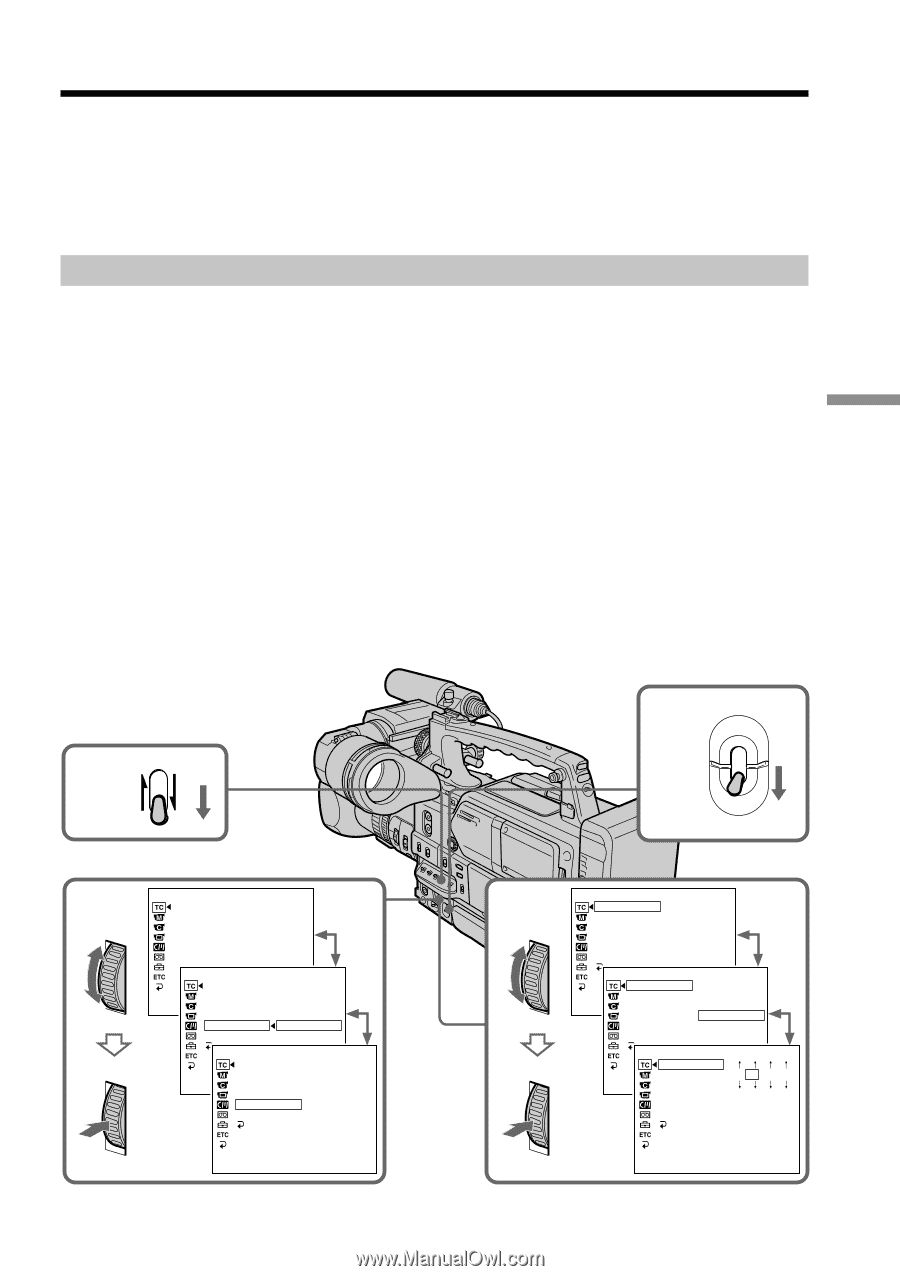
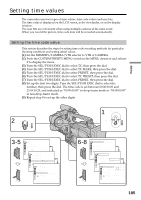
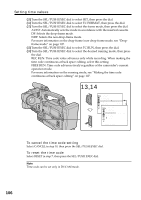
Setting time values The camcorder uses two types of time values: time code values and user bits. The time value is displayed on the LCD screen, in the viewfinder, or on the display window. The user bits are convenient when using multiple cameras at the same event. When you record the picture, time code data will be recorded automatically. Setting the time code value This section describes the steps for setting time code recording methods for particular shooting conditions and setting initial values. (1) Set the MEMORY/CAMERA/VTR selector to VTR or CAMERA. (2) Push the CUSTOM PRESET/MENU switch in the MENU direction and release it to display the menu. (3) Turn the SEL/PUSH EXEC dial to select TC, then press the dial. (4) Turn the SEL/PUSH EXEC dial to select TC MAKE, then press the dial. (5) Turn the SEL/PUSH EXEC dial to select PRESET, then press the dial. (6) Turn the SEL/PUSH EXEC dial to select TC PRESET, then press the dial. (7) Turn the SEL/PUSH EXEC dial to select PRESET, then press the dial. (8) Set up the first two digits. Turn the SEL/PUSH EXEC dial to select the number, then press the dial. The time code is set between 00:00:00:00 and 23:59:59:29, and indicated as "00:00.00:00" in drop-frame mode or "00:00:00:00" in non-drop-frame mode. (9) Repeat step 8 to set up the other digits. Editing CUSTOM PRESET MENU 2 3-5 TC / UB SET TC PRESET UB PRESET TC FORMAT TC RUN TC MAKE UB T I ME TC / UB SET TC PRESET UB PRESET [MENU]T:CENFDORMAT TC RUN TC MAKE REGEN UB T I ME PRESET RETURN TC / UB SET TC PRESET UB PRESET [MENU]T:CENFDORMAT TC RUN TC MAKE PRESET UB T I ME RETURN [MENU] : END 1 MEMORY CAMERA VTR 6-8 TC / UB SET TC PRESET 00:00:00:00 UB PRESET TC FORMAT TC RUN TC MAKE UB T I ME RETURN TC / UB SET TC PRESET 00:00:00:00 UB PRESET [MENU]T:CENFDORMAT RESET TC RUN PRESET TC MAKE RETURN UB T I ME RETURN TC / UB SET TC PRESET UB PRESET 01:00:00:00 [MENU]T:CENFDORMAT TC RUN TC MAKE SET UB T I ME CANCEL RETURN [MENU] : END 105
-
 1
1 -
2
-
3
-
4
-
5
-
6
-
7
-
8
-
9
-
10
-
11
-
12
-
13
-
14
-
15
-
16
-
17
-
18
-
19
-
20
-
21
-
22
-
23
-
24
-
25
-
26
-
27
-
28
-
29
-
30
-
31
-
32
-
33
-
34
-
35
-
36
-
37
-
38
-
39
-
40
-
41
-
42
-
43
-
44
-
45
-
46
-
47
-
48
-
49
-
50
-
51
-
52
-
53
-
54
-
55
-
56
-
57
-
58
-
59
-
60
-
61
-
62
-
63
-
64
-
65
-
66
-
67
-
68
-
69
-
70
-
71
-
72
-
73
-
74
-
75
-
76
-
77
-
78
-
79
-
80
-
81
-
82
-
83
-
84
-
85
-
86
-
87
-
88
-
89
-
90
-
91
-
92
-
93
-
94
-
95
-
96
-
97
-
98
-
99
-
 100
100 -
 101
101 -
 102
102 -
 103
103 -
 104
104 -
 105
105 -
 106
106 -
 107
107 -
 108
108 -
 109
109 -
 110
110 -
111
-
112
-
113
-
114
-
115
-
116
-
117
-
118
-
119
-
120
-
121
-
122
-
123
-
124
-
125
-
126
-
127
-
128
-
129
-
130
-
131
-
132
-
133
-
134
-
135
-
136
-
137
-
138
-
139
-
140
-
141
-
142
-
143
-
144
-
145
-
146
-
147
-
148
-
149
-
150
-
151
-
152
-
153
-
154
-
155
-
156
-
157
-
158
-
159
-
160
-
161
-
162
-
163
-
164
-
165
-
166
-
167
-
168
-
169
-
170
-
171
-
172
-
173
-
174
-
175
-
176
-
177
-
178
-
179
-
180
-
181
-
182
-
183
-
184
-
185
-
186
-
187
-
188
-
189
-
190
-
191
-
192
 |
 |