Sony DSR 250 Operating Instructions - Page 103
Audio dubbing, Adding an audio sound on a recorded tape
 |
UPC - 027242579514
View all Sony DSR 250 manuals
Add to My Manuals
Save this manual to your list of manuals |
Page 103 highlights
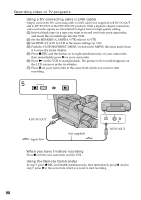
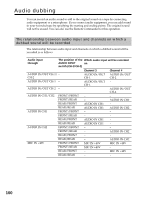
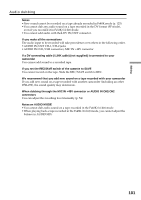
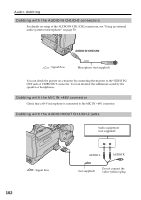
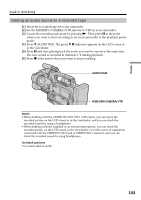
Editing Audio dubbing Adding an audio sound on a recorded tape (1) Insert the recorded tape into your camcorder. (2) Set the MEMORY/CAMERA/VTR selector to VTR on your camcorder. (3) Locate the recording start point by pressing N. Then press X at the point where you want to start recording to set your camcorder to the playback pause mode. (4) Press AUDIO DUB. The green X indicator appears on the LCD screen or in the viewfinder. (5) Press X and start playing back the audio you want to record at the same time. The new sound is recorded in channels 3/4 during playback. (6) Press x at the point where you want to stop recording. AUDIO DUB MEMORY/CAMERA/VTR Notes •When dubbing with the AUDIO IN/OUT CH-1/CH-2 jacks, you can check the recorded picture on the LCD screen or in the viewfinder, and you can check the recorded sound by using a headphones. •When dubbing with the supplied or an external microphone, you can check the recorded picture on the LCD screen, in the viewfinder, or on the screen of equipment connected with the VIDEO IN/OUT jack or VIDEO OUT connector, and you can check the recorded sound by using headphones. On blank portions You cannot add an audio. 103
-
 1
1 -
2
-
3
-
4
-
5
-
6
-
7
-
8
-
9
-
10
-
11
-
12
-
13
-
14
-
15
-
16
-
17
-
18
-
19
-
20
-
21
-
22
-
23
-
24
-
25
-
26
-
27
-
28
-
29
-
30
-
31
-
32
-
33
-
34
-
35
-
36
-
37
-
38
-
39
-
40
-
41
-
42
-
43
-
44
-
45
-
46
-
47
-
48
-
49
-
50
-
51
-
52
-
53
-
54
-
55
-
56
-
57
-
58
-
59
-
60
-
61
-
62
-
63
-
64
-
65
-
66
-
67
-
68
-
69
-
70
-
71
-
72
-
73
-
74
-
75
-
76
-
77
-
78
-
79
-
80
-
81
-
82
-
83
-
84
-
85
-
86
-
87
-
88
-
89
-
90
-
91
-
92
-
93
-
94
-
95
-
96
-
97
-
 98
98 -
 99
99 -
 100
100 -
 101
101 -
 102
102 -
 103
103 -
 104
104 -
 105
105 -
 106
106 -
 107
107 -
 108
108 -
109
-
110
-
111
-
112
-
113
-
114
-
115
-
116
-
117
-
118
-
119
-
120
-
121
-
122
-
123
-
124
-
125
-
126
-
127
-
128
-
129
-
130
-
131
-
132
-
133
-
134
-
135
-
136
-
137
-
138
-
139
-
140
-
141
-
142
-
143
-
144
-
145
-
146
-
147
-
148
-
149
-
150
-
151
-
152
-
153
-
154
-
155
-
156
-
157
-
158
-
159
-
160
-
161
-
162
-
163
-
164
-
165
-
166
-
167
-
168
-
169
-
170
-
171
-
172
-
173
-
174
-
175
-
176
-
177
-
178
-
179
-
180
-
181
-
182
-
183
-
184
-
185
-
186
-
187
-
188
-
189
-
190
-
191
-
192
 |
 |
