Sony DSR 250 Operating Instructions - Page 21
Contrast and brightness adjustment, Outline emphasis adjustment
 |
UPC - 027242579514
View all Sony DSR 250 manuals
Add to My Manuals
Save this manual to your list of manuals |
Page 21 highlights
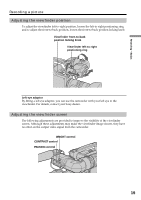
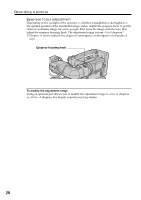
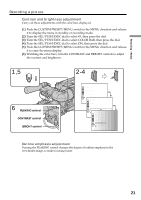
Recording - Basics Recording a picture Contrast and brightness adjustment Carry out these adjustments with the color bars displayed. (1) Push the CUSTOM PRESET/MENU switch in the MENU direction and release it to display the menu in standby or recording mode. (2) Turn the SEL/PUSH EXEC dial to select , then press the dial. (3) Turn the SEL/PUSH EXEC dial to select COLOR BAR, then press the dial. (4) Turn the SEL/PUSH EXEC dial to select ON, then press the dial. (5) Push the CUSTOM PRESET/MENU switch in the MENU direction and release it to erase the menu display. (6) Watching the color bars, turn the CONTRAST and BRIGHT controls to adjust the contrast and brightness. 1,5 2-4 CUSTOM PRESET MENU 6 PEAKING control CONTRAST control BRIGHT control OTHERS WORLD T I ME BEEP COMMANDER D I SPLAY EXT RECCTL DATE REC COLOR BAR HRS METER OTHERS WORLD T I ME [MENU] B: EENEDP COMMANDER D I SPLAY EXT RECCTL DATE REC COLOR BAR OFF HRS METER ON RETUORTHNERS WORLD T I ME [MENU] B: EENEDP COMMANDER D I SPLAY EXT RECCTL DATE REC COLOR BAR ON HRS METER RETURN [MENU] : END Outline emphasis adjustment Turning the PEAKING control changes the degree of outline emphasis in the viewfinder image, to make focusing easier. 21
-
 1
1 -
2
-
3
-
4
-
5
-
6
-
7
-
8
-
9
-
10
-
11
-
12
-
13
-
14
-
15
-
 16
16 -
 17
17 -
 18
18 -
 19
19 -
 20
20 -
 21
21 -
 22
22 -
 23
23 -
 24
24 -
 25
25 -
 26
26 -
27
-
28
-
29
-
30
-
31
-
32
-
33
-
34
-
35
-
36
-
37
-
38
-
39
-
40
-
41
-
42
-
43
-
44
-
45
-
46
-
47
-
48
-
49
-
50
-
51
-
52
-
53
-
54
-
55
-
56
-
57
-
58
-
59
-
60
-
61
-
62
-
63
-
64
-
65
-
66
-
67
-
68
-
69
-
70
-
71
-
72
-
73
-
74
-
75
-
76
-
77
-
78
-
79
-
80
-
81
-
82
-
83
-
84
-
85
-
86
-
87
-
88
-
89
-
90
-
91
-
92
-
93
-
94
-
95
-
96
-
97
-
98
-
99
-
100
-
101
-
102
-
103
-
104
-
105
-
106
-
107
-
108
-
109
-
110
-
111
-
112
-
113
-
114
-
115
-
116
-
117
-
118
-
119
-
120
-
121
-
122
-
123
-
124
-
125
-
126
-
127
-
128
-
129
-
130
-
131
-
132
-
133
-
134
-
135
-
136
-
137
-
138
-
139
-
140
-
141
-
142
-
143
-
144
-
145
-
146
-
147
-
148
-
149
-
150
-
151
-
152
-
153
-
154
-
155
-
156
-
157
-
158
-
159
-
160
-
161
-
162
-
163
-
164
-
165
-
166
-
167
-
168
-
169
-
170
-
171
-
172
-
173
-
174
-
175
-
176
-
177
-
178
-
179
-
180
-
181
-
182
-
183
-
184
-
185
-
186
-
187
-
188
-
189
-
190
-
191
-
192
 |
 |
