Sony DSR 250 Operating Instructions - Page 154
Writing a print mark, Print mark
 |
UPC - 027242579514
View all Sony DSR 250 manuals
Add to My Manuals
Save this manual to your list of manuals |
Page 154 highlights
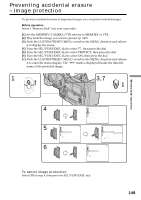
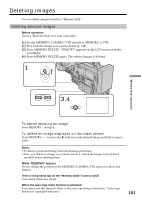
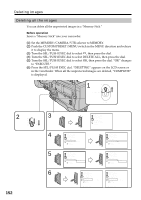
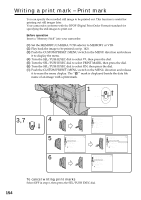
Writing a print mark - Print mark You can specify the recorded still image to be printed out. This function is useful for printing out still images later. Your camcorder conforms with the DPOF (Digital Print Order Format) standard for specifying the still images to print out. Before operation Insert a "Memory Stick" into your camcorder. (1) Set the MEMORY/CAMERA/VTR selector to MEMORY or VTR. (2) Play back the image to be printed out (p. 142). (3) Push the CUSTOM PRESET/MENU switch in the MENU direction and release it to display the menu. (4) Turn the SEL/PUSH EXEC dial to select , then press the dial. (5) Turn the SEL/PUSH EXEC dial to select PRINT MARK, then press the dial. (6) Turn the SEL/PUSH EXEC dial to select ON, then press the dial. (7) Push the CUSTOM PRESET/MENU switch in the MENU direction and release it to erase the menu display. The " " mark is displayed beside the data file name of an image with a print mark. 1 MEMORY CAMERA VTR 3,7 CUSTOM PRESET MENU 4 5 6 MEMORY SET 10 / 12 CONT I NUOUS QUAL I TY PR I NT MARK OFF PROTECT SL I DE SHOW DELETE ALL FORMAT RETURN [MENU] : END MEMORY SET CONT I NUOUS QUAL I TY PR I NT MARK PROTECT SL I DE SHOW DELETE ALL FORMAT [MENU] : END MEMORY SET 10 / 12 CONT I NUOUS QUAL I TY PR I NT MARK ON PROTECT OFF SL I DE SHOW DELETE ALL FORMAT RETURN [MENU] : END MEMORY SET 10 / 12 CONT I NUOUS QUAL I TY PR I NT MARK ON PROTECT SL I DE SHOW DELETE ALL FORMAT RETURN [MENU] : END To cancel writing print marks Select OFF in step 6, then press the SEL/PUSH EXEC dial. 154
-
 1
1 -
2
-
3
-
4
-
5
-
6
-
7
-
8
-
9
-
10
-
11
-
12
-
13
-
14
-
15
-
16
-
17
-
18
-
19
-
20
-
21
-
22
-
23
-
24
-
25
-
26
-
27
-
28
-
29
-
30
-
31
-
32
-
33
-
34
-
35
-
36
-
37
-
38
-
39
-
40
-
41
-
42
-
43
-
44
-
45
-
46
-
47
-
48
-
49
-
50
-
51
-
52
-
53
-
54
-
55
-
56
-
57
-
58
-
59
-
60
-
61
-
62
-
63
-
64
-
65
-
66
-
67
-
68
-
69
-
70
-
71
-
72
-
73
-
74
-
75
-
76
-
77
-
78
-
79
-
80
-
81
-
82
-
83
-
84
-
85
-
86
-
87
-
88
-
89
-
90
-
91
-
92
-
93
-
94
-
95
-
96
-
97
-
98
-
99
-
100
-
101
-
102
-
103
-
104
-
105
-
106
-
107
-
108
-
109
-
110
-
111
-
112
-
113
-
114
-
115
-
116
-
117
-
118
-
119
-
120
-
121
-
122
-
123
-
124
-
125
-
126
-
127
-
128
-
129
-
130
-
131
-
132
-
133
-
134
-
135
-
136
-
137
-
138
-
139
-
140
-
141
-
142
-
143
-
144
-
145
-
146
-
147
-
148
-
 149
149 -
 150
150 -
 151
151 -
 152
152 -
 153
153 -
 154
154 -
 155
155 -
 156
156 -
 157
157 -
 158
158 -
 159
159 -
160
-
161
-
162
-
163
-
164
-
165
-
166
-
167
-
168
-
169
-
170
-
171
-
172
-
173
-
174
-
175
-
176
-
177
-
178
-
179
-
180
-
181
-
182
-
183
-
184
-
185
-
186
-
187
-
188
-
189
-
190
-
191
-
192
 |
 |
