Sony DSR 250 Operating Instructions - Page 22
Using the LCD screen, Recording a picture
 |
UPC - 027242579514
View all Sony DSR 250 manuals
Add to My Manuals
Save this manual to your list of manuals |
Page 22 highlights
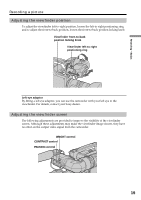
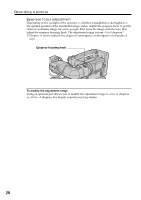
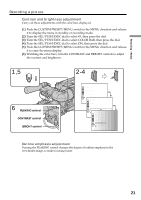
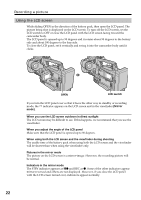
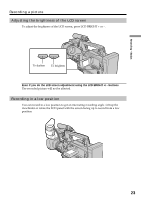
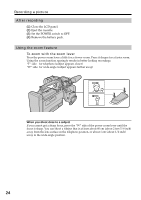
Recording a picture Using the LCD screen While sliding OPEN in the direction of the battery pack, then open the LCD panel. The picture being shot is displayed on the LCD screen. To turn off the LCD screen, set the LCD switch to OFF or close the LCD panel with the LCD screen facing toward the camcorder body. The LCD panel is opened up to 90 degrees and it rotates about 90 degrees to the battery side and about 180 degrees to the lens side. To close the LCD panel, set it vertically and swing it into the camcorder body until it clicks. 180° 90° OPEN LCD switch If you turn the LCD panel over so that it faces the other way in standby or recording mode, the indicator appears on the LCD screen and in the viewfinder (Mirror mode). When you use the LCD screen outdoors in direct sunlight The LCD screen may be difficult to see. If this happens, we recommend that you use the viewfinder. When you adjust the angle of the LCD panel Make sure that the LCD panel is opened up to 90 degrees. When using both the LCD screen and the viewfinder during shooting The usable time of the battery pack when using both the LCD screen and the viewfinder will be shorter than when using the viewfinder only. Pictures in the mirror mode The picture on the LCD screen is a mirror-image. However, the recording picture will be normal. Indicators in the mirror mode The STBY indicator appears as Xz and REC as z. Some of the other indicators appear mirror-reversed and others are not displayed. However, if you close the LCD panel with the LCD screen turned over, indicators appear normally. 22
-
 1
1 -
2
-
3
-
4
-
5
-
6
-
7
-
8
-
9
-
10
-
11
-
12
-
13
-
14
-
15
-
16
-
 17
17 -
 18
18 -
 19
19 -
 20
20 -
 21
21 -
 22
22 -
 23
23 -
 24
24 -
 25
25 -
 26
26 -
 27
27 -
28
-
29
-
30
-
31
-
32
-
33
-
34
-
35
-
36
-
37
-
38
-
39
-
40
-
41
-
42
-
43
-
44
-
45
-
46
-
47
-
48
-
49
-
50
-
51
-
52
-
53
-
54
-
55
-
56
-
57
-
58
-
59
-
60
-
61
-
62
-
63
-
64
-
65
-
66
-
67
-
68
-
69
-
70
-
71
-
72
-
73
-
74
-
75
-
76
-
77
-
78
-
79
-
80
-
81
-
82
-
83
-
84
-
85
-
86
-
87
-
88
-
89
-
90
-
91
-
92
-
93
-
94
-
95
-
96
-
97
-
98
-
99
-
100
-
101
-
102
-
103
-
104
-
105
-
106
-
107
-
108
-
109
-
110
-
111
-
112
-
113
-
114
-
115
-
116
-
117
-
118
-
119
-
120
-
121
-
122
-
123
-
124
-
125
-
126
-
127
-
128
-
129
-
130
-
131
-
132
-
133
-
134
-
135
-
136
-
137
-
138
-
139
-
140
-
141
-
142
-
143
-
144
-
145
-
146
-
147
-
148
-
149
-
150
-
151
-
152
-
153
-
154
-
155
-
156
-
157
-
158
-
159
-
160
-
161
-
162
-
163
-
164
-
165
-
166
-
167
-
168
-
169
-
170
-
171
-
172
-
173
-
174
-
175
-
176
-
177
-
178
-
179
-
180
-
181
-
182
-
183
-
184
-
185
-
186
-
187
-
188
-
189
-
190
-
191
-
192
 |
 |
