Sony DSR 250 Operating Instructions - Page 121
Menu items are displayed as the following icons, Icon/item, TC PRESET, UB PRESET, TC FORMAT, TC RUN - user manual
 |
UPC - 027242579514
View all Sony DSR 250 manuals
Add to My Manuals
Save this manual to your list of manuals |
Page 121 highlights
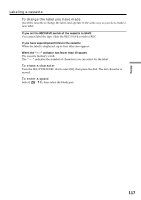
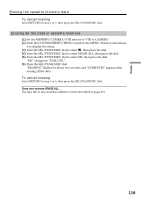
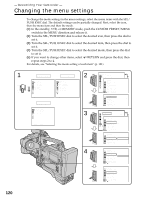
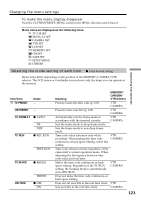
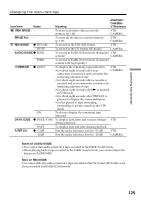
Changing the menu settings To make the menu display disappear Push the CUSTOM PRESET/MENU switch in the MENU direction and release it. Menu items are displayed as the following icons: TC/UB SET MANUAL SET CAMERA SET VTR SET LCD SET MEMORY SET CM SET TAPE SET SETUP MENU OTHERS Selecting the mode setting of each item z is the default setting. Menu items differ depending on the position of the MEMORY/CAMERA/VTR selector. The LCD screen or viewfinder screen shows only the items you can operate at the moment. Customizing Your Camcorder Icon/item TC PRESET Mode - UB PRESET - TC FORMAT z AUTO DF NDF TC RUN z REC RUN FREE RUN TC MAKE z REGEN UB TIME PRESET z OFF ON Meaning MEMORY/ CAMERA/ VTR selector Presets/resets the time code (p. 105). VTR CAMERA Presets/resets user bits (p. 108). VTR CAMERA Automatically sets the frame mode in accordance with the inserted cassette. VTR CAMERA Sets the frame mode to drop-frame mode. Sets the frame mode to non-drop-frame mode. Time code value advances only while VTR recording. When making the time code CAMERA continuous at back space editing, select this setting. Time code advances freely regardless of the camcorder's current operation mode. When adjusting the discrepancy between time code value and real time. Makes the time code continuous at back space editing. Regardless of the TC RUN setting, the running mode is automatically set to REC RUN. VTR CAMERA Does not make the time code continuous at back space editing. Does not set user bits to the real time clock. VTR Sets user bits to the real time clock. CAMERA 121
-
 1
1 -
2
-
3
-
4
-
5
-
6
-
7
-
8
-
9
-
10
-
11
-
12
-
13
-
14
-
15
-
16
-
17
-
18
-
19
-
20
-
21
-
22
-
23
-
24
-
25
-
26
-
27
-
28
-
29
-
30
-
31
-
32
-
33
-
34
-
35
-
36
-
37
-
38
-
39
-
40
-
41
-
42
-
43
-
44
-
45
-
46
-
47
-
48
-
49
-
50
-
51
-
52
-
53
-
54
-
55
-
56
-
57
-
58
-
59
-
60
-
61
-
62
-
63
-
64
-
65
-
66
-
67
-
68
-
69
-
70
-
71
-
72
-
73
-
74
-
75
-
76
-
77
-
78
-
79
-
80
-
81
-
82
-
83
-
84
-
85
-
86
-
87
-
88
-
89
-
90
-
91
-
92
-
93
-
94
-
95
-
96
-
97
-
98
-
99
-
100
-
101
-
102
-
103
-
104
-
105
-
106
-
107
-
108
-
109
-
110
-
111
-
112
-
113
-
114
-
115
-
 116
116 -
 117
117 -
 118
118 -
 119
119 -
 120
120 -
 121
121 -
 122
122 -
 123
123 -
 124
124 -
 125
125 -
 126
126 -
127
-
128
-
129
-
130
-
131
-
132
-
133
-
134
-
135
-
136
-
137
-
138
-
139
-
140
-
141
-
142
-
143
-
144
-
145
-
146
-
147
-
148
-
149
-
150
-
151
-
152
-
153
-
154
-
155
-
156
-
157
-
158
-
159
-
160
-
161
-
162
-
163
-
164
-
165
-
166
-
167
-
168
-
169
-
170
-
171
-
172
-
173
-
174
-
175
-
176
-
177
-
178
-
179
-
180
-
181
-
182
-
183
-
184
-
185
-
186
-
187
-
188
-
189
-
190
-
191
-
192
 |
 |