Sony DSR 250 Operating Instructions - Page 60
Using a video light - accessories
 |
UPC - 027242579514
View all Sony DSR 250 manuals
Add to My Manuals
Save this manual to your list of manuals |
Page 60 highlights
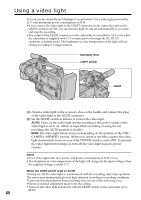
Using a video light You can use the Anton Bauer Ultralight 2 or equivalent. Use a video light powered by 12 V with maximum power consumption of 30 W. •If you connect the video light to the LIGHT connector on the camcorder and set the LIGHT switch to AUTO, you can turn the light on and off automatically as you start and stop the recording. •The output of the LIGHT connector on the camcorder is controlled to 12 V even when the camcorder is supplied with 12 V or more power (through the DC IN 12V connector or battery pack). The brightness or color temperature of the light will not change according to voltage increase. Accessory shoe LIGHT switch LIGHT (1) Attach a video light to the accessory shoe on the handle and connect the plug of the video light to the LIGHT connector. (2) Set the LIGHT switch as follows to control the video light: AUTO: Turns on the video light during recording if the power switch on the video light is set to on. (When in Tape Photo recording or using the cut recording, the AUTO position is disable.) MAN: The video light always turns on depending on the position of the VTR/ CAMERA/MEMORY selector. (When you insert or eject the cassette, the video light momentarily turns on even if the POWER switch is set to OFF. To prevent the video light from turning on, turn off the video light using its power switch.) Notes •Use a video light with 12-V power, and power consumption of 30 W or less. •The brightness or color temperature of the light will change by the input voltage when the supplied voltage is under 12 V. When the LIGHT switch is set to AUTO Turning on/off the video light is synchronized with the recording start/stop operation. The screen may momentarily glow in high-intensity according to recording conditions. To prevent this phenomenon from occurring, shoot in one of the following ways: •Shoots in manual adjustment mode to fix the setting. •Turns on the video light and shoots with the LIGHT switch on the camcorder set to MAN. 60
-
 1
1 -
2
-
3
-
4
-
5
-
6
-
7
-
8
-
9
-
10
-
11
-
12
-
13
-
14
-
15
-
16
-
17
-
18
-
19
-
20
-
21
-
22
-
23
-
24
-
25
-
26
-
27
-
28
-
29
-
30
-
31
-
32
-
33
-
34
-
35
-
36
-
37
-
38
-
39
-
40
-
41
-
42
-
43
-
44
-
45
-
46
-
47
-
48
-
49
-
50
-
51
-
52
-
53
-
54
-
 55
55 -
 56
56 -
 57
57 -
 58
58 -
 59
59 -
 60
60 -
 61
61 -
 62
62 -
 63
63 -
 64
64 -
 65
65 -
66
-
67
-
68
-
69
-
70
-
71
-
72
-
73
-
74
-
75
-
76
-
77
-
78
-
79
-
80
-
81
-
82
-
83
-
84
-
85
-
86
-
87
-
88
-
89
-
90
-
91
-
92
-
93
-
94
-
95
-
96
-
97
-
98
-
99
-
100
-
101
-
102
-
103
-
104
-
105
-
106
-
107
-
108
-
109
-
110
-
111
-
112
-
113
-
114
-
115
-
116
-
117
-
118
-
119
-
120
-
121
-
122
-
123
-
124
-
125
-
126
-
127
-
128
-
129
-
130
-
131
-
132
-
133
-
134
-
135
-
136
-
137
-
138
-
139
-
140
-
141
-
142
-
143
-
144
-
145
-
146
-
147
-
148
-
149
-
150
-
151
-
152
-
153
-
154
-
155
-
156
-
157
-
158
-
159
-
160
-
161
-
162
-
163
-
164
-
165
-
166
-
167
-
168
-
169
-
170
-
171
-
172
-
173
-
174
-
175
-
176
-
177
-
178
-
179
-
180
-
181
-
182
-
183
-
184
-
185
-
186
-
187
-
188
-
189
-
190
-
191
-
192
 |
 |
