Sony DSR 250 Operating Instructions - Page 184
IRIS PUSH AUTO button
 |
UPC - 027242579514
View all Sony DSR 250 manuals
Add to My Manuals
Save this manual to your list of manuals |
Page 184 highlights
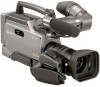
Identifying the parts and controls uf i; ia ug is id uh if uj ig uk ih ul ij uf Fixing screws for optional microphone holder (p. 56) ug MIC LOW CUT switch (p. 7) uh Power zoom lever (p. 24) uj PHOTO button (p. 62, 134) uk IRIS switch (p. 37) ul Grip strap i; Viewfinder front-to-back position locking knob (p. 19) ia Viewfinder left-to-right positioning ring (p. 19) is Viewfinder fitting shoe (p. 187) id IRIS PUSH AUTO button (p. 37) if Remote sensor ig Lens hood You can attach a wide teleconversion lens (not supplied) by removing the lens hood. ih Lens ij Lens hood fixing screw Removing the lens hood To remove the lens hood for attachment of the wide teleconversion lens, etc., loosen the lens hood fixing screw, and unscrew the lens hood counterclockwise. When using additional filters We recommend that you use the Sony made filters having the genuine accessory mark. Fastening the grip strap Fasten the grip strap firmly. 184
-
 1
1 -
2
-
3
-
4
-
5
-
6
-
7
-
8
-
9
-
10
-
11
-
12
-
13
-
14
-
15
-
16
-
17
-
18
-
19
-
20
-
21
-
22
-
23
-
24
-
25
-
26
-
27
-
28
-
29
-
30
-
31
-
32
-
33
-
34
-
35
-
36
-
37
-
38
-
39
-
40
-
41
-
42
-
43
-
44
-
45
-
46
-
47
-
48
-
49
-
50
-
51
-
52
-
53
-
54
-
55
-
56
-
57
-
58
-
59
-
60
-
61
-
62
-
63
-
64
-
65
-
66
-
67
-
68
-
69
-
70
-
71
-
72
-
73
-
74
-
75
-
76
-
77
-
78
-
79
-
80
-
81
-
82
-
83
-
84
-
85
-
86
-
87
-
88
-
89
-
90
-
91
-
92
-
93
-
94
-
95
-
96
-
97
-
98
-
99
-
100
-
101
-
102
-
103
-
104
-
105
-
106
-
107
-
108
-
109
-
110
-
111
-
112
-
113
-
114
-
115
-
116
-
117
-
118
-
119
-
120
-
121
-
122
-
123
-
124
-
125
-
126
-
127
-
128
-
129
-
130
-
131
-
132
-
133
-
134
-
135
-
136
-
137
-
138
-
139
-
140
-
141
-
142
-
143
-
144
-
145
-
146
-
147
-
148
-
149
-
150
-
151
-
152
-
153
-
154
-
155
-
156
-
157
-
158
-
159
-
160
-
161
-
162
-
163
-
164
-
165
-
166
-
167
-
168
-
169
-
170
-
171
-
172
-
173
-
174
-
175
-
176
-
177
-
178
-
 179
179 -
 180
180 -
 181
181 -
 182
182 -
 183
183 -
 184
184 -
 185
185 -
 186
186 -
 187
187 -
 188
188 -
 189
189 -
190
-
191
-
192
 |
 |
