Sony PDWF75 User Manual (PDW-F75 Professional Disc Recorder Operating Manual f - Page 16
SUB CLIP/CLIP MENU button, THUMBNAIL/ESSENCE MARK button
 |
View all Sony PDWF75 manuals
Add to My Manuals
Save this manual to your list of manuals |
Page 16 highlights
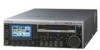
Chapter 1 Overview Note Do not turn off the POWER switch on the rear panel or disconnect the power cord while the ACCESS indicator is lit. Doing so can result in a loss of data on the disc. c Remote control switch Different positions of the switch allow different operations, as follows. NETWORK: Enables access to the network. Operation from the front panel of the unit is disabled during access to a network device. LOCAL: Enables operation from the front panel of the unit. REMOTE: Enables remote control of this unit from the following devices. • Devices connected to external device connectors on the rear panel • Devices with HDSDI remote control functions • The optional remote control panel (not supplied) Use the setup menu item INTERFACE SELECT >REMOTE I/F to select which of the connectors is used for remote control (see page 103). d LEVEL (audio level adjustment) knob This adjusts the volume of the audio output from the PHONES jack. At the same time, it also adjusts the volume of the output from the AUDIO MONITOR connector on the rear panel. e PHONES jack (stereo phone jack) Connect stereo headphones with an impedance of 8 ohms to monitor audio during recording, playback, and editing. The monitored channel is selected by the MONI CH and MONI SEL items on page P1 of the function menu (see page 89). f SHIFT button When pressed together with a button having two functions, switches between the functions of the button. Function button names are displayed in white when the buttons are pressed alone, and in yellow when they are pressed together with the SHIFT button. g MENU button Use this for system menu operations. The system menu appears in the display when this button is pressed. The same information is also superimposed on the display of a monitor connected to the unit. Press once more to exit the menu. For more information about the system menu, see Chapter 6 "Menus" (page 88). h SUB CLIP/CLIP MENU button This functions as a SUB CLIP button when pressed alone, and as a CLIP MENU button when pressed together with the SHIFT button. SUB CLIP button: Press this button, turning it on, to perform playback of a clip list. A clip list selection screen appears. To play back the clips in the order they were recorded, press this button again, turning it off. The clip list selection screen disappears. Note This button does not light, and pressing it has no effect, when no clip lists are registered. CLIP MENU button: Press this button, turning it on, to load, save, or delete a clip list. A clip list menu appears. To erase the clip list screen from the display, press the button again, turning it off. For details about clip lists, see Chapter 4 "Scene Selection" (page 62). i THUMBNAIL/ESSENCE MARK button This functions as a THUMBNAIL button when pressed alone, and as an ESSENCE MARK button when pressed together with the SHIFT button. THUMBNAIL button: Press this button, turning it on, to search for a frame by specifying a thumbnail (see page 53), and to create a clip list. A thumbnail selection screen appears on the display. To erase the selection screen from the display, press the button again, turning it off. ESSENCE MARK button: Press this button, turning it on, to search for a frame by specifying an essence mark (see page 56), and to record an essence mark. An essence mark selection list appears. To erase the selection list from the display, press the button again, turning it off. j Disc slot and EJECT button Insert discs into the disc slot. The indicator flashes in orange, and lights in blue when the disc is completely loaded. Press the EJECT button to eject a disc. The indicator flashes in blue, and goes off when the disc is completely ejected. k Infrared sensor This receives signals from the supplied remote commander. l RESET button Press this button to reset counters. This button is also used to cancel setup menu settings and abandon scene selections (thumbnail search), and to cancel other operations. m SET button Press this button to confirm menu and scene selection (thumbnail search) settings, and to execute operations. 16 Names and Functions of Parts
-
 1
1 -
2
-
3
-
4
-
5
-
6
-
7
-
8
-
9
-
10
-
 11
11 -
 12
12 -
 13
13 -
 14
14 -
 15
15 -
 16
16 -
 17
17 -
 18
18 -
 19
19 -
 20
20 -
 21
21 -
22
-
23
-
24
-
25
-
26
-
27
-
28
-
29
-
30
-
31
-
32
-
33
-
34
-
35
-
36
-
37
-
38
-
39
-
40
-
41
-
42
-
43
-
44
-
45
-
46
-
47
-
48
-
49
-
50
-
51
-
52
-
53
-
54
-
55
-
56
-
57
-
58
-
59
-
60
-
61
-
62
-
63
-
64
-
65
-
66
-
67
-
68
-
69
-
70
-
71
-
72
-
73
-
74
-
75
-
76
-
77
-
78
-
79
-
80
-
81
-
82
-
83
-
84
-
85
-
86
-
87
-
88
-
89
-
90
-
91
-
92
-
93
-
94
-
95
-
96
-
97
-
98
-
99
-
100
-
101
-
102
-
103
-
104
-
105
-
106
-
107
-
108
-
109
-
110
-
111
-
112
-
113
-
114
-
115
-
116
-
117
-
118
-
119
-
120
-
121
-
122
-
123
-
124
-
125
-
126
-
127
-
128
-
129
-
130
-
131
-
132
-
133
-
134
-
135
 |
 |
