Sony PDWF75 User Manual (PDW-F75 Professional Disc Recorder Operating Manual f - Page 28
Connections and Settings, Connecting an External Monitor
 |
View all Sony PDWF75 manuals
Add to My Manuals
Save this manual to your list of manuals |
Page 28 highlights
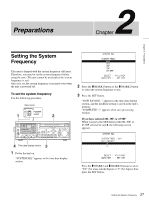
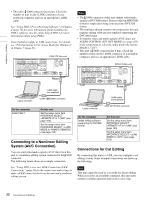
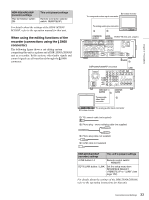
Chapter 2 Preparations Note Be sure to carry out step 3 before powering the unit off (putting it into standby). The new system frequency setting will not be saved if you power off without carrying out step 3. 4 Press the on/standby switch to power the unit off (put it into standby), and then press it again to power the unit on. The selected system frequency becomes available for use. You can change the system frequency setting by using the setup menu item OPERATIONAL FUNCTION >SYSTEM SEL >SYSTEM FREQ. For details about the setup menu, see page 90 "System Menu" in Chapter 6. Note When the system frequency is set to 60I or 30P, select drop-frame mode (DF) or non-drop-frame mode (NDF) on page P2 of the function menu (see page 90). Connections and Settings Note Production of some of the peripherals and related devices described in this chapter has been discontinued. For advice about choosing devices, please contact your Sony dealer or a Sony sales representative. Connecting an External Monitor You can connect a video monitor to this unit's video output connectors or to the MONITOR connector. The following figure shows an example using a Sony multi-format LCD monitor. You can also superimpose character information such as timecode and the unit's operating status on output video. For details, see "Superimposed Text Information" (page 40). To view HD video Connect an HD video monitor using method 1 or 2 in the following figure. When you connect a monitor with method 2, set the setup menu item INTERFACE SELECT >D-SUB OUTPUT to "YPbPr" (see page 102). 28 Connections and Settings
-
 1
1 -
2
-
3
-
4
-
5
-
6
-
7
-
8
-
9
-
10
-
11
-
12
-
13
-
14
-
15
-
16
-
17
-
18
-
19
-
20
-
21
-
22
-
 23
23 -
 24
24 -
 25
25 -
 26
26 -
 27
27 -
 28
28 -
 29
29 -
 30
30 -
 31
31 -
 32
32 -
 33
33 -
34
-
35
-
36
-
37
-
38
-
39
-
40
-
41
-
42
-
43
-
44
-
45
-
46
-
47
-
48
-
49
-
50
-
51
-
52
-
53
-
54
-
55
-
56
-
57
-
58
-
59
-
60
-
61
-
62
-
63
-
64
-
65
-
66
-
67
-
68
-
69
-
70
-
71
-
72
-
73
-
74
-
75
-
76
-
77
-
78
-
79
-
80
-
81
-
82
-
83
-
84
-
85
-
86
-
87
-
88
-
89
-
90
-
91
-
92
-
93
-
94
-
95
-
96
-
97
-
98
-
99
-
100
-
101
-
102
-
103
-
104
-
105
-
106
-
107
-
108
-
109
-
110
-
111
-
112
-
113
-
114
-
115
-
116
-
117
-
118
-
119
-
120
-
121
-
122
-
123
-
124
-
125
-
126
-
127
-
128
-
129
-
130
-
131
-
132
-
133
-
134
-
135
 |
 |
