Sony PDWF75 User Manual (PDW-F75 Professional Disc Recorder Operating Manual f - Page 39
Playback in 24P (23.98P) 2-3 Pulldown Mode, Pulldown playback frame sequences
 |
View all Sony PDWF75 manuals
Add to My Manuals
Save this manual to your list of manuals |
Page 39 highlights
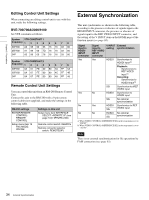
Chapter 2 Preparations timecode at the start of recorded clips may not have a number of frames that is a multiple of 4. If you want to make sure that the number of frames in the timecode of the first frames of recorded clips is a multiple of 4, set the run mode to "REC RUN", and record after manually presetting the timecode. Playback in 24P (23.98P) 2-3 Pulldown Mode Pulldown playback frame sequences During pulldown mode playback, playback is carried out so that the 24-frame timecode set with TIME CODE >PD PRESET in the setup menu becomes the "A-frame" of the frame sequence. The following figure shows the playback frame sequence when 01:00:00:00 has been set for the 24- frame timecode and 10:00:00:00 has been set for the 30frame timecode. Note This kind of frame sequence adjustment is not carried out for clip list playback. 24P Video Frame Count TC (24F) Frame Seqence 60i Pulldown Video 24P: 1frame Timecode conversion reference n-2 00:59:59:22 C-frame n-1 00:59:59:23 D-frame 60i: 1frame n 01:00:00:00 A-frame n+1 01:00:00:01 B-frame n+2 01:00:00:02 C-frame n+3 01:00:00:03 D-frame n+4 01:00:00:04 A-frame TC (30F) 09:59:59:28 09:59:59:29 10:00:00:00 10:00:00:01 10:00:00:02 10:00:00:03 10:00:00:04 10:00:00:05 Timecode during playback of pulldown signals During playback of pulldown signals, timecode is converted to 30 frames to match the 59.94i video output signals. The values of "24F TC" and "30F TC" under TIME CODE >PD PRESET in the setup menu are used as the conversion references. To display 30-frame pulldown timecode in the monitor video display section or on an external monitor 1 Press the MENU button. The system menu (see page 90) appears. 2 Press the M/MARK1 or m/MARK2 button to select SETUP MENU. 3 Press the ,/OUT button. The setup menu appears. 4 Press the M/MARK1 or m/MARK2 button to select "DISPLAY CONTROL". SETUP MENU OPERATIONAL FUNCTION DISPLAY CONTROL TIME CODE DISC PROTECTION VIDEO CONTROL AUDIO CONTROL INTERFACE SELECT METADATA SETUP BANK OPERATION MENU GRADE : ENHAN 5 Press the ,/OUT button. The second level of the DISPLAY CONTROL menu appears. 6 Press the M/MARK1 or m/MARK2 button to select "DISPLAY INFO". SETUP MENU DISPLAY CONTROL CHARA.POSITION CHARA.TYPE :WHITE CHARA.VSIZE :x1 DISPLAY INFO :T&STA SUB STATUS :OFF MENU DISPLAY :WHITE BRIGHTNESS :55 ALARM :ON MENU STATUS :DIS HD CHARA :ALL 39 24P (23.98P) Mode Settings
-
 1
1 -
2
-
3
-
4
-
5
-
6
-
7
-
8
-
9
-
10
-
11
-
12
-
13
-
14
-
15
-
16
-
17
-
18
-
19
-
20
-
21
-
22
-
23
-
24
-
25
-
26
-
27
-
28
-
29
-
30
-
31
-
32
-
33
-
 34
34 -
 35
35 -
 36
36 -
 37
37 -
 38
38 -
 39
39 -
 40
40 -
 41
41 -
 42
42 -
 43
43 -
 44
44 -
45
-
46
-
47
-
48
-
49
-
50
-
51
-
52
-
53
-
54
-
55
-
56
-
57
-
58
-
59
-
60
-
61
-
62
-
63
-
64
-
65
-
66
-
67
-
68
-
69
-
70
-
71
-
72
-
73
-
74
-
75
-
76
-
77
-
78
-
79
-
80
-
81
-
82
-
83
-
84
-
85
-
86
-
87
-
88
-
89
-
90
-
91
-
92
-
93
-
94
-
95
-
96
-
97
-
98
-
99
-
100
-
101
-
102
-
103
-
104
-
105
-
106
-
107
-
108
-
109
-
110
-
111
-
112
-
113
-
114
-
115
-
116
-
117
-
118
-
119
-
120
-
121
-
122
-
123
-
124
-
125
-
126
-
127
-
128
-
129
-
130
-
131
-
132
-
133
-
134
-
135
 |
 |
