Sony PFM-510A1WU Operating Instructions - Page 11
ID MODE ON/SET/OFF buttons
 |
View all Sony PFM-510A1WU manuals
Add to My Manuals
Save this manual to your list of manuals |
Page 11 highlights
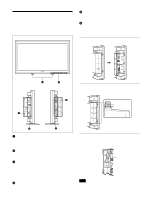
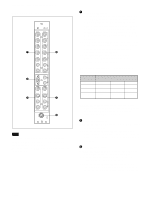
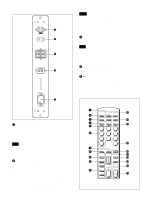
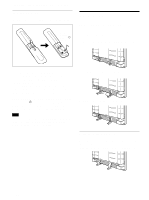
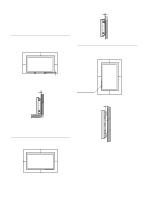
1 POWER switch Press to turn on the monitor. Press again to go back to the standby mode. Note When using multiple monitors, press this switch to turn monitors which are already on into the standby mode, or turn on monitors which are in the standby mode. 2 MUTING button Press to mute the sound. Press this button again or press the VOL (volume) +/- button to obtain the sound again. 3 RGB1/RGB2 buttons Select the signal input from the RGB1 or RGB2 connectors. 4 LINE button Selects the signal input from the VIDEO IN connector in the LINE connectors. 5 Y/C button Selects the signal input from the Y/C IN jack in the LINE connectors. 6 Number buttons Press to select the index number. 7 ZOOM button This button does not operate with the monitor. 8 STILL button This button does not operate with the monitor. 9 POWER ON switch Press to turn on the monitor. When you use multiple monitors, you can use this switch instead of the POWER switch 1 not to affect another monitor which is already turned on. 0 POWER OFF switch Press to turn the monitor into the standby mode. When you use multiple monitors, you can use this switch instead of the POWER switch 1 not to affect another monitor which are in the standby mode. qa ID MODE (ON/SET/OFF) buttons Press the ON button to make an index number appear on the screen. Then press the index number of the monitor you want to operate and press the SET button. After you finish the operation, press the OFF button to return to the normal mode. Location and Function of Parts and Controls qs DISPLAY button Displays the input signal information on the top of the monitor screen. Press again to clear it. qd YUV button Selects the component signal input from the RGB1 connectors. qf MTS/MPX button This button does not operate with the monitor. qg CH button This button does not operate with the monitor. qh DEGAUSS button This button does not operate with the monitor. qj SELECT +M/-m buttons Press to move the cursor (B) to an item or to adjust value in a menu. qk MENU button Press to make the menu appear. ql ENTER button Press to select the desired item in a menu. w; VOL +/- buttons Press the + button to increase the volume, or the - button to decrease the volume. wa CH +/- buttons This button does not operate with the monitor. 11 (GB)
-
 1
1 -
2
-
3
-
4
-
5
-
 6
6 -
 7
7 -
 8
8 -
 9
9 -
 10
10 -
 11
11 -
 12
12 -
 13
13 -
 14
14 -
 15
15 -
 16
16 -
17
-
18
-
19
-
20
-
21
-
22
-
23
-
24
-
25
-
26
-
27
-
28
-
29
-
30
-
31
-
32
-
33
-
34
-
35
-
36
-
37
-
38
-
39
-
40
-
41
-
42
-
43
-
44
-
45
-
46
-
47
-
48
-
49
-
50
-
51
-
52
-
53
-
54
-
55
-
56
-
57
-
58
-
59
-
60
-
61
-
62
-
63
-
64
-
65
-
66
-
67
-
68
-
69
-
70
-
71
-
72
-
73
-
74
-
75
-
76
-
77
-
78
-
79
-
80
-
81
-
82
-
83
-
84
-
85
-
86
-
87
-
88
-
89
-
90
-
91
-
92
-
93
-
94
-
95
-
96
-
97
-
98
-
99
-
100
-
101
-
102
-
103
-
104
-
105
-
106
-
107
-
108
-
109
-
110
-
111
-
112
-
113
-
114
-
115
-
116
-
117
-
118
-
119
-
120
-
121
-
122
-
123
-
124
-
125
-
126
-
127
-
128
-
129
-
130
-
131
-
132
-
133
-
134
-
135
-
136
-
137
-
138
-
139
-
140
-
141
-
142
-
143
-
144
-
145
-
146
-
147
-
148
-
149
-
150
-
151
-
152
-
153
-
154
-
155
-
156
-
157
-
158
-
159
-
160
-
161
-
162
-
163
-
164
-
165
-
166
-
167
-
168
-
169
-
170
-
171
-
172
-
173
-
174
-
175
-
176
-
177
-
178
-
179
-
180
-
181
-
182
-
183
-
184
 |
 |