Sony PFM-510A1WU Operating Instructions - Page 27
Operating a Specific Monitor with the Remote Commander
 |
View all Sony PFM-510A1WU manuals
Add to My Manuals
Save this manual to your list of manuals |
Page 27 highlights
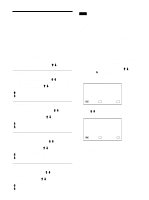
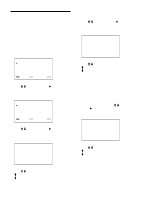
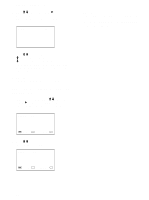
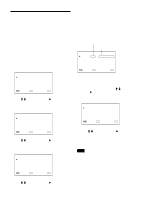
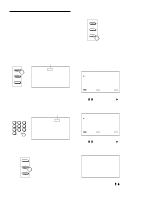
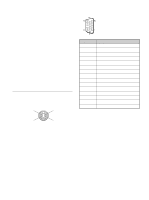
Operating a Specific Monitor with the Remote Commander Using the supplied Remote Commander, you can operate a specific monitor without affecting other monitors that are installed together. 1 Press ID MODE ON on the Remote Commander. Monitor index numbers appear in white characters on all the monitors. (Every monitor is allocated an individual preset index number from 1 to 255.) See "To change the index number" in the column to the right on this page to change the index number. Index number ON SET I NDEX NO . 1 1 7 . . . OFF ID MODE 2 Input the index number of the monitor you want to operate using 0 - 9 buttons on the Remote Commander. The input number appears right next to each monitor's own index number. Input number 123 456 789 10/0 I NDEX NO . 1 1 7 1 1 7 3 Press ID MODE SET. The character on the selected monitor changes to cyan while others change to red. ON SET OFF ID MODE You can operate only a specified monitor. (All operations are available in ID mode except POWER ON/OFF.) Operating a Specific Monitor with the Remote Commander 4 After necessary adjustment, press ID MODE OFF. The monitor returns to the normal mode. ON SET OFF ID MODE To change the index number You can change the index number if necessary. When you change the number, use the buttons on the monitor. 1 Press MENU. The main menu appears on the monitor screen. MA I N MENU P I C CONTROL P I C S I ZE CONF I G MEMOR Y R EMO T E STATUS S E L E C T ENTER C A N C E L MENU 2 Press M/m to move the cursor (B) to "REMOTE" and press ENT. The REMOTE menu appears on the monitor screen. R EMO T E I NDEX NO . : 001 R EMO T E MOD E : TV R EMO T E ON L Y : O F F S E L E C T ENTER C A N C E L MENU 3 Press M/m to move the cursor (B) to "INDEX NO." and press ENT. The following menu appears on the monitor screen. I NDEX NO . : 001 4 Select the index number with M/m and press ENT. The menu returns to the REMOTE menu. 27 (GB)
-
 1
1 -
2
-
3
-
4
-
5
-
6
-
7
-
8
-
9
-
10
-
11
-
12
-
13
-
14
-
15
-
16
-
17
-
18
-
19
-
20
-
21
-
 22
22 -
 23
23 -
 24
24 -
 25
25 -
 26
26 -
 27
27 -
 28
28 -
 29
29 -
 30
30 -
 31
31 -
 32
32 -
33
-
34
-
35
-
36
-
37
-
38
-
39
-
40
-
41
-
42
-
43
-
44
-
45
-
46
-
47
-
48
-
49
-
50
-
51
-
52
-
53
-
54
-
55
-
56
-
57
-
58
-
59
-
60
-
61
-
62
-
63
-
64
-
65
-
66
-
67
-
68
-
69
-
70
-
71
-
72
-
73
-
74
-
75
-
76
-
77
-
78
-
79
-
80
-
81
-
82
-
83
-
84
-
85
-
86
-
87
-
88
-
89
-
90
-
91
-
92
-
93
-
94
-
95
-
96
-
97
-
98
-
99
-
100
-
101
-
102
-
103
-
104
-
105
-
106
-
107
-
108
-
109
-
110
-
111
-
112
-
113
-
114
-
115
-
116
-
117
-
118
-
119
-
120
-
121
-
122
-
123
-
124
-
125
-
126
-
127
-
128
-
129
-
130
-
131
-
132
-
133
-
134
-
135
-
136
-
137
-
138
-
139
-
140
-
141
-
142
-
143
-
144
-
145
-
146
-
147
-
148
-
149
-
150
-
151
-
152
-
153
-
154
-
155
-
156
-
157
-
158
-
159
-
160
-
161
-
162
-
163
-
164
-
165
-
166
-
167
-
168
-
169
-
170
-
171
-
172
-
173
-
174
-
175
-
176
-
177
-
178
-
179
-
180
-
181
-
182
-
183
-
184
 |
 |
