Sony PFM-510A1WU Operating Instructions - Page 16
Using On-screen Menus, Operating Through Menus, Menu Guide
 |
View all Sony PFM-510A1WU manuals
Add to My Manuals
Save this manual to your list of manuals |
Page 16 highlights
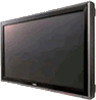
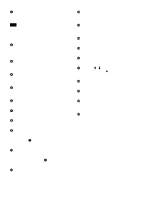
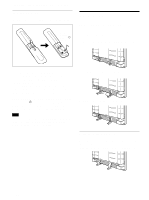
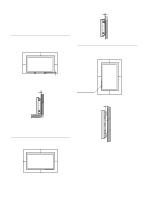
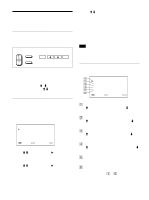
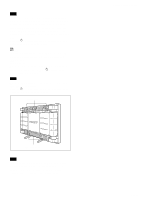
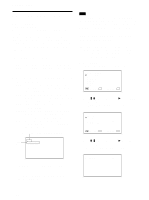
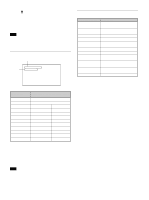
Using On-screen Menus Using On-screen Menus Operating Through Menus Menu operating buttons There are four buttons on the monitor and the Remote Commander for menu operations. Remote Commander SELECT MENU ENTER Monitor MENU m M ENT The buttons on the control panel are used for explanation purpose in this operating instructions. The ENTER button on the Remote Commander has the same function as the ENT button on the control panel and the SELECT +M/-m buttons on the Remote Commander as same as the M/m buttons on the control panel. Configuration of the menu To select the language used in the menu, see page 26 (GB). 1 Press MENU. The main menu appears on the monitor screen. MA I N MENU P I C CONTROL P I C S I ZE CONF I G MEMOR Y R EMO T E STATUS S E L E C T ENTER C A N C E L MENU 2 Press M/m to move the cursor (B) and press ENT to select a menu. The selected menu appears on the monitor screen. 3 Press M/m to move the cursor (B) and press ENT to select an item. The menu for the selected item appears on the monitor screen. 4 Press M/m to adjust or select the setting and press ENT to set. The setting is registered and the menu returns to the previous menu. To return to the normal screen, press the MENU button repeatedly until the menu disappears. Menu Guide Note "- - - -" appears next to an item when its function is not available. The availability depends on the types of input signal. PIC CONTROL menu This menu is used for adjusting the picture. 1 P I C CONTROL 2 CONTRAS T : 80 3 BR I GHTNESS : 00 C H R OM A : 00 4 PHASE : 00 5 COLOR T EMP : H I GH RESET 6 S E L E C T ENTER C A N C E L MENU 1 CONTRAST Press M to increase the contrast and press m to decrease it. 2 BRIGHTNESS Press M to make the picture brighter and press m to make it darker. 3 CHROMA Press M to increase color saturation and press m to decrease it. 4 PHASE Press M to make overall picture greenish and press m to make it purplish. 5 COLOR TEMP Select a color temperature from HIGH or LOW. 6 RESET Select to restore the factory settings in the PIC CONTROL menu items 1 to 5. For details on using the reset function, see "Restoring the PIC CONTROL Menu Items to Original Settings" on page 22 (GB). 16 (GB)
-
 1
1 -
2
-
3
-
4
-
5
-
6
-
7
-
8
-
9
-
10
-
 11
11 -
 12
12 -
 13
13 -
 14
14 -
 15
15 -
 16
16 -
 17
17 -
 18
18 -
 19
19 -
 20
20 -
 21
21 -
22
-
23
-
24
-
25
-
26
-
27
-
28
-
29
-
30
-
31
-
32
-
33
-
34
-
35
-
36
-
37
-
38
-
39
-
40
-
41
-
42
-
43
-
44
-
45
-
46
-
47
-
48
-
49
-
50
-
51
-
52
-
53
-
54
-
55
-
56
-
57
-
58
-
59
-
60
-
61
-
62
-
63
-
64
-
65
-
66
-
67
-
68
-
69
-
70
-
71
-
72
-
73
-
74
-
75
-
76
-
77
-
78
-
79
-
80
-
81
-
82
-
83
-
84
-
85
-
86
-
87
-
88
-
89
-
90
-
91
-
92
-
93
-
94
-
95
-
96
-
97
-
98
-
99
-
100
-
101
-
102
-
103
-
104
-
105
-
106
-
107
-
108
-
109
-
110
-
111
-
112
-
113
-
114
-
115
-
116
-
117
-
118
-
119
-
120
-
121
-
122
-
123
-
124
-
125
-
126
-
127
-
128
-
129
-
130
-
131
-
132
-
133
-
134
-
135
-
136
-
137
-
138
-
139
-
140
-
141
-
142
-
143
-
144
-
145
-
146
-
147
-
148
-
149
-
150
-
151
-
152
-
153
-
154
-
155
-
156
-
157
-
158
-
159
-
160
-
161
-
162
-
163
-
164
-
165
-
166
-
167
-
168
-
169
-
170
-
171
-
172
-
173
-
174
-
175
-
176
-
177
-
178
-
179
-
180
-
181
-
182
-
183
-
184
 |
 |