Sony PFM-510A1WU Operating Instructions - Page 17
PIC SIZE menu, CONFIG menu, SIZE or H/V SHIFT in the PIC SIZE menu, - problems
 |
View all Sony PFM-510A1WU manuals
Add to My Manuals
Save this manual to your list of manuals |
Page 17 highlights
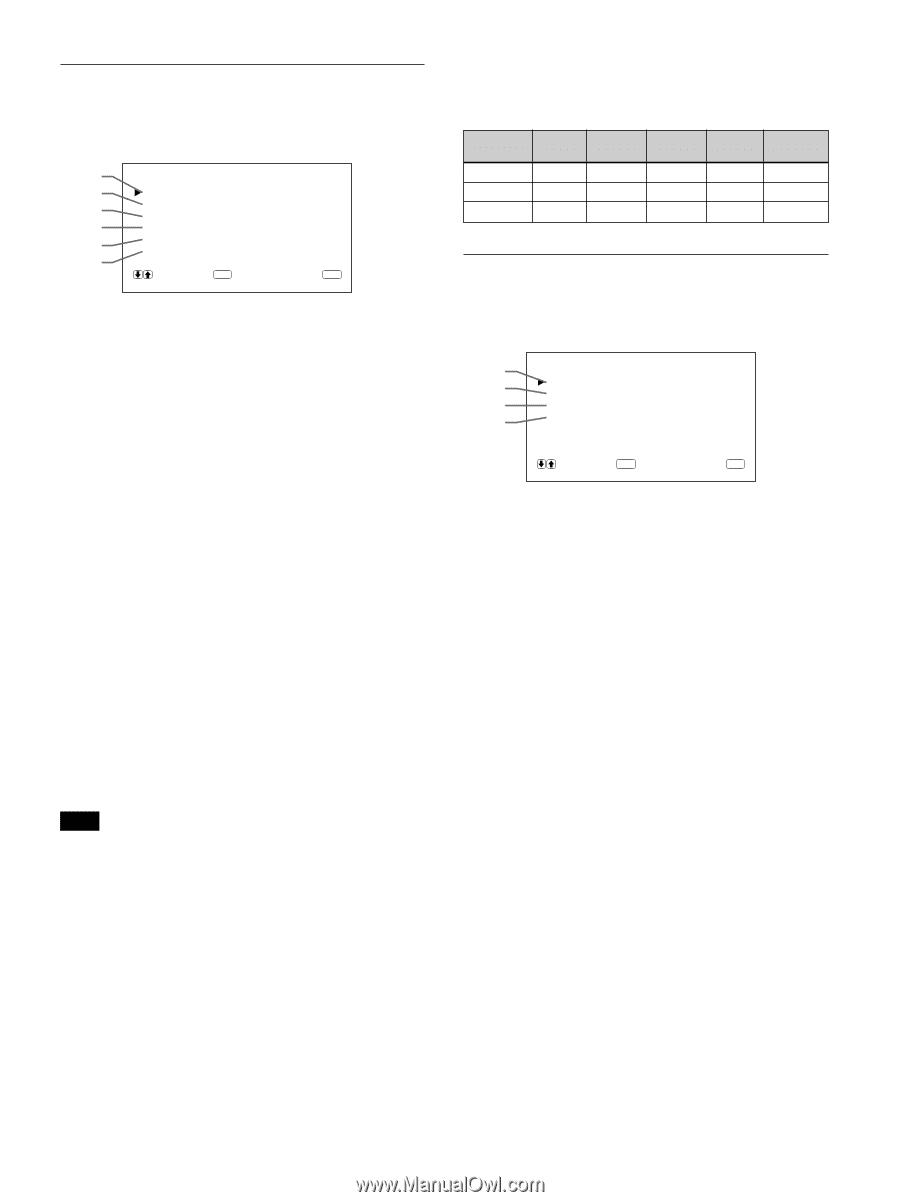
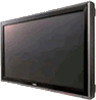
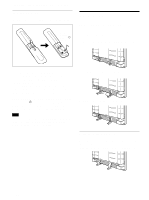
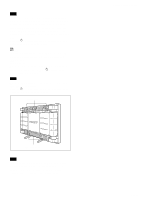
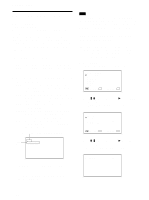
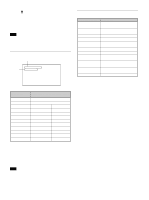
PIC SIZE menu This menu is used for positioning and resizing the picture. 7 P I C S I ZE 8 H S I ZE : 00 9 H SH I FT V S I ZE 0 V SH I FT : 00 : 00 : 00 qa ASPECT RESET qs : 4x3 S E L E C T ENTER C A N C E L MENU 7 H SIZE Adjusts the horizontal picture size. Press M to enlarge the horizontal size and press m to diminish it. 8 H SHIFT Adjusts the horizontal centering. Press M to move the picture to the right and press m to move it to the left. 9 V SIZE Adjusts the vertical picture size. Press M to enlarge the vertical size and press m to diminish it. q; V SHIFT Adjusts the vertical centering. Press M to move the picture up and press m to move it down. qa ASPECT Set the aspect ratio of the picture to 4:3 or 16:9. qs RESET Select to restore the factory settings in the PIC SIZE menu items 7 to qa. For details on using the reset function, see "Restoring the Original Picture Size and Position" on page 24 (GB). Note When receiving DTV signals and changing the H/V SIZE or H/V SHIFT in the PIC SIZE menu, the system goes into the Offset Sampling Mode; the image may become blurred or horizontal lines may appear because the memory write phase is faster than the read phase. This is not a system malfunction. To avoid this problem, reset the H/V SIZE and the H/ V SHIFT to the factory settings. If any problems persist with the factory setting, adjust the settings as shown below. To adjust the setting, see "Restoring the original Picture Size and Position" (page 24 (GB)). Using On-screen Menus • DTV signals for factory setting: 1080/60i, 480/60i, 575/50i, 480/60p • Other DTV signals and their recommended settings: 1080/50i 1080/48i 1152/50i H SIZE + 48 MAX + 33 V SIZE + 11 + 09 - 02 H SHIFT + 10 + 12 + 20 V SHIFT - 02 - 02 0 ASPECT 16:9 16:9 16:9 CONFIG menu This menu is used for adjusting the signal or selecting the language. qd CONF I G qf ENHANCE H F I L TER qg D I SPLAY qh L ANGUAGE : H I GH : AUTO : ON S E L E C T ENTER C A N C E L MENU qd ENHANCE (Sharpness) You can change the outline correction level: LOW: Default setting for VIDEO signal HIGH: Default setting for computer signal qf H FILTER Select AUTO normally. Select HIGH when the ringing appears on the screen. Select LOW when the moiré pattern or noise appears on the screen. The moiré pattern or noise decreases even the screen looks a little blurred. qg DISPLAY Select ON to display the input signal information for about five seconds on the top of the monitor screen when turning on the power or switching the input signal. qh LANGUAGE Select the on-screen language among five languages. Available languages are: English, German, French, Italian and Spanish. For details on selecting the language, see "Selecting the On-screen Language" on page 26 (GB). 17 (GB)
-
 1
1 -
2
-
3
-
4
-
5
-
6
-
7
-
8
-
9
-
10
-
11
-
 12
12 -
 13
13 -
 14
14 -
 15
15 -
 16
16 -
 17
17 -
 18
18 -
 19
19 -
 20
20 -
 21
21 -
 22
22 -
23
-
24
-
25
-
26
-
27
-
28
-
29
-
30
-
31
-
32
-
33
-
34
-
35
-
36
-
37
-
38
-
39
-
40
-
41
-
42
-
43
-
44
-
45
-
46
-
47
-
48
-
49
-
50
-
51
-
52
-
53
-
54
-
55
-
56
-
57
-
58
-
59
-
60
-
61
-
62
-
63
-
64
-
65
-
66
-
67
-
68
-
69
-
70
-
71
-
72
-
73
-
74
-
75
-
76
-
77
-
78
-
79
-
80
-
81
-
82
-
83
-
84
-
85
-
86
-
87
-
88
-
89
-
90
-
91
-
92
-
93
-
94
-
95
-
96
-
97
-
98
-
99
-
100
-
101
-
102
-
103
-
104
-
105
-
106
-
107
-
108
-
109
-
110
-
111
-
112
-
113
-
114
-
115
-
116
-
117
-
118
-
119
-
120
-
121
-
122
-
123
-
124
-
125
-
126
-
127
-
128
-
129
-
130
-
131
-
132
-
133
-
134
-
135
-
136
-
137
-
138
-
139
-
140
-
141
-
142
-
143
-
144
-
145
-
146
-
147
-
148
-
149
-
150
-
151
-
152
-
153
-
154
-
155
-
156
-
157
-
158
-
159
-
160
-
161
-
162
-
163
-
164
-
165
-
166
-
167
-
168
-
169
-
170
-
171
-
172
-
173
-
174
-
175
-
176
-
177
-
178
-
179
-
180
-
181
-
182
-
183
-
184
 |
 |