Stihl MS 251 Instruction Manual - Page 102
Fuel Intake, 12.11.1 Pickup Body, 12.11.2 Fuel Hose, Use hook 5910 893 8800
 |
View all Stihl MS 251 manuals
Add to My Manuals
Save this manual to your list of manuals |
Page 102 highlights
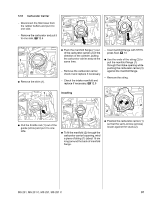
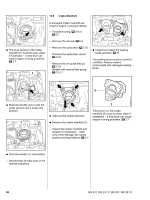
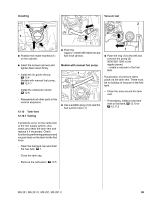
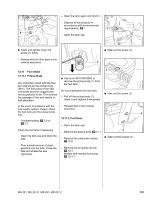
2310RA372 TG 2310RA373 TG - Open the tank again and drain it. - Dispose of fuel properly in accordance with environmental requirements, b 1 1 1 - Open the tank cap. 2310RA365 TG : Insert and tighten down the screw (1) firmly. - Reassemble all other parts in the reverse sequence. : Take out the screw (1). 1 2310RA371 TG 12.11 Fuel Intake 12.11.1 Pickup Body Any impurities mixed with the fuel are retained by the pickup body (filter). The fine pores of the filter eventually become clogged with minute particles of dirt. This restricts the passage of fuel and results in fuel starvation. : Use hook 5910 893 8800 to remove the pickup body (1) from the fuel tank. Do not overstretch the fuel hose. - Pull off the pickup body (1), check it and replace if necessary. 1 : Take out the screw (1). In the event of problems with the - Reassemble in the reverse fuel supply system, always check sequence. the fuel tank and the pickup body first. 1 - Troubleshooting, b 3.6 or b 3.7 12.11.2 Fuel Hose - Open the tank cap. Clean the fuel tank if necessary. - Open the tank cap and drain the tank. - Pour a small amount of clean gasoline into the tank. Close the tank and shake the saw vigorously. - Remove the pickup body, b 11.1 - Remove the carburetor carrier, b 12.8 1 : Take out the screws (1). - Remove the air guide shroud, b 12.4 Models with manual fuel pump, b 12.4.1 2310RA374 TG MS 231, MS 231 C, MS 251, MS 251 C 101
-
 1
1 -
2
-
3
-
4
-
5
-
6
-
7
-
8
-
9
-
10
-
11
-
12
-
13
-
14
-
15
-
16
-
17
-
18
-
19
-
20
-
21
-
22
-
23
-
24
-
25
-
26
-
27
-
28
-
29
-
30
-
31
-
32
-
33
-
34
-
35
-
36
-
37
-
38
-
39
-
40
-
41
-
42
-
43
-
44
-
45
-
46
-
47
-
48
-
49
-
50
-
51
-
52
-
53
-
54
-
55
-
56
-
57
-
58
-
59
-
60
-
61
-
62
-
63
-
64
-
65
-
66
-
67
-
68
-
69
-
70
-
71
-
72
-
73
-
74
-
75
-
76
-
77
-
78
-
79
-
80
-
81
-
82
-
83
-
84
-
85
-
86
-
87
-
88
-
89
-
90
-
91
-
92
-
93
-
94
-
95
-
96
-
 97
97 -
 98
98 -
 99
99 -
 100
100 -
 101
101 -
 102
102 -
 103
103 -
 104
104 -
 105
105 -
 106
106 -
 107
107 -
108
-
109
-
110
-
111
-
112
-
113
-
114
 |
 |
