Stihl MS 251 Instruction Manual - Page 39
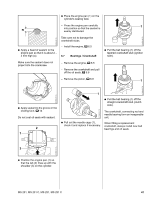
Cylinder / Crankshaft, Insert the screws 1 - do - test
 |
View all Stihl MS 251 manuals
Add to My Manuals
Save this manual to your list of manuals |
Page 39 highlights
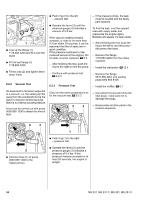
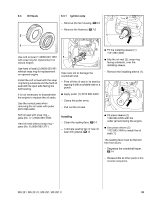
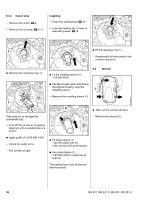
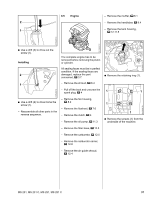
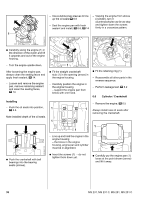
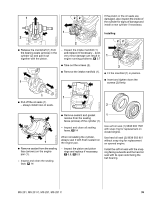
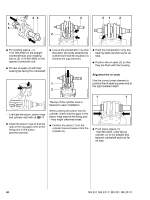
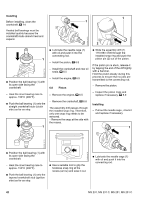
- Use suitable press sleeves to line up the oil seals b 6.6 - Seal the engine pan with fresh sealant and install, b 6.6, b 14 - Viewing the engine from above (cylinder), turn it counterclockwise as far as stop and tighten down the screws firmly in a crosswise pattern. 1 2310RA093 TG 2310RA096 TG 2310RA087 TG : Carefully swing the engine (1) in 1 the direction of the clutch and lift it upwards and out of the engine housing. - Turn the engine upside down. After loosening the engine pan, always clean the sealing faces and apply fresh sealant, b 14. - Loosen and remove the engine pan, remove remaining sealant and clean the sealing faces, b 14 Installing - Push the oil seals into position, b 6.6 Note installed depth of the oil seals. 1 : Fit the straight crankshaft stub (1) in the opening (arrow) in the engine housing. - Carefully position the engine in the engine housing - support the engine pan from below with one hand. 1 1 1 1 : Fit the retaining ring (1). - Reassemble all other parts in the reverse sequence. - Perform leakage test, b 6.2 6.6 Cylinder / Crankshaft - Remove the engine, b 6.5 Always install new oil seals after removing the crankshaft. 1 2310RA427 TG 2310RA092 TG 2310RA098 TG - Line up and hold the engine in the engine housing - the bores in the engine housing, engine pan and cylinder must be in alignment. : Push the crankshaft with ball bearings into the bearing seats (arrows). : Insert the screws (1) - do not tighten them down yet. : Carefully pry the engine pan (1) loose at the point shown (arrow) and lift it away. 38 MS 231, MS 231 C, MS 251, MS 251 C
-
 1
1 -
2
-
3
-
4
-
5
-
6
-
7
-
8
-
9
-
10
-
11
-
12
-
13
-
14
-
15
-
16
-
17
-
18
-
19
-
20
-
21
-
22
-
23
-
24
-
25
-
26
-
27
-
28
-
29
-
30
-
31
-
32
-
33
-
 34
34 -
 35
35 -
 36
36 -
 37
37 -
 38
38 -
 39
39 -
 40
40 -
 41
41 -
 42
42 -
 43
43 -
 44
44 -
45
-
46
-
47
-
48
-
49
-
50
-
51
-
52
-
53
-
54
-
55
-
56
-
57
-
58
-
59
-
60
-
61
-
62
-
63
-
64
-
65
-
66
-
67
-
68
-
69
-
70
-
71
-
72
-
73
-
74
-
75
-
76
-
77
-
78
-
79
-
80
-
81
-
82
-
83
-
84
-
85
-
86
-
87
-
88
-
89
-
90
-
91
-
92
-
93
-
94
-
95
-
96
-
97
-
98
-
99
-
100
-
101
-
102
-
103
-
104
-
105
-
106
-
107
-
108
-
109
-
110
-
111
-
112
-
113
-
114
 |
 |
