Stihl MS 251 Instruction Manual - Page 65
Installing unwound rewind spring, Models with ErgoStart, clockwise in the housing, holding
 |
View all Stihl MS 251 manuals
Add to My Manuals
Save this manual to your list of manuals |
Page 65 highlights
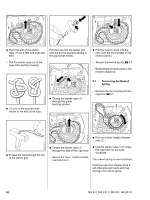
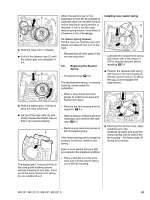
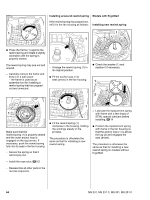
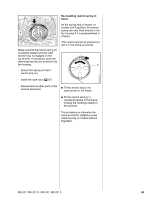
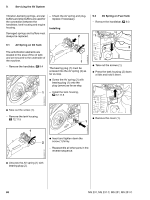
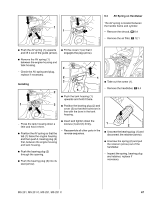
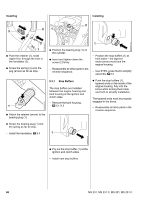
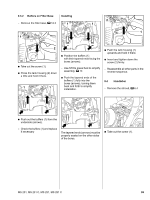
2310RA223 TG Installing unwound rewind spring Models with ErgoStart If the rewind spring has popped out, refit it in the fan housing as follows: Installing new rewind spring 1 1 1 2310RA227 TG : Press the frame (1) against the rewind spring and rotate it slightly clockwise until the spring is properly seated. The rewind spring may pop out and unwind. - Carefully remove the frame and keep it in a safe place - the frame is used as an assembly tool for installing a rewind spring that has popped out and unwound. - Arrange the rewind spring (1) in its original position. : Fit the anchor loop in its seat (arrow) in the fan housing. 2310RA230 TG : Check the washer (1) and replace it if necessary. 1 2 2310RA225 TG 1 Make sure that the rewind spring (1) is properly seated and the outer anchor loop is engaged on the lug (arrow). If necessary, push the rewind spring fully into its seat in the fan housing. - Secure the spring so that it cannot pop out. 2310RA228 TG 1 : Fit the rewind spring (1) clockwise in the housing, holding the windings steady in the process. The procedure is otherwise the same as that for installing a new rewind spring. 2310RA231 TG - Lubricate the replacement spring with frame with a few drops of STIHL special lubricant before installing, b 14 : Position the replacement spring with frame in the fan housing so that the anchor loop (1) is above the lug (2) and engages the seat (arrow). The procedure is otherwise the same as that for installing a new rewind spring on models without ErgoStart. - Install the rope rotor, b 8.5 - Reassemble all other parts in the reverse sequence. 64 MS 231, MS 231 C, MS 251, MS 251 C
-
 1
1 -
2
-
3
-
4
-
5
-
6
-
7
-
8
-
9
-
10
-
11
-
12
-
13
-
14
-
15
-
16
-
17
-
18
-
19
-
20
-
21
-
22
-
23
-
24
-
25
-
26
-
27
-
28
-
29
-
30
-
31
-
32
-
33
-
34
-
35
-
36
-
37
-
38
-
39
-
40
-
41
-
42
-
43
-
44
-
45
-
46
-
47
-
48
-
49
-
50
-
51
-
52
-
53
-
54
-
55
-
56
-
57
-
58
-
59
-
 60
60 -
 61
61 -
 62
62 -
 63
63 -
 64
64 -
 65
65 -
 66
66 -
 67
67 -
 68
68 -
 69
69 -
 70
70 -
71
-
72
-
73
-
74
-
75
-
76
-
77
-
78
-
79
-
80
-
81
-
82
-
83
-
84
-
85
-
86
-
87
-
88
-
89
-
90
-
91
-
92
-
93
-
94
-
95
-
96
-
97
-
98
-
99
-
100
-
101
-
102
-
103
-
104
-
105
-
106
-
107
-
108
-
109
-
110
-
111
-
112
-
113
-
114
 |
 |
