Stihl MS 251 Instruction Manual - Page 20
Clutch, 4.1 Clutch Drum, flat side of its metal top must rest - parts
 |
View all Stihl MS 251 manuals
Add to My Manuals
Save this manual to your list of manuals |
Page 20 highlights
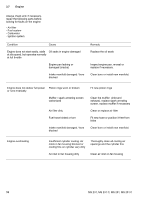
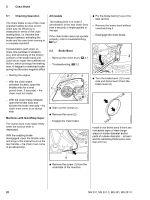
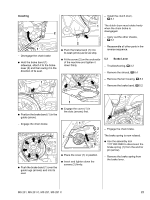
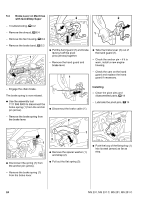
4. Clutch 4.1 Clutch Drum - Remove and install the clutch drum, see instruction manual. - Remove the needle cage. - Clean the needle cage and crankshaft stub, b 14 - Lubricate the needle cage and crankshaft stub, b 14 1 : Pull boot (1) off the spark plug. - Unscrew the spark plug. 2310RA001 TG TOP 1 : Apply wrench to hexagon (arrow) and unscrew the clutch (1) - lefthand thread. 2310RA004 TG 1 1 Installing TOP 5902RA018 TG 80% ! 100% - Inspect the clutch drum (1) for signs of wear. If there are signs of serious wear on the inside diameter of the clutch drum (1), check the remaining wall thickness. If it is less than about 80% of the original thickness, install a new clutch drum. - Install the clutch drum. : Hold the locking strip (1) 0000 893 5904 so that the flat side of its metal top faces the piston and then push it into the cylinder. 1 4.2 Clutch - Troubleshooting, b 4.2 - Remove the clutch drum, b 4.1 2310RA002 TG 1 2 Fit the cover washer (1) so that the word "TOP" faces outwards. : Position the clutch (2) on the crankshaft stub so that the raised hexagon (arrow) faces outwards. : Fit the clutch (2) and tighten it down firmly - left-hand thread. - Remove the locking strip from the cylinder. - Reassemble all other parts in the reverse sequence. 2310RA005 TG 2310RA003 TG - Remove the shroud, b 6.4 : The locking strip (1) 0000 893 5904 must butt against the cylinder wall (arrow) and the flat side of its metal top must rest on the piston crown - as shown in the illustration. MS 231, MS 231 C, MS 251, MS 251 C 19
-
 1
1 -
2
-
3
-
4
-
5
-
6
-
7
-
8
-
9
-
10
-
11
-
12
-
13
-
14
-
 15
15 -
 16
16 -
 17
17 -
 18
18 -
 19
19 -
 20
20 -
 21
21 -
 22
22 -
 23
23 -
 24
24 -
 25
25 -
26
-
27
-
28
-
29
-
30
-
31
-
32
-
33
-
34
-
35
-
36
-
37
-
38
-
39
-
40
-
41
-
42
-
43
-
44
-
45
-
46
-
47
-
48
-
49
-
50
-
51
-
52
-
53
-
54
-
55
-
56
-
57
-
58
-
59
-
60
-
61
-
62
-
63
-
64
-
65
-
66
-
67
-
68
-
69
-
70
-
71
-
72
-
73
-
74
-
75
-
76
-
77
-
78
-
79
-
80
-
81
-
82
-
83
-
84
-
85
-
86
-
87
-
88
-
89
-
90
-
91
-
92
-
93
-
94
-
95
-
96
-
97
-
98
-
99
-
100
-
101
-
102
-
103
-
104
-
105
-
106
-
107
-
108
-
109
-
110
-
111
-
112
-
113
-
114
 |
 |
