Stihl MS 251 Instruction Manual - Page 45
Piston Rings, that the radii face
 |
View all Stihl MS 251 manuals
Add to My Manuals
Save this manual to your list of manuals |
Page 45 highlights
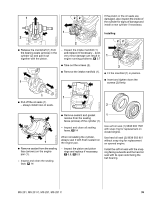
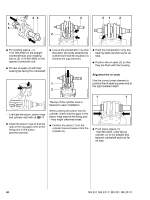
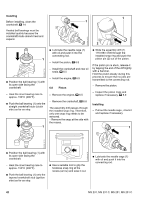
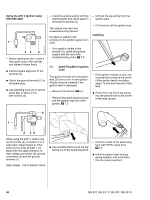
6.9 Piston Rings - Remove the piston, b 6.8 - Remove the piston rings from the piston. 5902RA162 TG 2310RA420 TG : Apply the installing tool 5910 890 2210 with the sleeve against the piston boss, hold the piston steady, center the tool shank exactly and press home until the snap ring slips into the groove. Make sure the tool is held square on the piston pin axis. : Use a piece of old piston ring to scrape the grooves (arrows) clean. 5902RA160 TG - Carefully fit the piston rings over the piston - they might otherwise break. : Install the piston rings so that the radii at the ring gap meet at the fixing pins in the piston grooves (arrows). : Check correct installed position of the piston rings (arrows). - Install the piston, b 6.8 - Reassemble all other parts in the reverse sequence. 2310RA421 TG 5902RA161 TG - Inspect the piston rings and replace if necessary, b 6.9 - Install the crankshaft and new oil seals, b 6.5 : Position the new piston rings so that the radii face upward (arrows). - Install the crankshaft, b 6.6 - Install the engine, b 6.5 44 MS 231, MS 231 C, MS 251, MS 251 C
-
 1
1 -
2
-
3
-
4
-
5
-
6
-
7
-
8
-
9
-
10
-
11
-
12
-
13
-
14
-
15
-
16
-
17
-
18
-
19
-
20
-
21
-
22
-
23
-
24
-
25
-
26
-
27
-
28
-
29
-
30
-
31
-
32
-
33
-
34
-
35
-
36
-
37
-
38
-
39
-
 40
40 -
 41
41 -
 42
42 -
 43
43 -
 44
44 -
 45
45 -
 46
46 -
 47
47 -
 48
48 -
 49
49 -
 50
50 -
51
-
52
-
53
-
54
-
55
-
56
-
57
-
58
-
59
-
60
-
61
-
62
-
63
-
64
-
65
-
66
-
67
-
68
-
69
-
70
-
71
-
72
-
73
-
74
-
75
-
76
-
77
-
78
-
79
-
80
-
81
-
82
-
83
-
84
-
85
-
86
-
87
-
88
-
89
-
90
-
91
-
92
-
93
-
94
-
95
-
96
-
97
-
98
-
99
-
100
-
101
-
102
-
103
-
104
-
105
-
106
-
107
-
108
-
109
-
110
-
111
-
112
-
113
-
114
 |
 |
