Stihl MS 251 Instruction Manual - Page 93
Lever on Throttle Shaft, Align the end cover
 |
View all Stihl MS 251 manuals
Add to My Manuals
Save this manual to your list of manuals |
Page 93 highlights
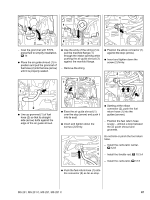
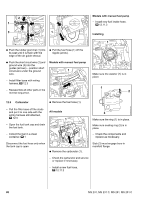
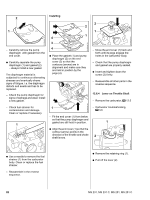
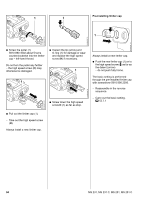
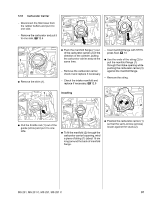
2310RA266 TG 2310RA268 TG 2310RA270 TG Installing 2 2 1 1 4 3 - Carefully remove the pump diaphragm with gasket from the end cover. : Carefully separate the pump diaphragm (1) and gasket (2) - always install a new gasket. The diaphragm material is subjected to continuous alternating stresses and eventually shows signs of fatigue. i.e. the diaphragm distorts and swells and has to be replaced. 4 : Place the gasket (1) and pump diaphragm (2) on the end cover (3) so that the contours (arrows) are in alignment and make sure they are held in position by the pegs (4). - Check the pump diaphragm for signs of damage and wear. Install a new gasket. 2 1 - Move the end cover (1) back and forth until its pegs engage the holes in the carburetor body. - Check that the pump diaphragm and gasket are properly seated. : Insert and tighten down the screw (2) firmly. - Reassemble all other parts in the reverse sequence. 12.6.4 Lever on Throttle Shaft - Remove the carburetor, b 12.5 - Check fuel strainer for contamination and damage. Clean or replace if necessary. 1 1 - Carburetor troubleshooting, b 3.6 - Fit the end cover (1) from below so that the pump diaphragm and gasket are still held in position. 1 : Align the end cover (1) so that the contour (arrow) points in the direction of the throttle and choke shaft levers. 2 2310RA267 TG 2310RA269 TG 2310RA271 TG : Use a needle to remove the fuel strainer (1) from the carburetor body. Clean or replace the fuel strainer. - Reassemble in the reverse sequence. : Remove the retaining ring (1). : Pull off the lever (2). 92 MS 231, MS 231 C, MS 251, MS 251 C
-
 1
1 -
2
-
3
-
4
-
5
-
6
-
7
-
8
-
9
-
10
-
11
-
12
-
13
-
14
-
15
-
16
-
17
-
18
-
19
-
20
-
21
-
22
-
23
-
24
-
25
-
26
-
27
-
28
-
29
-
30
-
31
-
32
-
33
-
34
-
35
-
36
-
37
-
38
-
39
-
40
-
41
-
42
-
43
-
44
-
45
-
46
-
47
-
48
-
49
-
50
-
51
-
52
-
53
-
54
-
55
-
56
-
57
-
58
-
59
-
60
-
61
-
62
-
63
-
64
-
65
-
66
-
67
-
68
-
69
-
70
-
71
-
72
-
73
-
74
-
75
-
76
-
77
-
78
-
79
-
80
-
81
-
82
-
83
-
84
-
85
-
86
-
87
-
 88
88 -
 89
89 -
 90
90 -
 91
91 -
 92
92 -
 93
93 -
 94
94 -
 95
95 -
 96
96 -
 97
97 -
 98
98 -
99
-
100
-
101
-
102
-
103
-
104
-
105
-
106
-
107
-
108
-
109
-
110
-
111
-
112
-
113
-
114
 |
 |
