Stihl MS 251 Instruction Manual - Page 91
Servicing the Carburetor, 12.6.1 Metering Diaphragm, 12.6.2 Inlet Needle, holes in the tabs.
 |
View all Stihl MS 251 manuals
Add to My Manuals
Save this manual to your list of manuals |
Page 91 highlights
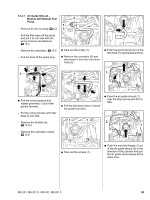
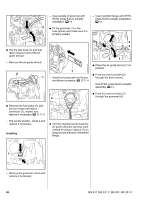
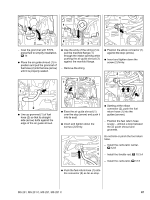
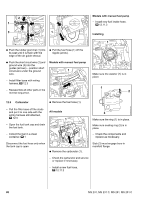
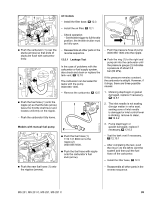
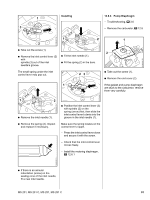
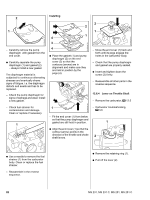
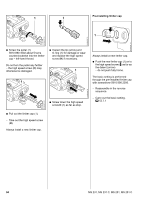
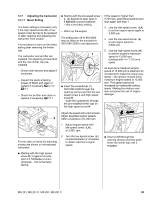
12.6 Servicing the Carburetor 12.6.1 Metering Diaphragm - Troubleshooting, b 3.6 - Remove the carburetor, b 12.5 21 21 2 2 2 2310RA256 TG 2310RA256 TG 2310RA260 TG 1 : Take out the screws (arrows). : Remove the end cover (1). If the gasket and diaphragm are stuck to the carburetor, remove them very carefully. 2 3 : Carefully separate the metering diaphragm (1) and gasket (2). The diaphragm material is subjected to continuous alternating stresses and eventually shows signs of fatigue. i.e. the diaphragm distorts and swells and has to be replaced. - Check the metering diaphragm for signs of damage and wear. Install a new gasket. Installing 1 2 : Position the end cover (1) so that the stub (3) points in the direction of the choke shutter and the holes line up. : Fit the screws (2) but do not tighten them down yet. - Check position of metering diaphragm and gasket, then tighten down the screws firmly in a crosswise pattern. Take care not to damage the Oring (arrow). - Reassemble all other parts in the reverse sequence. 12.6.2 Inlet Needle - Remove the metering diaphragm, b 12.6.1 2310RA257 TG 2310RA259 TG 1 : Check the O-ring (1) and replace it if necessary : On versions with a manual fuel pump, check the nipple (2) and replace the end cover if necessary. - Note installed positions of metering diaphragm (2) and gasket (1). : Position the gasket (1) and metering diaphragm (2) so that pegs (arrows) engage the small holes in the tabs. 90 MS 231, MS 231 C, MS 251, MS 251 C
-
 1
1 -
2
-
3
-
4
-
5
-
6
-
7
-
8
-
9
-
10
-
11
-
12
-
13
-
14
-
15
-
16
-
17
-
18
-
19
-
20
-
21
-
22
-
23
-
24
-
25
-
26
-
27
-
28
-
29
-
30
-
31
-
32
-
33
-
34
-
35
-
36
-
37
-
38
-
39
-
40
-
41
-
42
-
43
-
44
-
45
-
46
-
47
-
48
-
49
-
50
-
51
-
52
-
53
-
54
-
55
-
56
-
57
-
58
-
59
-
60
-
61
-
62
-
63
-
64
-
65
-
66
-
67
-
68
-
69
-
70
-
71
-
72
-
73
-
74
-
75
-
76
-
77
-
78
-
79
-
80
-
81
-
82
-
83
-
84
-
85
-
 86
86 -
 87
87 -
 88
88 -
 89
89 -
 90
90 -
 91
91 -
 92
92 -
 93
93 -
 94
94 -
 95
95 -
 96
96 -
97
-
98
-
99
-
100
-
101
-
102
-
103
-
104
-
105
-
106
-
107
-
108
-
109
-
110
-
111
-
112
-
113
-
114
 |
 |
