TP-Link Archer MR200 Archer MR200 V1 User Guide
TP-Link Archer MR200 Manual
 |
View all TP-Link Archer MR200 manuals
Add to My Manuals
Save this manual to your list of manuals |
TP-Link Archer MR200 manual content summary:
- TP-Link Archer MR200 | Archer MR200 V1 User Guide - Page 1
Archer MR200 User Guide AC750 Wireless Dual Band 4G LTE Router REV1.0.0 1910011340 - TP-Link Archer MR200 | Archer MR200 V1 User Guide - Page 2
Connect the Hardware 8 2. 1. Requirements for Operation 9 2. 2. Position Your 4G LTE Router 9 2. 3. Connect Your 4G LTE Router 9 Chapter 3. Log into Your 4G LTE Router 12 Chapter 4. Set Up Internet Connections 14 4. 1. Use Quick Setup Wizard 15 4. 2. Create a Connection Profile 15 4. 3. Test - TP-Link Archer MR200 | Archer MR200 V1 User Guide - Page 3
Wireless Settings 57 11. 5. Set Up a Dynamic DNS Service Account 58 11. 6. Create Static Routes 59 11. 7. Set up a VPN Connection 61 Chapter 12.Administrate Your Network 66 12. 1. Set System Time and Region 67 12. 2. Update the Firmware 68 12. 3. Back up and Restore Configuration Settings 68 - TP-Link Archer MR200 | Archer MR200 V1 User Guide - Page 4
12. 6. Remote Management 70 12. 7. System Log 71 12. 8. Monitor the Internet Traffic Statistics 73 12. 9. CWMP Settings 74 12. 10. SNMP Settings 76 Appendix A: Specifications 78 Appendix B: Troubleshooting 80 - TP-Link Archer MR200 | Archer MR200 V1 User Guide - Page 5
appropriate to your needs. In addition to this guide, a Quick Installation Guide is also released with each TP-LINK router, you are suggested to configure your router for quick Internet setup by following the published Quick Installation Guide before you get started with a further configuration - TP-Link Archer MR200 | Archer MR200 V1 User Guide - Page 6
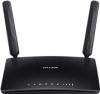
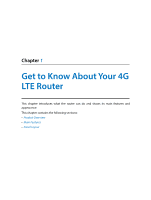
Chapter 1 Get to Know About Your 4G LTE Router This chapter introduces what the router can do and shows its main features and appearance. This chapter contains the following sections: • Product Overview • Main Features • Panel Layout - TP-Link Archer MR200 | Archer MR200 V1 User Guide - Page 7
four Ethernet ports add your wired devices to the 4G LTE network. 802.11ac - The Next Generation of Wi-Fi TP-LINK's Archer MR200 comes external antennas and high power amplifiers, Archer MR200 is able to boost Wi-Fi coverage throughout your home. Advanced Beamforming technology enables Archer MR200 - TP-Link Archer MR200 | Archer MR200 V1 User Guide - Page 8
EDGE/GPRS/GSM: 850/900/1800/1900MHz • 4G LTE supported with up to 150Mbps downloads and 50Mbps uploads speeds (FDDLTE) • Supports 802.11ac - The next generation of Wi-Fi threats • Easy Setup Assistant with multi-language support provides a quick & hassle free installation process • Supports up to 10 - TP-Link Archer MR200 | Archer MR200 V1 User Guide - Page 9
or firmware upgrading is in process. Do not disconnect or power off the router. Power is off. Please ensure that the power adapter is connected correctly. Internet connection is available. No Internet connection. Please refer to Note 1 for troubleshooting. The router is using the 4G network - TP-Link Archer MR200 | Archer MR200 V1 User Guide - Page 10
for troubleshooting. Note: 1. If the Internet LED is off, please check your Internet connection first. Refer to Connect Your 4G LTE Router panel shows the connection ports, buttons and antennas (view from left to right). Refer to the following for detailed instructions. Item Description POWER - TP-Link Archer MR200 | Archer MR200 V1 User Guide - Page 11
Chapter 1 Get to Know About Your 4G LTE Router Item WPS/RESET Wi-Fi ON/OFF SIM Card Slot Antennas Description The switch for the WPS and RESET function. RESET: There are two ways to reset the router to its factory defaults. Method one: With the router powered on, use a pin to press and hold the - TP-Link Archer MR200 | Archer MR200 V1 User Guide - Page 12
Chapter 2 Connect the Hardware This chapter contains the following sections: • Requirements for Operation • Requirements for Operation • Connect Your 4G LTE Router - TP-Link Archer MR200 | Archer MR200 V1 User Guide - Page 13
Internet Explorer, Mozilla Firefox and Apple Safari. 2. 2. Position Your 4G LTE Router With the router, you can access your network from The router can be placed on a shelf or desktop. 2. 3. Connect Your 4G LTE Router Follow the steps below to connect your router. 1. Connect the power adapter - TP-Link Archer MR200 | Archer MR200 V1 User Guide - Page 14
adapter provided by TP-LINK. 2. Connect your computer to the router. Method 1: Wired Connect your computer's Ethernet port to one of the LAN ports on Archer MR200 via an Ethernet cable. Method 2: Wirelessly Use the default SSID (Wireless Network Name) and Wireless Password printed on the product - TP-Link Archer MR200 | Archer MR200 V1 User Guide - Page 15
Chapter 2 Connect the Hardware 11 - TP-Link Archer MR200 | Archer MR200 V1 User Guide - Page 16
Chapter 3 Log into Your 4G LTE Router - TP-Link Archer MR200 | Archer MR200 V1 User Guide - Page 17
LTE Router With a Web-based management page, it is easy to configure and manage the Archer MR200 AC750 Wireless Dual Band 4G LTE Router. The Web-based management page can be used on any Windows, Macintosh or UNIX OS with a Web browser, such as Microsoft Internet Explorer, - TP-Link Archer MR200 | Archer MR200 V1 User Guide - Page 18
many of the steps and verifies that those steps have been successfully completed. Furthermore, you can set up IPv6 connection if your ISP provides IPv6 service. This chapter includes the following sections: • Use Quick Setup Wizard • Create Create a Connection Profile • Test Internet Connectivity - TP-Link Archer MR200 | Archer MR200 V1 User Guide - Page 19
instructions to complete the setup. Note: 1. During the quick setup process, you can change the preset wireless network name (SSID) and wireless password. Once done, all your wireless devices must use the new SSID and password to connect to the router. 2. The router supports two operation modes - TP-Link Archer MR200 | Archer MR200 V1 User Guide - Page 20
this page. 4. 3. Test Internet Connectivity After manually set up the Internet connection, you need to know the Internet connectivity. The router provides a diagnostic tool to help you locate the malfunction. 1. Visit http://tplinkmodem.net, and log in with the password you set for the router. 2. Go - TP-Link Archer MR200 | Archer MR200 V1 User Guide - Page 21
Chapter 4 Set Up Internet Connections 3. Click Start to test the Internet connectivity and you will see the test result in the gray box. 17 - TP-Link Archer MR200 | Archer MR200 V1 User Guide - Page 22
Chapter 5 Bandwidth Control The Bandwidth Control feature is used to fully utilize your limited bandwidth and optimize the load respectively. With this feature enabled, you can assign a specific minimum or maximum bandwidth for each computer, thus minimizing the impact caused when the connection is - TP-Link Archer MR200 | Archer MR200 V1 User Guide - Page 23
. About how to configure address reservation, please refer to Reserve LAN IP Addresses. 1. Visit http://tplinkmodem.net, and log in with the password you set for the router. 2. Go to Advanced > Bandwidth Control page. 3. Enable Bandwidth Control. Enter the Total Upstream Bandwidth and the Total - TP-Link Archer MR200 | Archer MR200 V1 User Guide - Page 24
an IP address range, all computers in the range will share the given bandwidth. 2 ) Port Range: Keep the default settings. The default port range of TCP protocol or UDP protocol is from 1 to 65535. 3 ) Protocol: Keep the default setting. Or you can choose the TCP protocol or UDP protocol or both of - TP-Link Archer MR200 | Archer MR200 V1 User Guide - Page 25
Chapter 5 Bandwidth Control Done! Now you and your roommate have an independent bandwidth. 21 - TP-Link Archer MR200 | Archer MR200 V1 User Guide - Page 26
Chapter 6 Network Security This chapter guides you on how to protect your home network from unauthorized users by implementing these three network security functions. You can block or allow specific client - TP-Link Archer MR200 | Archer MR200 V1 User Guide - Page 27
. • The unknown device is not allowed to access the wireless network. • I don't have to keep changing my wireless password as often. 1. Visit http://tplinkmodem.net, and log in with the password you set for the router. 2. Go to Advanced > Wireless > MAC Filtering. Enable Wireless MAC Filtering. 23 - TP-Link Archer MR200 | Archer MR200 V1 User Guide - Page 28
Chapter 6 Network Security 3. Select the filtering rule to either block (recommended) or allow the device(s) in the list. To block specific device(s) 1 ) Select Block wireless access from the devices in the list below and click Save. 2 ) Select the device(s) to be blocked in the Devices Online - TP-Link Archer MR200 | Archer MR200 V1 User Guide - Page 29
I do that? Block or allow specific client devices to access my network (via wired or wireless). 1. Visit http://tplinkmodem.net, and log in with the password you set for the router. 2. Go to Advanced > Security > Access Control and enable Access Control. 25 - TP-Link Archer MR200 | Archer MR200 V1 User Guide - Page 30
Chapter 6 Network Security 3. Select the access mode to either block (recommended) or allow the device(s) in the list. To block specific device(s) 1 ) Select Blacklist and click Save. 2 ) Select the device(s) to be - TP-Link Archer MR200 | Archer MR200 V1 User Guide - Page 31
, but unrecognized MAC address. I want to: How can I do that? Prevent ARP spoofing and ARP attacks. 1. Visit http://tplinkmodem.net, and log in with the password you set for the router. 2. Go to Advanced > Security > IP & MAC Binding and enable IP & MAC Binding. 27 - TP-Link Archer MR200 | Archer MR200 V1 User Guide - Page 32
Chapter 6 Network Security 3. Bind your device(s) according to your needs. To bind the connected device(s) 1 ) Select the device(s) to be bound in the ARP List. 2 ) Click Bind to add to the Binding List. To bind the unconnected device 1 ) Click Add. Done! 2 ) Enter the MAC address and IP address - TP-Link Archer MR200 | Archer MR200 V1 User Guide - Page 33
Chapter 7 Parental Controls This function allows you to block inappropriate, explicit and malicious websites, and control access to specified websites at specified time. - TP-Link Archer MR200 | Archer MR200 V1 User Guide - Page 34
to allow my children's devices (e.g. a computer or a tablet) to access only www.tp-link.com and Wikipedia.org, from 18:00 (6PM) to 22:00 (10PM) on weekdays and not other times. 1. Visit http://tplinkmodem.net, and log in with the password you set for the router. 2. Go to Basic or Advanced > Parental - TP-Link Archer MR200 | Archer MR200 V1 User Guide - Page 35
device to be controlled. Or, enter the Device Name and MAC Address manually. 5. Click the icon to set the Internet Access Time. Drag the cursor this entry and click OK. 8. Select the restriction mode. 1 ) In Blacklist mode, the controlled devices cannot access any websites containing the specified - TP-Link Archer MR200 | Archer MR200 V1 User Guide - Page 36
Chapter 7 Parental Controls 2 ) In Whitelist mode, the controlled devices can only access websites containing . Below are some sample entries to allow access. 1 ) Enter a web address (e.g. www.tp-link.com) or a web address keyword (e.g. wikipedia) to only allow or block access to the websites - TP-Link Archer MR200 | Archer MR200 V1 User Guide - Page 37
Chapter 8 SMS This chapter introduces how to use the SMS functions to view and write messages, keep drafts and specify the message center number. You can easily monitor your data usage by sending a message to your carrier. This chapter includes the following sections: • View Messages • Edit and Send - TP-Link Archer MR200 | Archer MR200 V1 User Guide - Page 38
the message is read, while indicates the message is unread. 8. 2. Edit and Send a New Message 1. Visit http://tplinkmodem.net, and log in with the password you set for the router. 1. Go to Advanced > SMS > New Message page. 2. Enter the receiver's phone number in the Phone Number field. 3. Enter - TP-Link Archer MR200 | Archer MR200 V1 User Guide - Page 39
page. All the messages you sent are listed in the Outbox table. Tips: You can click to edit and forward the message. 8. 4. View Drafts 1. Visit http://tplinkmodem.net, and log in with the password you set for the router. 2. Go to Advanced > SMS > Drafts page. All the unsent messages are listed in - TP-Link Archer MR200 | Archer MR200 V1 User Guide - Page 40
change it for a wrong message center number will affect the SMS function of the router. 1. Visit http://tplinkmodem.net, and log in with the password you set for the router. 2. Go to Advanced > SMS > SMS Settings page and enable Message Center. 3. The Message Center Number is auto-populated. Change - TP-Link Archer MR200 | Archer MR200 V1 User Guide - Page 41
Chapter 9 Guest Network This function allows you to provide Wi-Fi access for guests without disclosing your main network. When you have guests in your house, apartment, or workplace, you can create a guest network for them. In addition, you can assign network authorities and bandwidth for guests to - TP-Link Archer MR200 | Archer MR200 V1 User Guide - Page 42
select Hide SSID unless you want your guests and other people to manually input this SSID for Wi-Fi access. 3 ) Set Security to WPA/WPA2 Personal, keep the default Version and Encryption values, and set an easy-to-remember password. 4. Click Save. Now your guests can access your guest network using - TP-Link Archer MR200 | Archer MR200 V1 User Guide - Page 43
Chapter 9 Guest Network • Allow guests to see each other Select this checkbox if you to allow the clients in your guest network to access each other. • Allow guests to access my local network Select this checkbox if you want to allow the clients in your guest network to access your local network, - TP-Link Archer MR200 | Archer MR200 V1 User Guide - Page 44
feature the router can penetrate the isolation of NAT and allows the external hosts in the Internet to initiatively communicate with the devices in the local network, thus to realize some special functions. TP-LINK router includes four forwarding rules. If two or more rules are set, the priority of - TP-Link Archer MR200 | Archer MR200 V1 User Guide - Page 45
service uses different service port. Port 80 is used in HTTP service, port 21 in FTP service, port 25 in SMTP service and port 110 in POP3 service. Please verify the service port router with the WAN IP address 218.18.232.154. Personal Website 4G LTE Router How can I do that? LAN Home WAN: 218.18 - TP-Link Archer MR200 | Archer MR200 V1 User Guide - Page 46
NAT Forwarding Done! 4. Click View Existing Services, and choose HTTP. The external port, internal port and protocol will be auto-populated. Enter the PC's IP address 192.168.1.100 in the Internal IP field. 5. Click OK to save the settings. Tips: 1. It is recommended to keep the default settings - TP-Link Archer MR200 | Archer MR200 V1 User Guide - Page 47
.net, and log in with the password you set for the router. 2. Go to Advanced > NAT Forwarding > Port Triggering and click Add. 3. Click View Existing Applications, and select the desired application. The triggering port and protocol, the external port and protocol will be auto-populated. Here - TP-Link Archer MR200 | Archer MR200 V1 User Guide - Page 48
with other players. To solve this problem, set your PC as a DMZ with all ports opened. 1. Assign a static IP address to your PC, for example 192.168.1.100. 2. Visit http://tplinkmodem.net, and log in with the password you set for the router. 3. Go to Advanced > NAT Forwarding > DMZ and select the - TP-Link Archer MR200 | Archer MR200 V1 User Guide - Page 49
Xbox online games without a hitch. LAN WAN Xbox 4G LTE Router If necessary, you can follow the steps to change the status of UPnP. 1. Visit http://tplinkmodem.net, and log in with the password you set for the router; 2. Go to Advanced > NAT Forwarding > UPnP and toggle on or off according to - TP-Link Archer MR200 | Archer MR200 V1 User Guide - Page 50
the default settings or adjust the basic configuration of the router using the web-based management page. This chapter contains the following sections: • PIN Management • Data Settings • Data Settings • Wireless Settings • Set Up a Dynamic DNS Service Account • Create Static Routes • Set up a VPN - TP-Link Archer MR200 | Archer MR200 V1 User Guide - Page 51
and log in with the password you set for the router. , saving you the trouble to enter the PIN reset a PIN that has been lost or forgotten. The PUK is a SIM-specific code assigned by the service provider. You need to enter the PUK after 3 incorrect login attempts of PIN. Contact your service - TP-Link Archer MR200 | Archer MR200 V1 User Guide - Page 52
your data usage. 1. Visit http://tplinkmodem.net, and log in with the password you set for the router. 2. Go to Advanced > Network > Data be shown on the Basic > Network Map Page. 6. Enable Data Statistics to reset data statistics when the next billing cycle starts. 7. Enter the start date of - TP-Link Archer MR200 | Archer MR200 V1 User Guide - Page 53
change your IP address. 1. Visit http://tplinkmodem.net, and log in with the password you set for the router. 2. Go to Advanced > Network > LAN Settings page Leave the rest of the default settings as they are. 7. Click Save to make the settings effective. 11. 3. 2. Use the 4G LTE Router as a DHCP - TP-Link Archer MR200 | Archer MR200 V1 User Guide - Page 54
settings as default and click Save to make the settings effective. Note: 1. 1. The router can be configured to work as a DHCP Relay. A DHCP relay is a computer that forwards DHCP data .net, and log in with the password you set for the router. 2. Go to Advanced > Network > LAN Settings page. - TP-Link Archer MR200 | Archer MR200 V1 User Guide - Page 55
. 11. 4. Wireless Settings 11. 4. 1. Specify Basic Wireless Settings The router's wireless network name (SSID) and password, and security option are preset in the factory. The preset SSID and password can be found on the product label. You can customize the wireless settings according to your needs - TP-Link Archer MR200 | Archer MR200 V1 User Guide - Page 56
) and wireless password: Enter a new SSID using up to 32 characters. The default SSID is TP-LINK_XXXX and the manually join the network. ¾¾ To change the mode or channel: Go to Advanced > Wireless >Wireless Settings page and select the wireless network 2.4GHz or 5GHz. Mode: Select the desired mode - TP-Link Archer MR200 | Archer MR200 V1 User Guide - Page 57
problems with another nearby access point. Channel Width: Select the channel width from the drop-down list. The default the Wi-Fi Protected Setup Button Use this method if your client device has a Wi-Fi Protected Setup button. 1. Press the WPS/RESET button on the password you set for the router. 53 - TP-Link Archer MR200 | Archer MR200 V1 User Guide - Page 58
for the router's PIN. 1. Visit http://tplinkmodem.net, and log in with the password you set for the router. 2. Go to Advanced > Wireless > WPS page. a new PIN. 4. On the client device, enter the router's PIN. (The default PIN is also labeled on the bottom of the router.) 5. The WPS LED flashes - TP-Link Archer MR200 | Archer MR200 V1 User Guide - Page 59
network (both 2.4GHz and 5GHz) at time when you do not need the wireless connection. 1. Visit http://tplinkmodem.net, and log in with the password you set for the router. 2. Go to Advanced > Wireless > Wireless Schedule page. 3. Select the 2.4GHz wireless network to configure. Toggle on the button - TP-Link Archer MR200 | Archer MR200 V1 User Guide - Page 60
period you set. 11. 4. 4. View Wireless Information ¾¾ To view the detailed wireless network settings: 1. Visit http://tplinkmodem.net, and log in with the password you set for the router. 2. Go to Advanced > Status page. You can see the Wireless box. 3. Select 2.4GHz or 5GHz to view the wireless - TP-Link Archer MR200 | Archer MR200 V1 User Guide - Page 61
the provided default values; otherwise it may result in lower wireless network performance. 1. Visit http://tplinkmodem.net, and log in with the password you set 11n or 802.11ac mode. It is strongly recommended to enable WMM. • Enable Short GI: This feature is enabled by default and recommended to - TP-Link Archer MR200 | Archer MR200 V1 User Guide - Page 62
feature to allow the router to bridge with another access point (AP) in a wireless local area network (WLAN). Refer to Appendix B: Troubleshooting for detailed instructions. 11. 5. Set Up a Dynamic DNS Service Account Most ISPs (Internet service providers) assign a dynamic IP address to the router - TP-Link Archer MR200 | Archer MR200 V1 User Guide - Page 63
visit my company's network at the same time, I need to configure the static routing. 4G LTE router Router 2 Company's server LAN: 192.168.1.1 WAN: 172.30.30.100 function. 2. Visit http://tplinkmodem.net, and log in with the password you set for the router. 3. Go to Advanced > Network > Advanced - TP-Link Archer MR200 | Archer MR200 V1 User Guide - Page 64
on the same subnet with the router's IP which sends out the data. In the example, the data packets will be sent to the LAN port of 60 - TP-Link Archer MR200 | Archer MR200 V1 User Guide - Page 65
the example, the data is sent to the gateway through the LTE port, so LTE should be selected. 5. Check to enable this entry and in headquarters both support IPSec VPN feature, so I decide to set up a VPN connection with the headquarter office. The following diagram is a typical VPN topology. Here - TP-Link Archer MR200 | Archer MR200 V1 User Guide - Page 66
A (local network) and site B (remote network)'s LAN IP and WAN IP. 2. Configuration on site A (local network). 1 ) Visit http://tplinkmodem.net, and log in with the password you set for the router. 2 ) Go to Advanced > Network > IPSec VPN to open the configuration page. Click Add to set up - TP-Link Archer MR200 | Archer MR200 V1 User Guide - Page 67
local IP addresses column, here we take Subnet Address as an example. Then input the LAN IP range of Site A in the IP Address for VPN column, and input Subnet Mask of Site A. 6 ) To configure Site B's LAN: In the Tunnel access from local IP addresses column, here we take Subnet Address - TP-Link Archer MR200 | Archer MR200 V1 User Guide - Page 68
A and make sure that Site A and Site B use the same pre-shared keys and Perfect Forward Secrecy settings. 4. The Status column will change to Up if the VPN connection has been set up successfully. 5. 5. Check the VPN connection. You can ping site B' LAN IP from your computer to verify that the IPSec - TP-Link Archer MR200 | Archer MR200 V1 User Guide - Page 69
proceeds successfully (gets replies from host in Site B), the IPSec connection is working properly now. Done! Now IPSec VPN is implemented to establish a connection. Note: 1. The product supports a maximum of ten simultaneous connections. 2. If one of the site has been off line for a while, for - TP-Link Archer MR200 | Archer MR200 V1 User Guide - Page 70
settings and administrate your router's network. This chapter contains the following sections: • Set System Time and Region • Update the Firmware • Back up and Restore Configuration Settings • Change the Administrator Account • Local Management • Remote Management • System Log • Monitor the Internet - TP-Link Archer MR200 | Archer MR200 V1 User Guide - Page 71
other time-based functions like Parental Controls and Wireless Schedule. You can manually set how to get the system time. Follow the steps below to set your system time. 1. Visit http://tplinkmodem.net, and log in with the password you set for the router. 2. Go to Advanced > System Tools > Time - TP-Link Archer MR200 | Archer MR200 V1 User Guide - Page 72
tp-link.com and upgrade the firmware to the latest version. Follow the steps below to update your firmware to the latest. 1. Download the latest firmware file from our website: www.tp-link.com. 2. Visit http://tplinkmodem.net, and log in with the password reset the router. 3. The upgraded firmware - TP-Link Archer MR200 | Archer MR200 V1 User Guide - Page 73
click Restore. 4. Wait for the restoring and then the router will automatically reboot. To reset the router to factory default settings: 1. Visit http://tplinkmodem.net, and log in with the password you set for the router. 2. Click Advanced > System Tools > Backup & Restore page. 3. Click Factory - TP-Link Archer MR200 | Archer MR200 V1 User Guide - Page 74
the local management. 1. Visit http://tplinkmodem.net, and log in with the password you set for the router. 2. Go to Advanced > System Tools> Administration page. Locate the Local Management section. 3. Keep the Port as the default setting. Enter the IP address or MAC address of the local device to - TP-Link Archer MR200 | Archer MR200 V1 User Guide - Page 75
password you set for the router. 2. Go to Advanced > System Tools> Administration page. Locate the Remote Management section. 3. Tick the checkbox to enable Remote Management. Keep the Port as the default support for troubleshooting. 1. Visit http://tplinkmodem.net, and log in with the password - TP-Link Archer MR200 | Archer MR200 V1 User Guide - Page 76
Chapter 12 Administrate Your Network To view the system logs: 1. Select the log Type. Select ALL to view all kinds of logs, or select DHCPD or IGMP to view the specific logs. 2. Select the log Level and you will see the logs with the specific or higher levels. 3. Click Refresh to refresh the log - TP-Link Archer MR200 | Archer MR200 V1 User Guide - Page 77
WLAN sent and received packets, allowing you to monitor the volume of Internet traffic statistics. 1. Visit http://tplinkmodem.net, and log in with the password you set for the router. 2. Go to Advanced > System Tools > Statistics page. 3. Toggle on Traffic Statistics, and then you can monitor the - TP-Link Archer MR200 | Archer MR200 V1 User Guide - Page 78
The router offers CWMP feature. The function supports TR-069 protocol which collects information, diagnoses the devices and configures the devices automatically via ACS (Auto-Configuration Server). 1. Visit http://tplinkmodem.net, and log in with the password you set for the router. 2. Go to - TP-Link Archer MR200 | Archer MR200 V1 User Guide - Page 79
will be sent to the ACS. • ACS URL: Enter the web address of the ACS which is provided by your ISP. • ACS Username/Password: Enter the username/password to log in to the ACS server. • Interface used by TR-069 client: Select which interface to be used by the TR-069 client - TP-Link Archer MR200 | Archer MR200 V1 User Guide - Page 80
Port: Enter the port that connects to the ACS server. • Connection Request URL: Enter the URL that connects to the ACS server. • Get RPC methods: Click to get the methods to support . 1. Visit http://tplinkmodem.net, and log in with the password you set for the router. 2. Go to Advanced > System - TP-Link Archer MR200 | Archer MR200 V1 User Guide - Page 81
community string that protects the router from unauthorized access. • Set Community: Displays the default read and write community string that protects the router from unauthorized changes. • System Name: Displays the administratively-assigned name for this managed device. • System Description - TP-Link Archer MR200 | Archer MR200 V1 User Guide - Page 82
Antenna Type 1 10/100Mbps RJ45 WAN/LAN Port 3 10/100Mbps RJ45 LAN Ports 1SIM Card Slot 1 Power On/Off Button 1 Wi-Fi On/Off Button 1 WPS/RESET Button WiFi Antenna :3 internal antennas LTE Antenna: 2 detachable external antennas Radio, WDS Bridge, WMM, Wireless Statistics 64/128-bit WEP, - TP-Link Archer MR200 | Archer MR200 V1 User Guide - Page 83
SOFTWARE FEATURES Operation Mode 3G/4G Router, Wireless Router DHCP Server, Client, DHCP Client List, Address Reservation, DHCP relay Quality of Service Traffic Control(IP QoS) Port Forwarding Virtual server, Port Triggering, DMZ, ALG, UPnP VPN Pass-through PPTP, L2TP, IPSec Pass-through - TP-Link Archer MR200 | Archer MR200 V1 User Guide - Page 84
/PIN is printed on the product label of the router. 2. If the default wireless password has been changed, log into the router's web management page and go to Basic > Wireless to retrieve or reset your password. T3. What can I do if I cannot log into the router's web management page? • Make sure - TP-Link Archer MR200 | Archer MR200 V1 User Guide - Page 85
4 ) Click LAN settings, deselect the following three options and click OK; 5 ) Go to Advanced > Restore advanced settings, click OK to save the settings. 81 - TP-Link Archer MR200 | Archer MR200 V1 User Guide - Page 86
log in again. • Reset the router to factory default settings: With the router powered on, press and hold the WPS/RESET button on the rear panel surf the Internet once the router is reset. Open a web browser and log in again. If login fails, please contact the technical support. T4. What can I do if - TP-Link Archer MR200 | Archer MR200 V1 User Guide - Page 87
9. Check the Data Roaming: 1 ) Confirm with your ISP if you are in a roaming service area. If you are, open a web browser and log into the web management page. 2 the 5GHz Wi-Fi network if your devices support it. Visit http://tplinkmodem.net, and log in with the password you set for the router. Go to - TP-Link Archer MR200 | Archer MR200 V1 User Guide - Page 88
to the modem or the network port. 2. Visit http://tplinkmodem.net, and log in with password you set for the router. 3. Go to Advanced > Operation Mode page. 4. Select the Wireless Router Mode option and click Save to make the settings effective. T7. How to use the WDS Bridging function to extend my - TP-Link Archer MR200 | Archer MR200 V1 User Guide - Page 89
Configure the Security settings as the AP you choose to be bridged. 6. Click Save to make the settings effective. 7. Go password to enjoy the network. Note: The extended router (4G LTE router) can have different SSID and password from the root router, you can change your router's SSID and password - TP-Link Archer MR200 | Archer MR200 V1 User Guide - Page 90
blocked somehow; 2 ) Clicking on Troubleshoot and windows might be able to fix the problem by itself. On Windows XP 1 TP-LINK Utility, for example); 3 ) Select and right click on My Computer on desktop, select Manage to open Computer Management window; 4 ) Expand Services and Applications > Services - TP-Link Archer MR200 | Archer MR200 V1 User Guide - Page 91
5 ) Select Wireless Zero Configuration, right click it, and then select Properties; 6 ) Change Startup type to Automatic, click on Start button and make sure the Service status is Started. And then click OK. 87 - TP-Link Archer MR200 | Archer MR200 V1 User Guide - Page 92
signal. 4. Connect to wireless network. ¾¾ If you can find your wireless network but fail to connect, please follow the steps below: 1. Authenticating problem, password mismatch. 1 ) Sometimes it will ask you to type in a PIN number when you connect to the wireless network for the first time. This - TP-Link Archer MR200 | Archer MR200 V1 User Guide - Page 93
you cannot find the PIN or PIN failed, you may choose Connecting using a security key instead, and then type in the Network Security Key/Wireless Password; 3 ) If it continues saying network security key mismatch, it is suggested to confirm the wireless - TP-Link Archer MR200 | Archer MR200 V1 User Guide - Page 94
2. Windows was unable to connect to XXXX /Cannot join this network/Taking longer than usual to connect to this network. 1 ) Check the wireless signal strength of your network, if it is weak (1~3 bars), please move the router closer and try again; 2 ) Change the wireless Channel of the router to 1,6, - TP-Link Archer MR200 | Archer MR200 V1 User Guide - Page 95
COPYRIGHT & TRADEMARKS Specifications are subject to change without notice. is a registered trademark of TP-LINK TECHNOLOGIES CO., LTD. Other brands and product names are trademarks or registered trademarks of their respective holders. No part of the specifications may be reproduced - TP-Link Archer MR200 | Archer MR200 V1 User Guide - Page 96
, if not installed and used in accordance with the instructions, may cause harmful interference to radio communications. However, one or more of the following measures: • Reorient or relocate the receiving antenna. • Increase the separation between the equipment and receiver. • Connect the equipment - TP-Link Archer MR200 | Archer MR200 V1 User Guide - Page 97
Federation None Implemented None General authorization required for network and service supply(not for spectrum) This subsection does not apply for device has been designed to operate with the antennas listed below, and having a maximum gain of 3 dBi. Antennas not included in this list or having a - TP-Link Archer MR200 | Archer MR200 V1 User Guide - Page 98
To reduce potential radio interference to other users, the antenna type and its gain should be so chosen that the equivalent isotropically radiated power (e.i.r.p.) is not more than that permitted for successful communication. Industry Canada - TP-Link Archer MR200 | Archer MR200 V1 User Guide - Page 99
Don't disassemble the product, or make repairs yourself. You run the risk of electric shock and voiding the limited warranty. If you need service, please contact us. • Avoid water and wet locations. • Adapter shall be installed near the equipment and shall be easily accessible. • The plug considered - TP-Link Archer MR200 | Archer MR200 V1 User Guide - Page 100
: Product Description: AC750 Wireless Dual Band 4G LTE Router Model No.: Archer MR200 Trademark: TP-LINK We declare under product is in conformity with the following standards or other normative documents EN 300 328 V1.8.1 EN 301 489-1 V1.9.2 & EN 301 489-17 V2.2.1 EN 55022: 2010 + AC: 2011 EN
-
 1
1 -
 2
2 -
 3
3 -
 4
4 -
 5
5 -
 6
6 -
 7
7 -
8
-
9
-
10
-
11
-
12
-
13
-
14
-
15
-
16
-
17
-
18
-
19
-
20
-
21
-
22
-
23
-
24
-
25
-
26
-
27
-
28
-
29
-
30
-
31
-
32
-
33
-
34
-
35
-
36
-
37
-
38
-
39
-
40
-
41
-
42
-
43
-
44
-
45
-
46
-
47
-
48
-
49
-
50
-
51
-
52
-
53
-
54
-
55
-
56
-
57
-
58
-
59
-
60
-
61
-
62
-
63
-
64
-
65
-
66
-
67
-
68
-
69
-
70
-
71
-
72
-
73
-
74
-
75
-
76
-
77
-
78
-
79
-
80
-
81
-
82
-
83
-
84
-
85
-
86
-
87
-
88
-
89
-
90
-
91
-
92
-
93
-
94
-
95
-
96
-
97
-
98
-
99
-
100
 |
 |

REV1.0.0
1910011340
Archer MR200
User Guide
AC750 Wireless Dual Band
4G LTE Router