Toshiba Qosmio G30 PQG32C-AV605E Users Manual Canada; English - Page 36
Utilities, Printers and Other
 |
View all Toshiba Qosmio G30 PQG32C-AV605E manuals
Add to My Manuals
Save this manual to your list of manuals |
Page 36 highlights
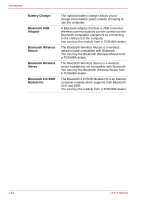
Introduction Standby TOSHIBA RAID If you have to interrupt your work, you can use this feature to allow you to turn off power to the computer without exiting from your software. Data is maintained in the computer's main memory so that when you next turn on the power, you can continue working right where you left off. RAID (Redundant Array of Independent Disks) realizes high performance (striping = RAID0) or fault tolerance (mirroring = RAID1), which is configured by arraying multiple independent hard disk drives. Utilities This section describes the pre-installed utilities that come with the computer and details how to start them. For further information on their operation, please refer to each utility's online manual, help files or README.TXT file. TOSHIBA Power Saver To access the power management utility, click start followed by Control Panel followed by Performance and Maintenance and then click the TOSHIBA Power Saver icon. HW Setup This utility allows you to customize your hardware settings according to the way you work with the computer and the peripherals you use. To access this utility, click start followed by Control Panel followed by Printers and Other Hardware and then click the TOSHIBA HWSetup icon. TOSHIBA Controls This utility lets you do the following: ■ Buttons: Assign applications to the REC, Brightness down, Brightness up, DOLBY, TV-out buttons. To access this utility, click start followed by Control Panel followed by Printers and Other Hardware and then click the Toshiba Controls icon. 1-14 User's Manual
-
 1
1 -
2
-
3
-
4
-
5
-
6
-
7
-
8
-
9
-
10
-
11
-
12
-
13
-
14
-
15
-
16
-
17
-
18
-
19
-
20
-
21
-
22
-
23
-
24
-
25
-
26
-
27
-
28
-
29
-
30
-
 31
31 -
 32
32 -
 33
33 -
 34
34 -
 35
35 -
 36
36 -
 37
37 -
 38
38 -
 39
39 -
 40
40 -
 41
41 -
42
-
43
-
44
-
45
-
46
-
47
-
48
-
49
-
50
-
51
-
52
-
53
-
54
-
55
-
56
-
57
-
58
-
59
-
60
-
61
-
62
-
63
-
64
-
65
-
66
-
67
-
68
-
69
-
70
-
71
-
72
-
73
-
74
-
75
-
76
-
77
-
78
-
79
-
80
-
81
-
82
-
83
-
84
-
85
-
86
-
87
-
88
-
89
-
90
-
91
-
92
-
93
-
94
-
95
-
96
-
97
-
98
-
99
-
100
-
101
-
102
-
103
-
104
-
105
-
106
-
107
-
108
-
109
-
110
-
111
-
112
-
113
-
114
-
115
-
116
-
117
-
118
-
119
-
120
-
121
-
122
-
123
-
124
-
125
-
126
-
127
-
128
-
129
-
130
-
131
-
132
-
133
-
134
-
135
-
136
-
137
-
138
-
139
-
140
-
141
-
142
-
143
-
144
-
145
-
146
-
147
-
148
-
149
-
150
-
151
-
152
-
153
-
154
-
155
-
156
-
157
-
158
-
159
-
160
-
161
-
162
-
163
-
164
-
165
-
166
-
167
-
168
-
169
-
170
-
171
-
172
-
173
-
174
-
175
-
176
-
177
-
178
-
179
-
180
-
181
-
182
-
183
-
184
-
185
-
186
-
187
-
188
-
189
-
190
-
191
-
192
-
193
-
194
-
195
-
196
-
197
-
198
-
199
-
200
-
201
-
202
-
203
-
204
-
205
-
206
-
207
-
208
-
209
-
210
-
211
-
212
-
213
-
214
-
215
-
216
-
217
-
218
-
219
-
220
-
221
-
222
-
223
-
224
-
225
-
226
-
227
-
228
-
229
-
230
-
231
-
232
-
233
-
234
-
235
-
236
-
237
-
238
-
239
-
240
-
241
-
242
-
243
-
244
-
245
-
246
-
247
-
248
-
249
-
250
-
251
-
252
-
253
-
254
-
255
-
256
-
257
-
258
-
259
-
260
-
261
-
262
-
263
-
264
-
265
-
266
-
267
-
268
-
269
-
270
-
271
-
272
-
273
-
274
-
275
-
276
-
277
-
278
-
279
-
280
-
281
-
282
-
283
-
284
-
285
-
286
-
287
-
288
-
289
-
290
-
291
-
292
-
293
-
294
-
295
-
296
-
297
-
298
-
299
-
300
-
301
-
302
 |
 |
