Toshiba Qosmio G30 PQG32C-AV605E Users Manual Canada; English - Page 93
into place when it is locked., To remove CD/DVD/HD DVD's, follow the steps as listed below.
 |
View all Toshiba Qosmio G30 PQG32C-AV605E manuals
Add to My Manuals
Save this manual to your list of manuals |
Page 93 highlights
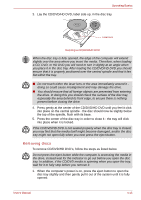
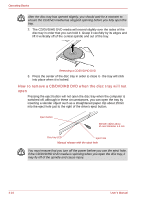
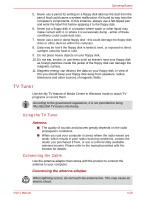
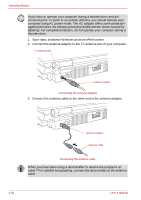
Operating Basics 3. Lay the CD/DVD/HD DVD, label side up, in the disc tray. Laser lens Inserting a CD/DVD/HD DVD When the disc tray is fully opened, the edge of the computer will extend slightly over the area where you insert the media. Therefore, when loading a CD, DVD, or HD DVD you will need to turn it slightly at an angle when you place it in the disc tray. After loading the CD/DVD/HD DVD you should ensure that it is properly positioned over the central spindle and that it lies flat within the tray. ■ Do not touch either the laser lens or the area immediately around it doing so could cause misalignment and may damage the drive. ■ You should ensure that all foreign objects are prevented from entering the drive. In doing this you should check the surface of the disc tray, especially the area behind its front edge, to ensure there is nothing present before closing the drive. 4. Press gently at the center of the CD/DVD/HD DVD until you feel it click into place on the central spindle - the disc should now lie slightly below the top of the spindle, flush with its base. 5. Press the center of the disc tray in order to close it - the tray will click into place when it is locked. If the CD/DVD/HD DVD is not seated properly when the disc tray is closed, you may find that the media itself might become damaged, and/or the disc tray might not open fully when you next press the eject button. Removing discs To remove CD/DVD/HD DVD's, follow the steps as listed below. Do not press the eject button while the computer is accessing the media in the drive, instead wait for the indicator to go out before you open the disc tray. In addition, if the CD/DVD media is spinning when you open the tray, wait for it to fully stop before you remove it. 1. When the computer's power is on, press the eject button to open the disc tray slightly and then gently pull it out of the system until it is fully opened. User's Manual 4-15
-
 1
1 -
2
-
3
-
4
-
5
-
6
-
7
-
8
-
9
-
10
-
11
-
12
-
13
-
14
-
15
-
16
-
17
-
18
-
19
-
20
-
21
-
22
-
23
-
24
-
25
-
26
-
27
-
28
-
29
-
30
-
31
-
32
-
33
-
34
-
35
-
36
-
37
-
38
-
39
-
40
-
41
-
42
-
43
-
44
-
45
-
46
-
47
-
48
-
49
-
50
-
51
-
52
-
53
-
54
-
55
-
56
-
57
-
58
-
59
-
60
-
61
-
62
-
63
-
64
-
65
-
66
-
67
-
68
-
69
-
70
-
71
-
72
-
73
-
74
-
75
-
76
-
77
-
78
-
79
-
80
-
81
-
82
-
83
-
84
-
85
-
86
-
87
-
 88
88 -
 89
89 -
 90
90 -
 91
91 -
 92
92 -
 93
93 -
 94
94 -
 95
95 -
 96
96 -
 97
97 -
 98
98 -
99
-
100
-
101
-
102
-
103
-
104
-
105
-
106
-
107
-
108
-
109
-
110
-
111
-
112
-
113
-
114
-
115
-
116
-
117
-
118
-
119
-
120
-
121
-
122
-
123
-
124
-
125
-
126
-
127
-
128
-
129
-
130
-
131
-
132
-
133
-
134
-
135
-
136
-
137
-
138
-
139
-
140
-
141
-
142
-
143
-
144
-
145
-
146
-
147
-
148
-
149
-
150
-
151
-
152
-
153
-
154
-
155
-
156
-
157
-
158
-
159
-
160
-
161
-
162
-
163
-
164
-
165
-
166
-
167
-
168
-
169
-
170
-
171
-
172
-
173
-
174
-
175
-
176
-
177
-
178
-
179
-
180
-
181
-
182
-
183
-
184
-
185
-
186
-
187
-
188
-
189
-
190
-
191
-
192
-
193
-
194
-
195
-
196
-
197
-
198
-
199
-
200
-
201
-
202
-
203
-
204
-
205
-
206
-
207
-
208
-
209
-
210
-
211
-
212
-
213
-
214
-
215
-
216
-
217
-
218
-
219
-
220
-
221
-
222
-
223
-
224
-
225
-
226
-
227
-
228
-
229
-
230
-
231
-
232
-
233
-
234
-
235
-
236
-
237
-
238
-
239
-
240
-
241
-
242
-
243
-
244
-
245
-
246
-
247
-
248
-
249
-
250
-
251
-
252
-
253
-
254
-
255
-
256
-
257
-
258
-
259
-
260
-
261
-
262
-
263
-
264
-
265
-
266
-
267
-
268
-
269
-
270
-
271
-
272
-
273
-
274
-
275
-
276
-
277
-
278
-
279
-
280
-
281
-
282
-
283
-
284
-
285
-
286
-
287
-
288
-
289
-
290
-
291
-
292
-
293
-
294
-
295
-
296
-
297
-
298
-
299
-
300
-
301
-
302
 |
 |
