Toshiba Qosmio G30 PQG32C-AV605E Users Manual Canada; English - Page 71
Turning on the power, Power
 |
View all Toshiba Qosmio G30 PQG32C-AV605E manuals
Add to My Manuals
Save this manual to your list of manuals |
Page 71 highlights
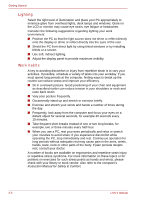
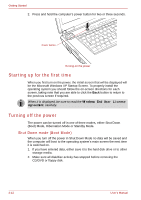
Getting Started ■ As the LCD display panel cannot be opened until 180 degrees, please be careful of the angle when flipping open the LCD display panel. ■ Be careful not to open the LCD display panel too far as this could put stress on the display panel's hinges and cause damage. ■ Do not press or push on the LCD display panel. ■ Do not lift the computer by the LCD display panel. ■ Do not close the LCD display panel with pens or any other objects left in between the LCD display panel and the keyboard. ■ When opening or closing the LCD display panel, place one hand on the palm rest to hold the computer in place and use the other hand to slowly open or close the LCD display panel (Do not use excessive force when opening or closing the LCD display panel). Turning on the power This section describes how to turn on the power - the Power indicator will then indicate the status. Please refer to the Power indicators section in Chapter 6, Power for more information. ■ After you turn on the power for the first time, do not turn it off until you have set up the operating system. Please refer to the section Starting up for the first time for more information. ■ If a USB floppy disk drive is connected, please make sure that it is empty - if a floppy disk is in the drive, press the eject button and remove it. ■ Volume cannot be adjusted during Windows Setup. 1. Open the computer's LCD display panel. User's Manual 3-11
-
 1
1 -
2
-
3
-
4
-
5
-
6
-
7
-
8
-
9
-
10
-
11
-
12
-
13
-
14
-
15
-
16
-
17
-
18
-
19
-
20
-
21
-
22
-
23
-
24
-
25
-
26
-
27
-
28
-
29
-
30
-
31
-
32
-
33
-
34
-
35
-
36
-
37
-
38
-
39
-
40
-
41
-
42
-
43
-
44
-
45
-
46
-
47
-
48
-
49
-
50
-
51
-
52
-
53
-
54
-
55
-
56
-
57
-
58
-
59
-
60
-
61
-
62
-
63
-
64
-
65
-
 66
66 -
 67
67 -
 68
68 -
 69
69 -
 70
70 -
 71
71 -
 72
72 -
 73
73 -
 74
74 -
 75
75 -
 76
76 -
77
-
78
-
79
-
80
-
81
-
82
-
83
-
84
-
85
-
86
-
87
-
88
-
89
-
90
-
91
-
92
-
93
-
94
-
95
-
96
-
97
-
98
-
99
-
100
-
101
-
102
-
103
-
104
-
105
-
106
-
107
-
108
-
109
-
110
-
111
-
112
-
113
-
114
-
115
-
116
-
117
-
118
-
119
-
120
-
121
-
122
-
123
-
124
-
125
-
126
-
127
-
128
-
129
-
130
-
131
-
132
-
133
-
134
-
135
-
136
-
137
-
138
-
139
-
140
-
141
-
142
-
143
-
144
-
145
-
146
-
147
-
148
-
149
-
150
-
151
-
152
-
153
-
154
-
155
-
156
-
157
-
158
-
159
-
160
-
161
-
162
-
163
-
164
-
165
-
166
-
167
-
168
-
169
-
170
-
171
-
172
-
173
-
174
-
175
-
176
-
177
-
178
-
179
-
180
-
181
-
182
-
183
-
184
-
185
-
186
-
187
-
188
-
189
-
190
-
191
-
192
-
193
-
194
-
195
-
196
-
197
-
198
-
199
-
200
-
201
-
202
-
203
-
204
-
205
-
206
-
207
-
208
-
209
-
210
-
211
-
212
-
213
-
214
-
215
-
216
-
217
-
218
-
219
-
220
-
221
-
222
-
223
-
224
-
225
-
226
-
227
-
228
-
229
-
230
-
231
-
232
-
233
-
234
-
235
-
236
-
237
-
238
-
239
-
240
-
241
-
242
-
243
-
244
-
245
-
246
-
247
-
248
-
249
-
250
-
251
-
252
-
253
-
254
-
255
-
256
-
257
-
258
-
259
-
260
-
261
-
262
-
263
-
264
-
265
-
266
-
267
-
268
-
269
-
270
-
271
-
272
-
273
-
274
-
275
-
276
-
277
-
278
-
279
-
280
-
281
-
282
-
283
-
284
-
285
-
286
-
287
-
288
-
289
-
290
-
291
-
292
-
293
-
294
-
295
-
296
-
297
-
298
-
299
-
300
-
301
-
302
 |
 |
