Xerox PE220 User Guide - Page 45
Changing the Clock Mode, Enter, Stop/Clear - out of range
 |
UPC - 095205221152
View all Xerox PE220 manuals
Add to My Manuals
Save this manual to your list of manuals |
Page 45 highlights
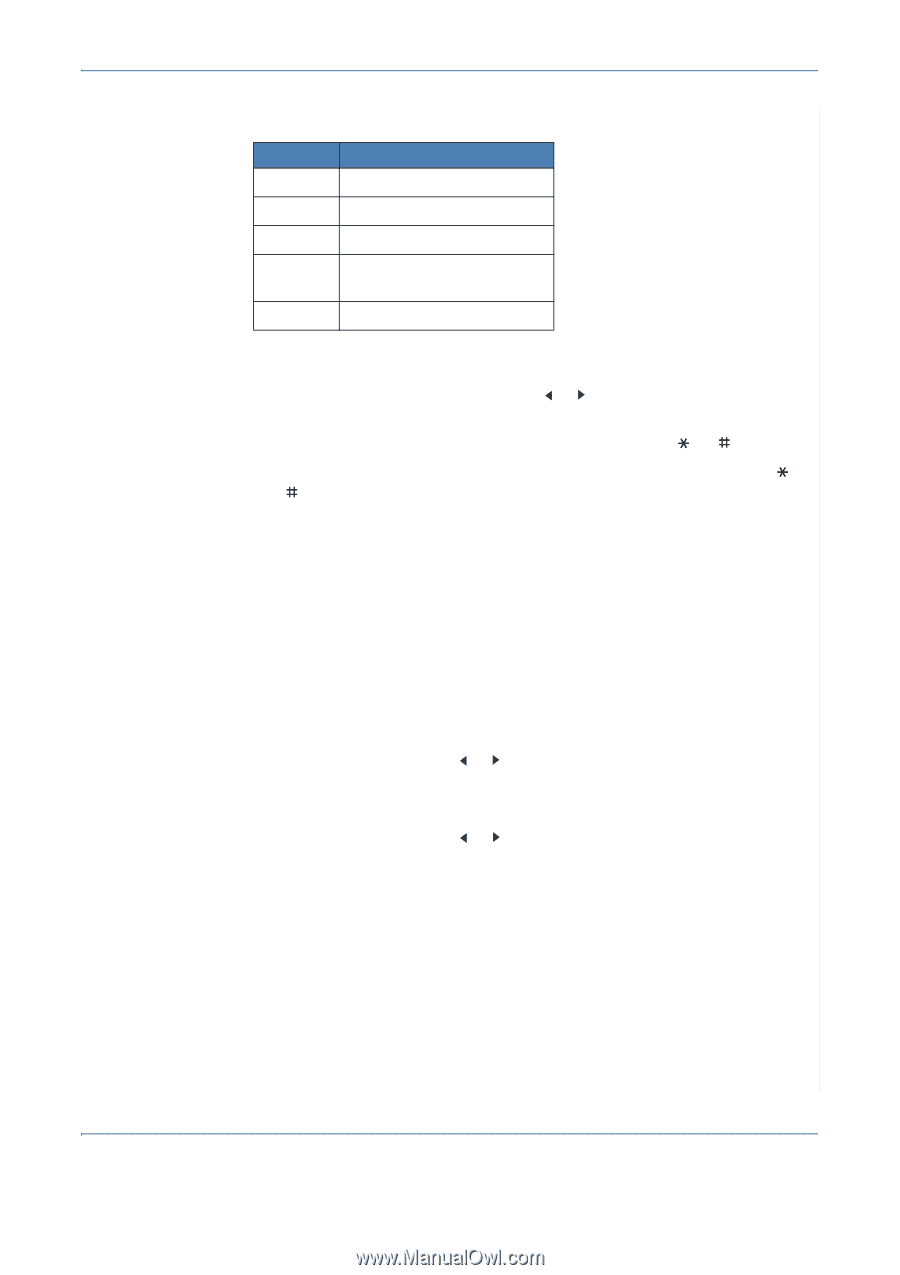
2 Getting Started 3. Enter the correct time and date using the number keypad. Unit Month Day Year Hour Minute Range 01 - 12 01 - 31 Required four digits 01 - 12 (12 hour mode) 00 - 23 (24 hour mode) 00 - 59 NOTE: The date format may differ from country to country. You can also use the scroll button ( or ) to move the cursor under the digit you want to correct and enter a new number. 4. To select "AM" or "PM" for 12-hour format, press the or button. 5. When the cursor is not under the AM or PM indicator, pressing the or button immediately moves the cursor to the indicator. 6. You can change the clock mode to 24-hour format (e.g. 01:00 PM as 13:00). For details, see Changing the Clock Mode on page 17. 7. Press Enter when the time and date on the display is correct. 8. To return to Standby mode, press Stop/Clear. Changing the Clock Mode You can set your machine to display the current time using either a 12-hour or 24-hour format. 1. Press Menu until "Machine Setup" appears on the top line of the display. 2. Press the scroll button ( or ) until you see "Clock Mode" on the bottom line and press Enter. 3. The clock mode currently set for the machine displays. 4. Press the scroll button ( or ) to select the other mode and then press Enter to save the selection. 5. To return to Standby mode, press Stop/Clear. Xerox PE220 2-17
-
 1
1 -
2
-
3
-
4
-
5
-
6
-
7
-
8
-
9
-
10
-
11
-
12
-
13
-
14
-
15
-
16
-
17
-
18
-
19
-
20
-
21
-
22
-
23
-
24
-
25
-
26
-
27
-
28
-
29
-
30
-
31
-
32
-
33
-
34
-
35
-
36
-
37
-
38
-
39
-
 40
40 -
 41
41 -
 42
42 -
 43
43 -
 44
44 -
 45
45 -
 46
46 -
 47
47 -
 48
48 -
 49
49 -
 50
50 -
51
-
52
-
53
-
54
-
55
-
56
-
57
-
58
-
59
-
60
-
61
-
62
-
63
-
64
-
65
-
66
-
67
-
68
-
69
-
70
-
71
-
72
-
73
-
74
-
75
-
76
-
77
-
78
-
79
-
80
-
81
-
82
-
83
-
84
-
85
-
86
-
87
-
88
-
89
-
90
-
91
-
92
-
93
-
94
-
95
-
96
-
97
-
98
-
99
-
100
-
101
-
102
-
103
-
104
-
105
-
106
-
107
-
108
-
109
-
110
-
111
-
112
-
113
-
114
-
115
-
116
-
117
-
118
-
119
-
120
-
121
-
122
-
123
-
124
-
125
-
126
-
127
-
128
-
129
-
130
-
131
-
132
-
133
-
134
-
135
-
136
-
137
-
138
-
139
-
140
-
141
-
142
-
143
-
144
-
145
-
146
-
147
-
148
-
149
-
150
-
151
-
152
-
153
-
154
-
155
-
156
-
157
-
158
-
159
-
160
-
161
-
162
-
163
-
164
-
165
-
166
-
167
-
168
-
169
-
170
-
171
-
172
-
173
-
174
-
175
-
176
-
177
-
178
-
179
-
180
-
181
-
182
-
183
-
184
-
185
-
186
-
187
-
188
-
189
-
190
-
191
-
192
-
193
-
194
-
195
-
196
-
197
-
198
-
199
-
200
 |
 |