Xerox PE220 User Guide - Page 46
Setting the Paper Size and Type, Setting Sounds, Speaker, Ringer, Key Sound, and Alarm Sound - no paper error
 |
UPC - 095205221152
View all Xerox PE220 manuals
Add to My Manuals
Save this manual to your list of manuals |
Page 46 highlights
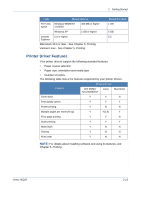
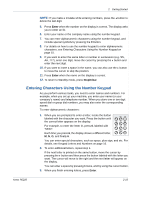
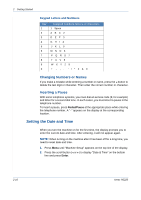
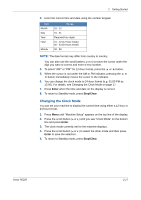
2 Getting Started Setting the Paper Size and Type After loading paper in the tray, you need to set the paper size and type using the control panel buttons. These settings will apply to copy and fax modes. For PC-printing, you need to select the paper size and type in the print driver you use on your PC. 1. Press Menu. The display shows "Paper Setting" on the top line of the display. 2. Press the scroll button ( or ) to display "Paper Size" on the bottom line and press Enter to access the menu item. 3. Use the scroll button ( or ) to find the paper size you are using and press Enter to save it. 4. Press the button to scroll to "Paper Type" and press Enter to access the menu item. 5. Use the scroll button ( or ) to find the paper type you are using and press Enter to save it. 6. To return to Standby mode, press Stop/Clear. Setting Sounds You can control the following sounds: • Speaker: You can turn on or off the sounds from the telephone line through the speaker, such as the dial tone or a fax tone. With this option set to "Comm." the speaker is on until the remote machine answers. • Ringer: You can adjust the ringer volume. • Key Sound: With this option set to "On" a key tone sounds each time a key is pressed. • Alarm Sound: You can turn the alarm sound on or off. With this option set to "On" an alarm tone sounds when an error occurs or fax communication ends. • You can adjust the volume level using the Manual Dial button. Speaker, Ringer, Key Sound, and Alarm Sound 1. Press Menu until "Sound/Volume" appears on the top line of the display. 2. Press the scroll button ( or ) to scroll through the options. Press Enter when you see the desired sound option. 3. Press the scroll button ( or ) to display the desired status or volume for the option you have selected. You will see the selection on the bottom line of the display. 2-18 Xerox PE220
-
 1
1 -
2
-
3
-
4
-
5
-
6
-
7
-
8
-
9
-
10
-
11
-
12
-
13
-
14
-
15
-
16
-
17
-
18
-
19
-
20
-
21
-
22
-
23
-
24
-
25
-
26
-
27
-
28
-
29
-
30
-
31
-
32
-
33
-
34
-
35
-
36
-
37
-
38
-
39
-
40
-
 41
41 -
 42
42 -
 43
43 -
 44
44 -
 45
45 -
 46
46 -
 47
47 -
 48
48 -
 49
49 -
 50
50 -
 51
51 -
52
-
53
-
54
-
55
-
56
-
57
-
58
-
59
-
60
-
61
-
62
-
63
-
64
-
65
-
66
-
67
-
68
-
69
-
70
-
71
-
72
-
73
-
74
-
75
-
76
-
77
-
78
-
79
-
80
-
81
-
82
-
83
-
84
-
85
-
86
-
87
-
88
-
89
-
90
-
91
-
92
-
93
-
94
-
95
-
96
-
97
-
98
-
99
-
100
-
101
-
102
-
103
-
104
-
105
-
106
-
107
-
108
-
109
-
110
-
111
-
112
-
113
-
114
-
115
-
116
-
117
-
118
-
119
-
120
-
121
-
122
-
123
-
124
-
125
-
126
-
127
-
128
-
129
-
130
-
131
-
132
-
133
-
134
-
135
-
136
-
137
-
138
-
139
-
140
-
141
-
142
-
143
-
144
-
145
-
146
-
147
-
148
-
149
-
150
-
151
-
152
-
153
-
154
-
155
-
156
-
157
-
158
-
159
-
160
-
161
-
162
-
163
-
164
-
165
-
166
-
167
-
168
-
169
-
170
-
171
-
172
-
173
-
174
-
175
-
176
-
177
-
178
-
179
-
180
-
181
-
182
-
183
-
184
-
185
-
186
-
187
-
188
-
189
-
190
-
191
-
192
-
193
-
194
-
195
-
196
-
197
-
198
-
199
-
200
 |
 |
