Xerox PE220 User Guide - Page 57
Making Copies on the Document Glass, face down, Stop/Clear, Start
 |
UPC - 095205221152
View all Xerox PE220 manuals
Add to My Manuals
Save this manual to your list of manuals |
Page 57 highlights
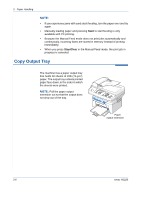
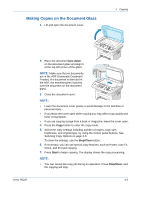
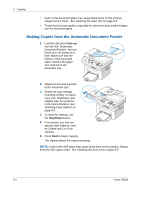
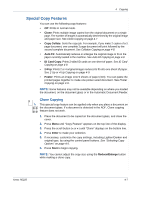
Making Copies on the Document Glass 1. Lift and open the document cover. 4 Copying Xerox PE220 2. Place the document face down on the document glass and align it at the top left corner of the glass. NOTE: Make sure that no documents are in the ADF (Automatic Document Feeder). If a document is detected in the ADF, the machine gives it priority over the document on the document glass. 3. Close the document cover. NOTE: • Lower the document cover gently to avoid damage to the machine or personal injury. • If you leave the cover open while copying you may affect copy quality and toner consumption. • If you are copying a page from a book or magazine, leave the cover open. 4. Press the Copy button to enter the copy mode. 5. Select the copy settings including number of copies, copy size, brightness, and original type, by using the control panel buttons. See Selecting Copy Options on page 4-5. To clear the settings, use the Stop/Clear button. 6. If necessary, you can use special copy features, such as Poster, Auto Fit, Clone, and ID Card copying. 7. Press Start to begin copying. The display shows the copy processing. NOTE: • You can cancel the copy job during an operation. Press Stop/Clear, and the copying will stop. 4-3
-
 1
1 -
2
-
3
-
4
-
5
-
6
-
7
-
8
-
9
-
10
-
11
-
12
-
13
-
14
-
15
-
16
-
17
-
18
-
19
-
20
-
21
-
22
-
23
-
24
-
25
-
26
-
27
-
28
-
29
-
30
-
31
-
32
-
33
-
34
-
35
-
36
-
37
-
38
-
39
-
40
-
41
-
42
-
43
-
44
-
45
-
46
-
47
-
48
-
49
-
50
-
51
-
 52
52 -
 53
53 -
 54
54 -
 55
55 -
 56
56 -
 57
57 -
 58
58 -
 59
59 -
 60
60 -
 61
61 -
 62
62 -
63
-
64
-
65
-
66
-
67
-
68
-
69
-
70
-
71
-
72
-
73
-
74
-
75
-
76
-
77
-
78
-
79
-
80
-
81
-
82
-
83
-
84
-
85
-
86
-
87
-
88
-
89
-
90
-
91
-
92
-
93
-
94
-
95
-
96
-
97
-
98
-
99
-
100
-
101
-
102
-
103
-
104
-
105
-
106
-
107
-
108
-
109
-
110
-
111
-
112
-
113
-
114
-
115
-
116
-
117
-
118
-
119
-
120
-
121
-
122
-
123
-
124
-
125
-
126
-
127
-
128
-
129
-
130
-
131
-
132
-
133
-
134
-
135
-
136
-
137
-
138
-
139
-
140
-
141
-
142
-
143
-
144
-
145
-
146
-
147
-
148
-
149
-
150
-
151
-
152
-
153
-
154
-
155
-
156
-
157
-
158
-
159
-
160
-
161
-
162
-
163
-
164
-
165
-
166
-
167
-
168
-
169
-
170
-
171
-
172
-
173
-
174
-
175
-
176
-
177
-
178
-
179
-
180
-
181
-
182
-
183
-
184
-
185
-
186
-
187
-
188
-
189
-
190
-
191
-
192
-
193
-
194
-
195
-
196
-
197
-
198
-
199
-
200
 |
 |
