Yamaha RX-A1010 Owners Manual
Yamaha RX-A1010 Manual
 |
View all Yamaha RX-A1010 manuals
Add to My Manuals
Save this manual to your list of manuals |
Yamaha RX-A1010 manual content summary:
- Yamaha RX-A1010 | Owners Manual - Page 1
AV Receiver Owner's Manual Be sure to read "Safety Brochure" (supplied booklet) before using this unit. English for Canada, Europe, Asia, Africa, Oceania and Latin America En 1 - Yamaha RX-A1010 | Owners Manual - Page 2
other devices 41 Connecting video/audio recording devices 41 Connecting a device with analog multi-channel output 41 Connecting a device compatible with SCENE link playback (remote connection 42 Connecting a device compatible with the trigger function 42 7 Connecting the power cable 43 - Yamaha RX-A1010 | Owners Manual - Page 3
output (MONITOR CHECK 121 Backing up/recovering the settings (RECOV./BACKUP 122 Restoring the default settings (INITIALIZE 122 Updating the firmware (FIRM UPDATE 122 Checking the firmware version (VERSION 122 Controlling external devices with the remote control 123 Setting remote control codes - Yamaha RX-A1010 | Owners Manual - Page 4
Troubleshooting 134 Power and system 134 Audio 135 Video 136 FM/AM radio 137 USB and network 137 Remote control 138 Error indications on the front display 139 Glossary 140 Audio information 140 Video information 142 Video signal flow 143 Information on HDMI 144 HDMI Control 144 HDMI - Yamaha RX-A1010 | Owners Manual - Page 5
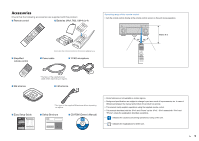
Within 6 m ■ AM antenna * The figure of the supplied power cable differs depending on regions. ■ FM antenna ■ Easy Setup Guide * The figure of the supplied FM antenna differs depending on regions. ■ Safety Brochure ■ CD-ROM (Owner's Manual) • Some features are not available in certain regions - Yamaha RX-A1010 | Owners Manual - Page 6
p.56 Enjoying compressed music with enhanced sound (Compressed Music Enhancer) p.59 USB device via Bluetooth BD/DVD player HDMI Control Audio/Video Operating external devices with the supplied remote control p.123 AV receiver (this unit) Remote control of this unit Selecting the input - Yamaha RX-A1010 | Owners Manual - Page 7
TV audio in surround sound with a single HDMI cable connection (Audio Return Channel: ARC) (p.29) When using a TV that supports ARC, you only need a single HDMI cable to connect the TV and this unit to output video to the TV, input audio from the TV, and transmit HDMI Control signals. HDMI Control - Yamaha RX-A1010 | Owners Manual - Page 8
- HDMI Control is enabled (p.144) - The standby through function is enabled (p.112) - The network standby function is enabled (p.113) - The iPod is being charged (p.94) - An iPod wireless system is connected (p.66) 3 Front display Displays information (p.10). 4 Remote control sensor Receives remote - Yamaha RX-A1010 | Owners Manual - Page 9
Selects the registered input source, sound program, HDMI output and various settings at once. Additionally, you can turn on this unit when it is in standby mode (p.53). G MULTI ZONE ZONE 2~3 Enables/disables the audio output to each zone (p.84). ZONE CONTROL Switches the zones (main, Zone2 or - Yamaha RX-A1010 | Owners Manual - Page 10
unit is receiving an FM/AM radio station signal. 3 ZONE indicators Light up when the audio output to Zone2 or Zone3 is enabled. 4 PARTY Lights up when this unit is in the party mode. 5 Information display Displays the current status (input name, sound mode name, etc). You can switch the information - Yamaha RX-A1010 | Owners Manual - Page 11
Yamaha products such as iPod dock (p.66), iPod wireless system (p.66), and Bluetooth receiver (p.70). 3 AV1~4 jacks For connecting video/audio playback devices to input video/ audio signals (p.35). 4 NETWORK jack For connecting to the network (p.40). 5 AV OUT jacks For outputting video/audio - Yamaha RX-A1010 | Owners Manual - Page 12
Remote control 1 2 3 4 5 SOURCE RECEIVER AV 1 2 3 5 6 7 AUDIO 1 2 3 PHONO MULTI USB DOCK TUNER [ A ] SCENE 1 2 3 4 V-AUX 4 NET with the remote control without switching the input source. 5 SCENE Selects the assigned input source, sound program, HDMI output and various - Yamaha RX-A1010 | Owners Manual - Page 13
set the time (120 min, 90 min, 60 min, 30 min, off). P LEVEL Adjusts the volume of each speaker (p.106). Q SETUP Switches the remote control to the setup mode (p.123) • To operate external devices with the remote control, register a remote control code for each device in advance (p.123). En 13 - Yamaha RX-A1010 | Owners Manual - Page 14
Apply bi-amp connections, channel expansion (using an external power amplifier) or multi-zone configurations to enhance the system. 2 Connecting a TV (p.29) Connect a TV to this unit. 3 Connecting playback devices (p.35) Connect video devices (BD/DVD players, etc.) and audio devices (CD players - Yamaha RX-A1010 | Owners Manual - Page 15
power amplifier) or multi-zone configurations to enhance your system (p.21). Caution • This unit is configured for 8-ohm speakers at the factory. When connecting and surround speakers to produce stereoscopic sound fields even when no presence speakers are connected (p.58). • Use "Ideal speaker - Yamaha RX-A1010 | Owners Manual - Page 16
1 Speaker connections 2 3 4 5 6 7 8 9 Basic speaker configuration ■ Placing speakers in your room highly-natural stereoscopic sound field with any contents. • The surround back speakers and rear presence speakers do not produce sounds simultaneously. This unit automatically switches the speakers to - Yamaha RX-A1010 | Owners Manual - Page 17
VPS) using the front, center and surround speakers to produce a stereoscopic sound field, and also allows you to enjoy extended surround sounds using the surround back speakers. Even when no surround speakers are connected, this unit creates the virtual surround speakers using the front speakers to - Yamaha RX-A1010 | Owners Manual - Page 18
This unit is configured for 8-ohm speakers at the factory. When connecting 6-ohm speakers, set the speaker impedance to "6 Ω MIN". In this case, you can also use 4-ohm speakers as the front speakers. 1 Before connecting speakers, connect the supplied power cable to this unit and then to an AC wall - Yamaha RX-A1010 | Owners Manual - Page 19
connected Room Speaker type Abbr. Speaker system (the number of channels) 9+2 9 7 5 2 Power Amp Assign Setup" menu after connecting the power cable to an AC wall outlet. • To use an external power amplifier (Hi-Fi amplifier, etc.) to enhance speaker output, see "Connecting an external power - Yamaha RX-A1010 | Owners Manual - Page 20
d - (black) Using a banana plug (Canada, China, Australia and General models only) a Tighten the speaker terminal. b Insert a banana plug into the end of the terminal. a+ FRONT Banana plug b ❑ Connecting the subwoofer Use an audio pin cable to connect the subwoofer. Audio pin cable PRE OUT - Yamaha RX-A1010 | Owners Manual - Page 21
to have more high-quality sounds Combining with an external power amplifier (Hi-Fi amplifier, etc.) to build an extended system Using the excess internal amplifiers for stereo speakers in another room Bi-amp connection (Example) Bi-amp connection Power-amp channel expansion (Example) Multi - Yamaha RX-A1010 | Owners Manual - Page 22
to the EXTRA SP1~2 jacks in "Power Amp Assign" (p.104) in the "Setup" menu. By default, Zone2 is assigned to the EXTRA SP1 jacks and Zone3 is assigned to the EXTRA SP2 jacks. The following explanation is based on the default zone assignments. Bi-amp Speaker Connect to FRONT and EXTRA SP1 (bi-amp - Yamaha RX-A1010 | Owners Manual - Page 23
8 9 ❑ 7ch +FRONT+1ZONE via external amp ❑ 5ch +FRONT+2ZONE via external amp Main zone Zone3 Speaker Zone3 speakers Connect to FRONT (PRE OUT) via external power amplifier CENTER SURROUND SURROUND BACK EXTRA SP1 (not used) SUBWOOFER 1~2 EXTRA SP2 Zone2 Main zone Zone3 Speaker Zone2 speakers - Yamaha RX-A1010 | Owners Manual - Page 24
used) (not used) SUBWOOFER 1~2 EXTRA SP1 Connect to Main zone Zone3 Speaker Zone3 speakers FRONT CENTER SURROUND SURROUND BACK EXTRA SP1 (not used) SUBWOOFER 1~2 EXTRA SP2 Connect to • When Zone3 output is enabled (p.84), the surround back speakers in the main zone do not output sound. En 24 - Yamaha RX-A1010 | Owners Manual - Page 25
7 8 9 ❑ 7ch +2ZONE Zone2 Main zone Zone3 Speaker Zone2 speakers Zone3 speakers FRONT CENTER SURROUND SURROUND BACK (not used) (not used) SUBWOOFER 1~2 EXTRA SP1 EXTRA SP2 Connect to • When Zone3 output is enabled (p.84), the surround back speakers in the main zone do not output sound. En 25 - Yamaha RX-A1010 | Owners Manual - Page 26
them to the FRONT jacks and EXTRA SP1 jacks. To enable the bi-amp function, configure the "Power Amp Assign" setting (p.104) in the "Setup" menu after connecting the power cable to an AC wall outlet. This unit (rear) R SURROUND L R SURROUND BACK L SPEAKERS ZONE 2/ZONE 3/R.PRESENCE R EXTRA - Yamaha RX-A1010 | Owners Manual - Page 27
, connect it to the SINGLE jack (L side). 4 CENTER jack Outputs center channel sounds. About external power amplifiers We recommend using power amplifiers that meet the following conditions. - With unbalanced inputs - With volume control bypass (or without volume control circuit) - Output power - Yamaha RX-A1010 | Owners Manual - Page 28
m long to prevent signal quality degradation. • To connect a device that has a DVI jack, an HDMI/DVI-D cable is required. • The HDMI jacks of this unit support the HDMI Control, Audio Return Channel (ARC), and 3D video transmission (through output) features. ■ Video jacks ❑ COMPONENT VIDEO jacks - Yamaha RX-A1010 | Owners Manual - Page 29
video input jacks available on your TV. Refer to the instruction manual of the TV and choose a connection method. Does your TV support Yes Audio Return Channel (ARC)? ■ Connection method 1 (p.29) No Does your TV support HDMI Control? Yes ■ Connection method 2 (p.31) No Does your TV have an - Yamaha RX-A1010 | Owners Manual - Page 30
7 8 9 ❑ Necessary settings To use HDMI Control and ARC, you need to configure the following settings. For details on settings and operations of your TV, refer to the instruction manual of the TV. 1 After connecting external devices (TV, playback devices, etc.) and power cable of this unit, turn on - Yamaha RX-A1010 | Owners Manual - Page 31
(OPTICAL or AUDIO) Audio output jacks (digital optical or analog stereo) ❑ Necessary settings To use HDMI Control, you need to configure the following settings. For details on settings and operations of your TV, refer to the instruction manual of the TV. 1 After connecting external devices - Yamaha RX-A1010 | Owners Manual - Page 32
automatically switched to "AUDIO1" and the TV audio will be played back on this unit. • If HDMI Control does not work properly, try turning off and on (or unplugging and re-plugging) the devices. It may solve the problem. • "AUDIO1" is set as TV audio input at the factory. If you have connected any - Yamaha RX-A1010 | Owners Manual - Page 33
or AUDIO) jacks Audio output (digital optical or analog stereo) S VIDEO connection (with an S-video cable) MONITOR OUT (S VIDEO) jack MONITOR OUT/ ZONE OUT This unit (rear) S DOCK NETWORK HDMI OUT 1 ARC 2 AV 1 (1 BD/DVD AV 1 (1 BD/DVD) AV 2 PHONO GND L R AV 3 AV 4 AV OUT MONITOR - Yamaha RX-A1010 | Owners Manual - Page 34
has 2 HDMI output jacks. If you connect another TV or a projector to this unit with an HDMI cable, you can switch the TVs (or projector) to be used for watching videos with the remote control (p.52). This unit (rear) HDMI OUT 2 jack HDMI OUT 1 2 ARC HDMI DOCK NETWORK HDMI OUT 1 ARC 2 AV - Yamaha RX-A1010 | Owners Manual - Page 35
device has an HDMI output jack. • Videos input to this unit via HDMI cannot be output to a TV connected to this unit with a cable other than HDMI. • The following explanation is based on the assumption that you have not changed the "Input Assignment" setting (p.115) in the "Setup" menu. As necessary - Yamaha RX-A1010 | Owners Manual - Page 36
Digital optical Analog stereo Input jacks on this unit AV1~2 (COMPONENT VIDEO + COAXIAL) AV3~4 (COMPONENT VIDEO + OPTICAL) AV1~4 (COMPONENT VIDEO + AUDIO) AV1~4 (COMPONENT VIDEO) jacks This unit (rear) Y PB PR DOCK NETWORK HDMI OUT 1 ARC 2 AV 1 (1 BD/DVD) AV 2 H AV 3 AV 1 (1 BD/DVD - Yamaha RX-A1010 | Owners Manual - Page 37
a turntable to this unit. Depending on the audio output jacks available on your audio device, choose one of the following connections. • The following explanation is based on the assumption that you have not changed the "Input Assignment" setting (p.115) in the "Setup" menu. As necessary, you can - Yamaha RX-A1010 | Owners Manual - Page 38
1 2 3 Playback device connections 4 5 6 7 8 9 PHONO jacks This unit (rear) PHONO GND L DOCK NETWORK AV 1 (1 BD/DVD) R AV 2 AV 3 AV 4 AV OUT PHONO GND L 1 HDMI OUT ARC 2 AV 1 (1 MONITOR OUT/ ZONE OUT Y PB R AV 1 A AV 2 B AUDIO 1 AUDIO 2 AUDIO 3 AUDIO 4 L (2 TV) (3 CD) R - Yamaha RX-A1010 | Owners Manual - Page 39
Connect the supplied FM/AM antennas to this unit. AM antenna FM antenna DOCK NETWORK HDMI OUT 1 ARC 2 AV 1 (1 BD/DVD) AV 2 AV 3 HDMI AV 4 AV 5 AV 6 AV 7 AV 1 (1 BD/DVD) AV 2 PHONO GND L AV 3 AV 4 AV OUT MONITOR OUT/ ZONE OUT Y AV 1 A AV 2 B AUDIO 1 AUDIO 2 AUDIO 3 AUDIO - Yamaha RX-A1010 | Owners Manual - Page 40
• To use the service via the Internet, broadband connection is strongly recommended. Router Network cable DOCK NETWORK HDMI OUT 1 ARC 2 AV 1 AV (1 BD/DVD) AV 1 (1 BD/DVD) AV 2 PHONO GND L AV 3 AV 4 AV OUT MONITOR OUT/ ZONE OUT Y AV 1 A AV 2 B AUDIO 1 AUDIO 2 AUDIO 3 AUDIO 4 (2 TV - Yamaha RX-A1010 | Owners Manual - Page 41
/audio recording device OPTICAL O Connecting a device with analog multi-channel output You can connect an analog multi-channel output device such as a DVD player and an SACD player to the MULTI CH INPUT jacks. This unit (rear) DOCK NETWORK HDMI OUT 1 ARC 2 AV 1 (1 BD/DVD) AV 2 AV 3 AV - Yamaha RX-A1010 | Owners Manual - Page 42
the capability of the SCENE control signal transmission, you can control the Yamaha product in conjunction with a scene selection (p.53) by connecting it to one of the REMOTE (OUT) jacks with a monaural mini-jack cable. This unit (rear) AV 3 HDMI AV 4 AV 5 AV 6 AV 7 C PR MONITOR OUT/ZONE OUT - Yamaha RX-A1010 | Owners Manual - Page 43
R EXTRA SP1 L AC IN SPEAKER IMPEDANCE After all the connections are complete, connect the supplied power cable to this unit and then to an AC wall outlet. This unit (rear) AV 5 AV 6 AV 7 RS-232C OR OUT/ZONE OUT PB PR REMOTE 1 2 IN OUT IN OUT PRE OUT (SINGLE) (FRONT) 1 TRIGGER - Yamaha RX-A1010 | Owners Manual - Page 44
4 5 6 7 8 Language setting 9 SOURCE RECEIVER RECEIVER AV 1 2 3 5 6 7 AUDIO 1 2 3 PHONO MULTI DOCK TUNER USB [A] . 2 Turn on the TV and switch the TV input to display the video from this unit. 3 Press ON SCREEN. 4 Use the cursor keys to select "Setup" and press ENTER. 5 Use the - Yamaha RX-A1010 | Owners Manual - Page 45
connect headphones. • If your subwoofer supports the auto-standby function, disable it. 1 Press RECEIVER to turn on this unit. 2 Turn on the TV and switch the to your speaker configuration, configure the "Power Amp Assign" setting (p.104) in the "Setup" menu. For the basic speaker configuration - Yamaha RX-A1010 | Owners Manual - Page 46
4 5 6 7 8 9 Automatic speaker setup SOURCE RECEIVER The following screen appears on the TV. AV 1 2 3 5 6 7 AUDIO 1 2 3 PHONO MULTI DOCK TUNER USB this if your listening position is variable or you will enjoy surround sound with your company. You can perform the measurement at up to - Yamaha RX-A1010 | Owners Manual - Page 47
3 4 5 6 7 8 9 Automatic speaker setup SOURCE RECEIVER AV 1 2 3 5 6 7 AUDIO 1 2 3 PHONO MULTI DOCK TUNER USB [A] SCENE place where it will be subjected to direct sunlight or high temperatures (top of an AV equipment, etc). • If any error message (such as E-1) or warning message ( - Yamaha RX-A1010 | Owners Manual - Page 48
1 2 3 4 5 6 7 8 9 Automatic speaker setup SOURCE RECEIVER AV 1 2 3 5 6 7 AUDIO 1 2 3 PHONO MULTI DOCK TUNER USB [A] SCENE 1 2 3 4 V-AUX 4 NET [B] 4 PROGRAM MUTE VOLUME TOP MENU ON SCREEN POP-UP/MENU OPTION ENTER RETURN DISPLAY Cursor keys ENTER - Yamaha RX-A1010 | Owners Manual - Page 49
5 6 7 8 9 Automatic speaker setup SOURCE RECEIVER AV 1 2 3 5 6 7 AUDIO 1 2 3 PHONO MULTI DOCK TUNER is connected with the correct polarity (+/-). Reverse: The speaker cable may be connected with each speaker Output level adjustment for each speaker • A speaker with any problem is - Yamaha RX-A1010 | Owners Manual - Page 50
follow the on-screen instructions to start the measurement again. Connect the YPAO microphone to the YPAO MIC jack firmly and follow the on-screen instructions to start the measurement again. If this error occurs repeatedly, contact the nearest authorized Yamaha dealer or service center. Follow the - Yamaha RX-A1010 | Owners Manual - Page 51
results by following on-screen instructions. However, we recommend you perform YPAO again to use this unit with the optimal speaker settings. Warning message W-1: Out of Phase W-2: Over Distance W-3: Level Error Cause Any of the speaker cables may be connected with the reversed polarity (+/-). Any - Yamaha RX-A1010 | Owners Manual - Page 52
TVs connected to this unit support. (For example, if you have connected a 1080p TV to the HDMI OUT 1 jack, and a 720p TV to the HDMI OUT 2 jack, this unit outputs 720p video signals.) • To mute the audio output, press MUTE. Press MUTE again to unmute. • To adjust treble/bass parts of sound, use - Yamaha RX-A1010 | Owners Manual - Page 53
RECEIVER AV 1 2 3 5 6 7 AUDIO assigned input source, sound program, HDMI output and various settings at once. You can use up to 12 scenes to register your favorite settings and switch can select SCENE1~4 by pressing SCENE on the remote control. Additionally, you can create 8 scenes (SCENE5~12 - Yamaha RX-A1010 | Owners Manual - Page 54
not registered the remote control code of the playback device yet, see "Setting the remote control codes for playback devices" (p.124) to register it. • You can start playback of external devices connected to this unit via HDMI or a Yamaha product connected to the REMOTE OUT jack, in conjunction - Yamaha RX-A1010 | Owners Manual - Page 55
to each input source. • You can check which speakers are currently outputting sound with the speaker indicators on the front panel (p.10) or the "Audio Signal" screen in the "Information" menu (p.118). • You can also select a sound program or the surround decoder by pressing PROGRAM. En 55 - Yamaha RX-A1010 | Owners Manual - Page 56
powerful space expanded widely to the left and right. The reproduced depth is also restrained relatively to ensure the separation between audio channels and the clarity of the sound the surround sound field that reproduces the space of a big live hall. Recital/Opera This program controls the amount - Yamaha RX-A1010 | Owners Manual - Page 57
realistic, live sound field features powerful sound as if the listener is in a row in front of a small stage. This program creates the sound field of to 2 channels and output from the front speakers (this program does not utilizes CINEMA DSP). Use this program to output sound from all speakers. - Yamaha RX-A1010 | Owners Manual - Page 58
RECEIVER AV 1 2 3 5 6 7 AUDIO HDMI OUT INFO MEMORY FM AM 1 2 3 TUN./ CH 4 5 6 7 8 9 SLEEP 10 0 ENT LEVEL ZONE SETUP SUR.DECODE ■ Enjoying stereoscopic sound sound fields even when no front presence speakers are connected. ■ Enjoying sound surround decoder switches. DOCK - Yamaha RX-A1010 | Owners Manual - Page 59
streaming audio • You can also use "Enhancer" (p.92) in the "Option" menu to enable/disable Compressed Music Enhancer. Enjoying surround sound with headphones (SILENT CINEMA) You can enjoy surround or sound field effects like a multi-channel speaker system with stereo headphones by connecting the - Yamaha RX-A1010 | Owners Manual - Page 60
RECEIVER AV 1 2 3 5 6 7 AUDIO HDMI OUT INFO MEMORY FM AM 1 2 3 TUN./ CH 4 5 6 7 8 9 SLEEP 10 0 ENT LEVEL ZONE SETUP ) At the factory, the frequency received from a radio station. "STEREO" also lights up when a stereo signal is received of receivable range • You can switch - Yamaha RX-A1010 | Owners Manual - Page 61
SOURCE RECEIVER AV 1 2 3 5 6 7 AUDIO 1 2 3 radio station manually and register it to a preset number. 1 Follow "Selecting a frequency for reception" (p.60) to tune PARTY HDMI OUT INFO MEMORY FM AM 1 2 3 TUN./ CH 4 5 6 7 8 9 SLEEP 10 0 ENT LEVEL ZONE SETUP MEMORY - Yamaha RX-A1010 | Owners Manual - Page 62
SOURCE RECEIVER AV 1 2 3 5 6 7 AUDIO 1 2 3 PHONO 2 Press INFO. Each time you press the key, the item switches. DOCK TAG Info HD STEREO TUNED PRE AMP PARTY ZONE ZONE ZONE Current time DSP Program Sound mode name Audio Decoder Decoder name • "Program Service", "Program Type", " - Yamaha RX-A1010 | Owners Manual - Page 63
System information ("Program Service", "Program Type," "Radio Text" and "Clock Time") is also displayed. 2 Band icon (Except for U.K. and Europe models) Select this icon and press ENTER to switch between FM and AM. 3 TUNED/STEREO indicators "TUNED" lights up when a signal is received from a radio - Yamaha RX-A1010 | Owners Manual - Page 64
SOURCE RECEIVER ■ Browse screen AV 1 2 3 5 6 7 AUDIO 1 2 3 PHONO MULTI DOCK TUNER USB [A] SCENE 1 2 3 4 V-AUX 4 NET [B] 4 PROGRAM MUTE VOLUME TOP MENU ON SCREEN POP-UP/MENU OPTION ENTER RETURN DISPLAY MODE PRESET INPUT - Yamaha RX-A1010 | Owners Manual - Page 65
differences depending on the way of connection USB cable supplied with iPod Audio output ✓ Video output ✓* Operation with remote control of ✓ the unit Operation with iPod ✓ Operation on TV screen ✓ Charging ✓ Charging during standby mode - Supported iPod (as of April 2011) iPod - Yamaha RX-A1010 | Owners Manual - Page 66
AV 1 (1 BD/DVD) AV 2 AV 3 AV 4 AV OUT PHONO GND 1 ARC MONITOR OUT/ ZONE OUT AUDIO 1 AUDIO 2 L (2 TV) (3 CD) R 1 COAXIAL 2 COAXIAL 3 OPTICAL 4 OPTICAL 5 OPTICAL 6 COAXIAL 123 AB ANTENNA (4 RADIO) AM FM 75Ω iPod wireless system (receiver) This unit (rear) 2 Connect the power - Yamaha RX-A1010 | Owners Manual - Page 67
SOURCE RECEIVER AV 1 2 3 5 6 7 AUDIO 1 2 3 PHONO MULTI DOCK TUNER USB [A] SCENE 1 2 3 4 V-AUX 4 NET [B] 4 PROGRAM MUTE VOLUME TOP MENU ON SCREEN POP-UP/MENU OPTION ENTER RETURN DISPLAY MODE Playback of iPod contents When using a USB cable or an iPod dock, you can control - Yamaha RX-A1010 | Owners Manual - Page 68
SOURCE RECEIVER ■ Playback screen AV 1 2 3 5 6 7 AUDIO 1 2 3 PHONO MULTI DOCK TUNER USB [A] SCENE 1 2 3 4 operation keys to redisplay it. ■ Operating the iPod itself or remote control (simple play) 1 Press MODE to switch to the simple play mode. The TV menu screen turns off - Yamaha RX-A1010 | Owners Manual - Page 69
SOURCE RECEIVER AV 1 2 3 5 6 7 AUDIO 1 2 3 PHONO MULTI DOCK TUNER USB [A] SCENE 1 2 3 4 V-AUX 4 NET [B] 4 PROGRAM MUTE VOLUME TOP MENU ON SCREEN POP-UP/MENU OPTION ENTER RETURN DISPLAY MODE OPTION Cursor - Yamaha RX-A1010 | Owners Manual - Page 70
using a Yamaha Bluetooth wireless audio receiver (such as YBA-10, optional). Refer to the instruction manuals of the Bluetooth receiver and your Bluetooth component in addition. This unit supports A2DP (Advanced Audio Distribution Profile) of the Bluetooth profile. • When connecting your Bluetooth - Yamaha RX-A1010 | Owners Manual - Page 71
SOURCE RECEIVER AV 1 2 3 5 6 7 AUDIO 1 2 3 PHONO MULTI DOCK connection between your Bluetooth component and the Bluetooth receiver. When the connection is established, this unit outputs sounds played back on the Bluetooth component. • Depending on Bluetooth components, "BT connected - Yamaha RX-A1010 | Owners Manual - Page 72
RECEIVER AV 1 2 3 5 6 7 AUDIO instruction manuals of the USB storage device in addition. This unit supports USB mass storage class devices (FAT16 or FAT32 format, except USB HDDs). • This unit supports IN OUT 1 OUT 2 2 3 4 SLEEP HD 3 USB Connected MUTE VOLUME ADAPTIVE DRC PL L C R PR SL SW1 - Yamaha RX-A1010 | Owners Manual - Page 73
SOURCE RECEIVER AV 1 2 3 5 6 7 AUDIO 1 2 3 PHONO MULTI DOCK TUNER USB [A] SCENE 1 2 3 4 V-AUX 4 NET [B] 4 ■ Browse screen 1 2 3 4 5 PROGRAM MUTE redisplay it. • You can also use the external device operation keys ( , , , ) on the remote control to control playback. En 73 - Yamaha RX-A1010 | Owners Manual - Page 74
SOURCE RECEIVER AV 1 2 3 5 6 7 AUDIO 1 2 3 PHONO MULTI DOCK TUNER USB [A] SCENE 1 2 3 4 V-AUX 4 NET [B] 4 PROGRAM MUTE VOLUME TOP MENU ON SCREEN POP-UP/MENU OPTION ENTER RETURN DISPLAY OPTION Cursor keys - Yamaha RX-A1010 | Owners Manual - Page 75
RECEIVER AV 1 2 3 5 6 7 AUDIO connected to the network properly (p.40). You can check whether the network parameters (IP address, etc.) are properly assigned to this unit in "Network" (p.119) in the "Information". • This unit supports installed Refer to the instruction manual of the device or - Yamaha RX-A1010 | Owners Manual - Page 76
SOURCE RECEIVER AV 1 2 3 5 6 7 AUDIO 1 2 3 PHONO MULTI DOCK TUNER • To return to the previous screen, press RETURN. • Files not supported by this unit are not listed (or cannot be selected even if remote control to control playback. • You can also use a DLNA-compatible Digital Media - Yamaha RX-A1010 | Owners Manual - Page 77
SOURCE RECEIVER AV 1 2 3 5 6 7 AUDIO 1 2 3 PHONO MULTI DOCK TUNER USB [A] SCENE 1 2 3 4 V-AUX 4 NET [B] 4 PROGRAM MUTE VOLUME TOP MENU ON SCREEN POP-UP/MENU OPTION ENTER RETURN DISPLAY OPTION Cursor keys - Yamaha RX-A1010 | Owners Manual - Page 78
SOURCE RECEIVER AV 1 2 3 5 6 7 AUDIO 1 2 3 PHONO MULTI DOCK TUNER USB [A] SCENE 1 2 3 4 connected to the Internet (p.40). You can check whether the network parameters (IP address, etc.) are properly assigned to this unit in "Network" (p.119) in the "Information". • This service - Yamaha RX-A1010 | Owners Manual - Page 79
SOURCE RECEIVER AV 1 2 3 5 6 7 AUDIO 1 2 3 PHONO MULTI DOCK TUNER USB [A] SCENE 1 2 3 4 V-AUX 4 NET [B] 4 PROGRAM MUTE VOLUME TOP MENU ON SCREEN keys to redisplay it. • You can also use the external device operation keys ( , ) on the remote control to control playback. En 79 - Yamaha RX-A1010 | Owners Manual - Page 80
room (main zone) Study room (Zone3) • Only analog audio signals (including radio, USB and network sources) can be output to Zone2 or Zone3. To listen to playback sounds of an external device in Zone2 or Zone3, you need to connect the device to the AUDIO jacks of this unit with a stereo pin cable - Yamaha RX-A1010 | Owners Manual - Page 81
■ Using an external amplifier Connect the external amplifier placed in Zone2 or Zone3 to this unit with a stereo pin cable. This unit (rear) AV 1 (1 BD/DVD) AV 2 AV 3 COMPONENT VIDEO PB PR Y AV 3 PB C PR HDMI ZONE OUT AV 4 AV5 (ZONE 2 or ZONE 3) jacks ZONE OUT MONITOR OUT/ZONE OUT Y - Yamaha RX-A1010 | Owners Manual - Page 82
to connect the video monitor to this unit in the same way as the video device. ZONE OUT jacks (any of COMPONENT VIDEO, VIDEO, S VIDEO) MONITOR OUT/ZONE OUT Y PB PR PR HDMI OUT 1 ARC 2 AV 1 (1 BD/DVD) AV 2 AV 3 HDMI AV 4 PB AV 5 Y MONITOR OUT/ ZONE OUT Y AV 1 A AV 2 B AUDIO 1 AUDIO - Yamaha RX-A1010 | Owners Manual - Page 83
FRONT L NGLE SPEAKER IMPEDANCE ❑ Remote connections between Yamaha products If you are using Yamaha products that support remote connections like this unit, an infrared signal transmitter is unnecessary. You can transmit remote control signals by connecting the REMOTE IN/OUT jacks with monaural - Yamaha RX-A1010 | Owners Manual - Page 84
you press the key, the zone to be operated switches. Selected zone (turns off when main zone is selected) RECEIVER 2 Press RECEIVER . Each time you press the key, audio output to the selected zone is enabled or disabled. When audio output to any of zones is enabled, the corresponding zone indicator - Yamaha RX-A1010 | Owners Manual - Page 85
HDMI OUT INFO MEMORY FM AM 1 PRESET 4 IN7PUT MU1T0E CLAS2SICAL MO5VIE TV 8 TV VOL 0 CLL3IVUEB STE6REO 9 TV CH ENT ENTERTAIN TUN./ CH STRAIGHT SDPLIRUEERECETP LEVEL ZONE SETUP PARTY SLEEP ■ Other operations for Zone2 or Zone3 The following functions are also available when audio output - Yamaha RX-A1010 | Owners Manual - Page 86
SOURCE RECEIVER AV 1 2 3 5 6 7 AUDIO 1 2 3 PHONO HDMI OUT INFO MEMORY FM AM 1 2 3 TUN./ CH 4 5 6 7 8 9 SLEEP 10 0 ENT LEVEL ZONE SETUP off or not connected to the network. - The registered network content is temporarily unavailable or out of service. - The registered - Yamaha RX-A1010 | Owners Manual - Page 87
settings screen. 4 PARTY MODE Turns on/off the party mode (p.85). 5 SYSTEM POWER Turns on/off the power for all zones. 6 MAIN VOLUME Adjusts the volume or mutes the audio output for the main zone. You can also switch the step for the volume adjustment. 7 RELOAD Reloads the current status of this - Yamaha RX-A1010 | Owners Manual - Page 88
source or controls playback for the selected zone. 2 TOP MENU Moves to the top menu screen. 3 SCENE Select a scene for the selected zone. 4 POWER Turns on/off the power for the selected zone. 5 VOLUME Adjusts the volume or mutes the audio output for the selected zone. You can also switch the step - Yamaha RX-A1010 | Owners Manual - Page 89
receiver, or during simple play: DSP Program (sound mode name), Audio Decoder (decoder name) PC USB NET RADIO Song (song title), Artist (artist name), Album (album name), DSP Program (sound mode name), Audio Decoder (decoder name) * When iPod is connected via USB, the display item switches - Yamaha RX-A1010 | Owners Manual - Page 90
77). - Configures the repeat setting for the iPod (p.69), USB storage device (p.74) or PC (p.77). - Establishes/terminates a wireless connection between your Bluetooth component and the Bluetooth receiver. 71 Performs pairing of your Bluetooth component and the Bluetooth receiver. 70 En 90 - Yamaha RX-A1010 | Owners Manual - Page 91
■ Tone Control (Tone Control) Adjusts the high-frequency range (Treble) and low-frequency range (Bass) of speaker sounds. When connecting headphones, you can adjust high-frequency range and lowfrequency range of sounds output from headphones. Choices Treble (Treble), Bass (Bass) Setting range -6.0db - Yamaha RX-A1010 | Owners Manual - Page 92
source. Settings Auto (Auto) (default) Automatically selects the audio input jack in the following priority order. 1. HDMI input 2. Digital input (COAXIAL or OPTICAL) 3. Analog input (AUDIO) HDMI (HDMI) Always selects HDMI input. No sounds are produced when no signals are input through the - Yamaha RX-A1010 | Owners Manual - Page 93
Input menu items The input source of this unit also changes. • You can still switch the input source by using cursor keys ( / ) after step 3. • Available 94 Selects whether to control this unit in conjunction with iPod operations. 94 Selects a video to be output with the audio input source. 95 - Yamaha RX-A1010 | Owners Manual - Page 94
wireless system. Input sources DOCK (iPod) • This function is available only when an iPod wireless system is connected to this unit. ❑ Power & Input Selects whether to control the power and input source selection of this unit in conjunction with iPod operations. Settings On (default) Enables - Yamaha RX-A1010 | Owners Manual - Page 95
output with the audio input source. Input sources TUNER, (network sources), USB, MULTI CH Settings Off (default) AV1~7, V-AUX Does not output videos. Outputs videos input through the corresponding video input jacks. ■ DMC Control • You can still switch the scene by using cursor keys ( / ) - Yamaha RX-A1010 | Owners Manual - Page 96
Save Load Rename/Icon Select Reset Function Page Registers the settings assignments, or view the settings currently assigned to the selected scene. ❑ Device Control Enables to start playback of external devices connected to this unit via HDMI or a Yamaha product connected to one of the REMOTE - Yamaha RX-A1010 | Owners Manual - Page 97
exclude "Volume" from the assignments for SCENE2 (TV) and include "Volume" in the assignments for SCENE4 (RADIO). ■ HDMI Output Mode Sound Surround Video Volume Lipsync Speaker Setup Input (p.52), Audio Select (p.92) HDMI Output (p.52) Sound Program (p.55), Pure Direct Mode (p.108) Tone Control - Yamaha RX-A1010 | Owners Manual - Page 98
operations, press RETURN. • To restore the default settings for the selected sound program, select "Reset". 5 Use the cursor keys to select a setting and press ENTER. 6 To exit from the menu, press ON SCREEN. • You can still switch the sound program by using cursor keys ( / ) after step 3. En 98 - Yamaha RX-A1010 | Owners Manual - Page 99
the direct sound and surround sound field generation. Adjusts the delay between the direct sound and surround back sound field generation. Level Selects whether to automatically bypass the DSP and tone control circuits when an analog audio source is played back. Auto (default), Off Select " - Yamaha RX-A1010 | Owners Manual - Page 100
Off (default), On Select "On" to wrap front right/left channel sounds around the field and generate a spacious sound field in combination with the surround sound field. Adjusts the broadening effect of the center sound field. 0 ~ 7 (default: 3) Higher to enhance the broadening effect and lower to - Yamaha RX-A1010 | Owners Manual - Page 101
menu) You can configure the various functions of this unit using the TV screen. 1 Press ON SCREEN. 2 Use the cursor keys to select "Setup" and press ENTER. 5 Use the cursor keys to select a setting and press ENTER. 6 To exit from the menu, press ON SCREEN. 3 Use the cursor keys ( / ) - Yamaha RX-A1010 | Owners Manual - Page 102
Test Tone Lipsync Dynamic Range Max Volume Initial Volume Pure Direct Mode Adaptive DSP Level Analog to Analog Conversion Processing HDMI Control Audio Output Standby Through Function Optimizes the speaker settings automatically (YPAO). Registers two speaker setting patterns and switches - Yamaha RX-A1010 | Owners Manual - Page 103
Volume Mono Monitor Out Assign Party Mode Set Zone Scene Rename Zone Rename Auto Power Down Input Assignment Display Set Dimmer Front the output level of the electronic signal transmitted with each input switching. Switches the output level for electronic signal transmission manually. - Yamaha RX-A1010 | Owners Manual - Page 104
Setup) Configures the speaker settings manually. ■ Setting Pattern Registers two speaker setting patterns and switches between them. When you configure the following speaker settings, the settings will be memorized in the selected pattern. - Measurement results (Auto Setup) - Power Amp Assign - Yamaha RX-A1010 | Owners Manual - Page 105
■ Configuration Configures the output characteristics of the speakers. • When you configure the speaker size this when no surround speakers are connected. The front speakers will produce surround channel audio. Virtual CINEMA DSP works when you select a sound program. ❑ Surround Back Selects - Yamaha RX-A1010 | Owners Manual - Page 106
is connected to the SUBWOOFER 1 or SUBWOOFER 2 jack. The front speakers will produce LFE (lowfrequency effect) channel audio and low-frequency components from other channels when both "Subwoofer 1" and "Subwoofer 2" are set to "None". • When the bass sound is lacking or unclear, switch the - Yamaha RX-A1010 | Owners Manual - Page 107
Manual Front > Manual Copies the "Flat" values acquired with "Auto Setup". Copies the "Front" values acquired with "Auto Setup". Natural > Manual Copies the "Natural" values acquired with "Auto Setup". ■ Manual . ■ Test Tone Enables/disabled the test tone output. Test tone output helps you - Yamaha RX-A1010 | Owners Manual - Page 108
Sound Configures the audio output settings. ■ Lipsync Adjusts the delay between video and audio output. ❑ Auto Adjusts the delay between video and audio output automatically when a TV that supports an automatic lipsync function is connected to this unit via HDMI for when this receiver is turned on. - Yamaha RX-A1010 | Owners Manual - Page 109
Off On (default) Disables the video conversion between the analog video jacks. Enables the video conversion between the analog video jacks. Converted video signals are output from the MONITOR OUT jacks only. • This function works only when "Monitor Out Assign" (p.114) is set to "Main". • This unit - Yamaha RX-A1010 | Owners Manual - Page 110
❑ Adjustment Configures the video adjustments when "Processing" is set to "On". You can register the video adjustments as presets (up to 6). ■ Setup procedure 1 Use the cursor keys ( / ) to select a preset number and press ENTER. 2 Use the cursor keys ( / ) to select an item. 3 Use the cursor keys - Yamaha RX-A1010 | Owners Manual - Page 111
produced from the speakers connected to this unit because TV audio signals input to this unit via ARC are not supported by this unit, set "ARC" to "Off" and use the TV speaker. ❑ Standby Sync Select whether to set this unit to standby in conjunction with TV power-off when "HDMI Control" is set to - Yamaha RX-A1010 | Owners Manual - Page 112
"HDMI Control" is set to "Off". ❑ Amp Enables/disables the audio output from the speakers connected to this unit. Settings Off Disables the audio output from the speakers. On (default) Enables the audio output from the speakers. ❑ HDMI OUT1, HDMI OUT2 Enables/disables the audio output from - Yamaha RX-A1010 | Owners Manual - Page 113
. Enables volume adjustments for Zone2 or Zone3 output. • This setting is available only when the corresponding zone speakers are connected to this unit via an external amplifier (p.81). ❑ Max Volume Sets the Zone2 or Zone3 maximum volume so that sound is not too loud. Setting range -30.0dB ~ +15 - Yamaha RX-A1010 | Owners Manual - Page 114
conversion between the analog video jacks does not work for multi-zone video output. To watch videos played back on a video device on the zone video monitor, you need to connect the video monitor to this unit in the same way as the video device. ■ Party Mode Set Enables/disables switching to the - Yamaha RX-A1010 | Owners Manual - Page 115
Function Configures the functions that make this unit easier to use. ■ Auto Power Down Sets the amount of time for auto-standby. If you do not Off ■ Input Assignment Assigns the COMPONENT VIDEO, COAXIAL and OPTICAL jacks to another input source. ■ Setup procedure Example: assigning the OPTICAL (e) - Yamaha RX-A1010 | Owners Manual - Page 116
Select this to manually switch the output level for electronic signal transmission with "Manual." ❑ Target Zone Specifies the zone with which the TRIGGER OUT jack functions synchronized. Settings Main Zone2 When "Trigger Mode" is set to "Power," electronic signal transmission is synchronized - Yamaha RX-A1010 | Owners Manual - Page 117
to the input source specified in this option. ❑ Manual Switches the output level for electronic signal transmission manually when "Trigger Mode" is set to "Manual". This setting can also be used to confirm proper function of the external component connected via the TRIGGER OUT jack. Choices Low - Yamaha RX-A1010 | Owners Manual - Page 118
output signal (HDMI) Analog Resolution HDMI Error Resolutions of input signal (analog) and signal output at the MONITOR OUT jacks (analog) Errors related to HDMI HDCP Error: The TV does not support HDCP (High-bandwidth Digital Content Protection). Device Over: The number of devices connected to - Yamaha RX-A1010 | Owners Manual - Page 119
The IP address of the primary DNS server The IP address of the secondary DNS server MAC address Network connection status ■ System Displays the system information on this unit. Remote ID The remote control ID setting of the main unit (p.120) TV Format The video signal type setting of this unit - Yamaha RX-A1010 | Owners Manual - Page 120
Turns on/off of the remote control sensor on the main unit. 120 Selects the remote control ID of the main unit. 120 (Asia and General models only) Changes the frequency step setting. 121 Switches the video signal type. 121 Removes the limitation on HDMI video output. 121 Creates backup of - Yamaha RX-A1010 | Owners Manual - Page 121
setup menu, press SETUP. • The registered remote control codes (p.123) are not cleared even if you change the remote control . Switching the video signal type (TV FORMAT) Removing the limitation on HDMI video output ( detects resolutions supported by a TV connected to the HDMI OUT jacks. - Yamaha RX-A1010 | Owners Manual - Page 122
The backup does not contain user information (user account, password, etc.) or unit-specific information (MAC address, IP downloaded from our website. If this unit is connected to the Internet, you can download the firmware via the network. For details, refer to the information supplied with updates - Yamaha RX-A1010 | Owners Manual - Page 123
SOURCE RECEIVER AV 1 2 3 5 6 7 AUDIO 1 2 3 HDMI OUT INFO MEMORY FM AM 1 2 3 TUN./ CH 4 5 6 7 8 9 SLEEP 10 0 ENT LEVEL ZONE SETUP SETUP Controlling external devices with the remote control By setting the code for external devices (BD/DVD players, etc.) or assigning - Yamaha RX-A1010 | Owners Manual - Page 124
input source and device to control with the remote control concurrently. Numeric keys SETUP • At the factory, Yamaha CD player code (5095) is set for AUDIO2 and Yamaha AV receiver code (5098) is set for the other input selection keys. • If you assign the remote control code for an external device - Yamaha RX-A1010 | Owners Manual - Page 125
SETUP. AV 1 2 3 5 6 7 AUDIO 1 2 3 PHONO MULTI USB DOCK TUNER [A] SCENE 1 2 3 4 V-AUX 4 NET [B] 4 PROGRAM MUTE VOLUME • For details on how to register the input selection key applied the remote control code on a corresponding SCENE key, refer to "Configuring scene assignments - Yamaha RX-A1010 | Owners Manual - Page 126
you can assign functions of an external receiver to the menu operation keys, external device operation keys or numeric keys. However, it makes these keys to control this unit impossible. If you need to restore the remote control code for this unit, perform the following steps. a Press SETUP. b Use - Yamaha RX-A1010 | Owners Manual - Page 127
RECEIVER AV 1 2 3 5 6 7 AUDIO 1 2 3 PHONO MULTI DOCK TUNER USB [ A ] SCENE 1 2 3 4 V-AUX 4 NET [ B ] 4 RECEIVER ENTER DMESCOUODRDE. E ENHANCER PARTY HDMI OUT INFO MEMORY FM AM TUN./ CH STRAIGHT SDPLIRUEERECETP LEVEL ZONE SETUP SETUP 6 Press ENTER to set the new - Yamaha RX-A1010 | Owners Manual - Page 128
SOURCE RECEIVER AV 1 2 3 5 6 7 AUDIO 1 2 3 PHONO MULTI USB DOCK TUNER remote control codes (p.123) or assign a function to each key using the learning function (p.125). • We do not recommend including continuous operations (such as volume adjustment) in macro operations. 1 Press SETUP - Yamaha RX-A1010 | Owners Manual - Page 129
SUR. DECODE ENHANCER PARTY HDMI OUT INFO MEMORY FM AM 1 2 3 TUN./ CH 4 5 6 7 8 9 SLEEP 10 0 ENT LEVEL ZONE SETUP SETUP LEARN Clears the functions learned from other remote controls. PRESET Restores the default remote control code settings. RENAME Restores the default - Yamaha RX-A1010 | Owners Manual - Page 130
SOURCE RECEIVER AV 1 2 3 5 6 7 AUDIO 1 2 3 PHONO MULTI reset until "OK" appears on the window display. If "NG" or "ERROR" appears, clearing failed. Repeat from step 2. ENTER 6 Repeat steps 3 to 5 until all desired key assignments are erased. 7 To exit from the setup menu, press SETUP - Yamaha RX-A1010 | Owners Manual - Page 131
Remove the insulation sheet before using the remote control. 1 Remote control signal transmitter Transmits infrared signals. 2 NET/USB Press repeatedly to select a desired network source or "USB". 3 SCENE Selects the assigned input source, sound program, HDMI output and various settings at once - Yamaha RX-A1010 | Owners Manual - Page 132
SOURCE RECEIVER AV 1 2 3 5 6 7 AUDIO DIRECT Updating the firmware of this unit If this unit is connected to power cable or network cable during firmware update. Firmware update takes about 15 minutes. • You can also update the firmware using the USB memory device from the "ADVANCED SETUP - Yamaha RX-A1010 | Owners Manual - Page 133
address of your PC in "Address Setup" (p.113) to allow the PC to access this unit. For information on how to check the MAC address of your PC, refer to the instruction manuals of it. The supplied remote control concurrently controls this unit and another Yamaha product that is not intended... When - Yamaha RX-A1010 | Owners Manual - Page 134
Troubleshooting Refer to the table below when this unit does not function properly. If the problem you are experiencing is not listed below, or if the instructions below do not help, turn off this unit, disconnect the power cable, and contact the nearest authorized Yamaha dealer or service center. - Yamaha RX-A1010 | Owners Manual - Page 135
Audio Problem No sound. The volume cannot be increased. No sound is heard from a specific speaker. No sound is heard from the surround back speaker. No sound is heard from the subwoofer. No sound from the playback device (connected to this unit with HDMI). No sound from the TV (when HDMI Control is - Yamaha RX-A1010 | Owners Manual - Page 136
on. (This may happen due to the nature of AV receivers.) Move this unit further away from such device. If there is no problem with the connection, replace with another cable. Turn on all devices connected to the output jacks of this unit Video Problem No video. No video from the playback device - Yamaha RX-A1010 | Owners Manual - Page 137
(p.60). Use an outdoor AM antenna commercially available. Connect it to the ANTENNA (AM) jack together with the supplied AM antenna. "Auto Preset" is for registering FM radio stations only. Register AM radio stations manually (p.61). USB and network Problem This unit does not detect the USB - Yamaha RX-A1010 | Owners Manual - Page 138
two remote controls is not appropriate. The signal coding or modulation of the other remote control is not compatible with this remote control. Place the remote controls at a proper distance (p.125). Learning is impossible in this case. Memory capacity is full. Clear unnecessary assignments to - Yamaha RX-A1010 | Owners Manual - Page 139
set it in pairing mode. The Bluetooth component is not found. (When establishing a wireless connection) - Turn on the Bluetooth component. - Place the Bluetooth component within 10 m of the Bluetooth receiver. - Perform pairing again. The connected iPod is not supported by the unit. Use an iPod - Yamaha RX-A1010 | Owners Manual - Page 140
technology delivers multichannel sound with discrete channel output. Supporting bitrates up to 6.0 Mbps, Dolby Digital Plus can carry up to 7.1 discreet audio channels simultaneously. Supported by HDMI version 1.3 and designed for the optical disc players and AV receivers/amplifiers of the future - Yamaha RX-A1010 | Owners Manual - Page 141
24.5 Mbps for BD, DTS-HD Master Audio can carry up to 7.1 discrete channels of 24-bit/96 kHz audio simultaneously. Supported by HDMI version 1.3 and designed for the optical disc players and AV receivers/ amplifiers of the future, DTS-HD Master Audio also remains fully compatible with the existing - Yamaha RX-A1010 | Owners Manual - Page 142
output of the HDMI specification. This AV receivers) and audio/video monitors (such as digital televisions), HDMI supports standard, enhanced or high-definition video as well as multichannel digital audio using a single cable. HDMI transmits all ATSC HDTV standards and supports 8-channel digital audio - Yamaha RX-A1010 | Owners Manual - Page 143
) is always available. (dotted line) is available only when "Analog to Analog Conversion" (p.109) in the "Setup" menu is set to "On" (default). ■ Video conversion table • You can select a resolution and an aspect ratio applied to HDMI-output video processing. • This unit does not convert 480-line - Yamaha RX-A1010 | Owners Manual - Page 144
3. It may solve the problem. Also, HDMI Control may not work if the number of connected devices is over the limit. In this case, disable HDMI Control on the devices not in use. • If the unit is not synchronized to the TV's power operations, check the priority of the audio output setting on the TV - Yamaha RX-A1010 | Owners Manual - Page 145
- 1080p/60 Hz, 50 Hz, 24 Hz - 576p/50 Hz • When CPPM copy-protected DVD-Audio is played back, video/audio signals may not be output, depending on the type of the DVD player. • This unit is not compatible with HDCP-incompatible HDMI or DVI devices. For details, refer to the instruction manual of - Yamaha RX-A1010 | Owners Manual - Page 146
OUT 1 ARC 2 AV 1 (1 BD/DVD) AV 2 AV 3 HDMI AV 4 AV 5 AV 6 AV 7 AV 1 (1 BD/DVD) AV 2 PHONO GND L AV 3 AV 4 AV OUT MONITOR OUT/ ZONE OUT Y AV 1 A AV 2 B AUDIO 1 AUDIO 2 AUDIO 3 AUDIO 4 (2 TV) (3 CD) COMPONENT VIDEO PB PR Y AV 3 PB C PR MONITOR OUT/ZONE OUT Y PB PR REMOTE - Yamaha RX-A1010 | Owners Manual - Page 147
United States and/or other countries. MPEG Layer-3 audio coding technology licensed from Fraunhofer IIS and Thomson. This receiver supports network connections. Bluetooth™ Bluetooth is a registered trademark of the Bluetooth SIG and is used by Yamaha in accordance with a license agreement. En 147 - Yamaha RX-A1010 | Owners Manual - Page 148
S-video x 1 - Component x 1 AV OUT - Composite x 1 - S-video x 1 • HDMI Output HDMI OUT x 2 (HDMI OUT1~2) ❑ Remote jacks • REMOTE IN x 2 • REMOTE OUT x 2 • TRIGGER OUT x 2 • RS-232C x 1 ❑ HDMI • HDMI Specification: Deep Color, "x.v.Color," Auto Lip Sync, HDMI Control (CEC), ARC (Audio Return Channel - Yamaha RX-A1010 | Owners Manual - Page 149
Neo:6 Music, DTS Neo:6 Cinema ❑ Audio Section • Rated Output Power (20 Hz to 20 kHz, 0.06 (IHF-A Network) PHONO to AV OUT (Input shorted 5 mV) [U.S.A., Canada, China and General models]... 60 dB/55 dB or more AUDIO2 etc. (Input 5.1 kΩ Shorted, 1 kHz/10 kHz) ..... 60 dB/45 dB or more • Volume Control - Yamaha RX-A1010 | Owners Manual - Page 150
50 Hz [Asia model AC 220-240 V, 50/60 Hz • Power Consumption [U.S.A. model 490 W/620 VA [Canada model 400 W/510 VA [Other models 490 W • Standby Power Consumption HDMI Control Off / Standby Through Off 0.3 W or less HDMI Control On / Standby Through On (Typical)...........2.7 W Network Standby - Yamaha RX-A1010 | Owners Manual - Page 151
© 2011 Yamaha Corporation YD505A0/OMEN2
-
 1
1 -
 2
2 -
 3
3 -
 4
4 -
 5
5 -
 6
6 -
 7
7 -
8
-
9
-
10
-
11
-
12
-
13
-
14
-
15
-
16
-
17
-
18
-
19
-
20
-
21
-
22
-
23
-
24
-
25
-
26
-
27
-
28
-
29
-
30
-
31
-
32
-
33
-
34
-
35
-
36
-
37
-
38
-
39
-
40
-
41
-
42
-
43
-
44
-
45
-
46
-
47
-
48
-
49
-
50
-
51
-
52
-
53
-
54
-
55
-
56
-
57
-
58
-
59
-
60
-
61
-
62
-
63
-
64
-
65
-
66
-
67
-
68
-
69
-
70
-
71
-
72
-
73
-
74
-
75
-
76
-
77
-
78
-
79
-
80
-
81
-
82
-
83
-
84
-
85
-
86
-
87
-
88
-
89
-
90
-
91
-
92
-
93
-
94
-
95
-
96
-
97
-
98
-
99
-
100
-
101
-
102
-
103
-
104
-
105
-
106
-
107
-
108
-
109
-
110
-
111
-
112
-
113
-
114
-
115
-
116
-
117
-
118
-
119
-
120
-
121
-
122
-
123
-
124
-
125
-
126
-
127
-
128
-
129
-
130
-
131
-
132
-
133
-
134
-
135
-
136
-
137
-
138
-
139
-
140
-
141
-
142
-
143
-
144
-
145
-
146
-
147
-
148
-
149
-
150
-
151
 |
 |

AV Receiver
Owner’s Manual
English for Canada, Europe, Asia, Africa, Oceania and Latin America
Be sure to read “Safety Brochure” (supplied booklet) before using this unit.