Yamaha RX-A1010 Owners Manual - Page 122
Backing up/recovering the settings (RECOV./BACKUP), Restoring the default settings (INITIALIZE)
 |
View all Yamaha RX-A1010 manuals
Add to My Manuals
Save this manual to your list of manuals |
Page 122 highlights
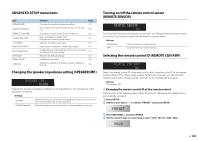
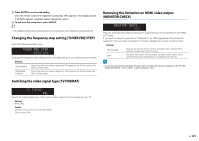
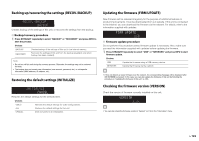
Backing up/recovering the settings (RECOV./BACKUP) S P DOCK TAG IMP. -RECOV./BACKUP HD STEREO TUNED PRE AMP PARTY MUTE VOLUME ZONE ZONE ZONE IN OUT 1 OUT 2 2 3 4 ENHANCER SLEEP B A C K U P ADAPTIVE DRC PL L C R PR SL SW1 SW SW2 SR HD 3 PL SBL SB SBR PR Creates backup of the settings of this unit, or recovers the settings from the backup. ■ Backup/recovery procedure 1 Press STRAIGHT repeatedly to select "BACKUP" or "RECOVERY" and press INFO to start the process. Choices BACKUP Creates backup of the settings of this unit in the internal memory. RECOVERY Recovers the settings of this unit from the backup (available only when backup has been created). Note • Do not turn off this unit during the recovery process. Otherwise, the settings may not be restored correctly. • The backup does not contain user information (user account, password, etc.) or unit-specific information (MAC address, IP address, etc). Restoring the default settings (INITIALIZE) SP IMP. - DOCK TAG HD STEREO TUNED PRE AMP PARTY ZONE ZONE ZONE IN OUT 1 OUT 2 2 3 4 ENHANCER SLEEP HD 3 INITIALIZE MUTE VOLUME C A N C E L ADAPTIVE DRC PL L C R PR SL SW1 SW SW2 SR PL SBL SB SBR PR Restores the default settings for the selected item. Choices VIDEO ALL CANCEL Restores the default settings for video configurations. Restores the default settings for this unit. Does not perform an initialization. Updating the firmware (FIRM UPDATE) New firmware will be released irregularly for the purpose of additional features or product improvements. It can be downloaded from our website. If this unit is connected to the Internet, you can download the firmware via the network. For details, refer to the information supplied with updates. SP IMP. - DOCK TAG HD STEREO TUNED PRE AMP PARTY ZONE ZONE ZONE IN OUT 1 OUT 2 2 3 4 ENHANCER SLEEP HD 3 FIRM UPDATE MUTE VOLUME U S B ADAPTIVE DRC PL L C R PR SL SW1 SW SW2 SR PL SBL SB SBR PR ■ Firmware update procedure Do not perform this procedure unless firmware update is necessary. Also, make sure you read the information supplied with updates before updating the firmware. 1 Press STRAIGHT repeatedly to select "USB" or "NETWORK" and press INFO to start firmware update. Choices USB Update the firmware using a USB memory device. NETWORK Update the firmware via the network. • If this unit detects a newer firmware over the network, the corresponding message will be displayed after ON SCREEN is pressed. In this case, you can also update the firmware of this unit by following the procedure in "Updating the firmware of this unit" (p.132). Checking the firmware version (VERSION) Check the version of firmware currently installed on this unit. SP IMP. - DOCK TAG HD STEREO TUNED PRE AMP PARTY ZONE ZONE ZONE IN OUT 1 OUT 2 2 3 4 ENHANCER SLEEP HD 3 VERSION MUTE VOLUME x . x x ADAPTIVE DRC PL L C R PR SL SW1 SW SW2 SR PL SBL SB SBR PR • You can also check the firmware version in "System" (p.119) in the "Information" menu. En 122
-
 1
1 -
2
-
3
-
4
-
5
-
6
-
7
-
8
-
9
-
10
-
11
-
12
-
13
-
14
-
15
-
16
-
17
-
18
-
19
-
20
-
21
-
22
-
23
-
24
-
25
-
26
-
27
-
28
-
29
-
30
-
31
-
32
-
33
-
34
-
35
-
36
-
37
-
38
-
39
-
40
-
41
-
42
-
43
-
44
-
45
-
46
-
47
-
48
-
49
-
50
-
51
-
52
-
53
-
54
-
55
-
56
-
57
-
58
-
59
-
60
-
61
-
62
-
63
-
64
-
65
-
66
-
67
-
68
-
69
-
70
-
71
-
72
-
73
-
74
-
75
-
76
-
77
-
78
-
79
-
80
-
81
-
82
-
83
-
84
-
85
-
86
-
87
-
88
-
89
-
90
-
91
-
92
-
93
-
94
-
95
-
96
-
97
-
98
-
99
-
100
-
101
-
102
-
103
-
104
-
105
-
106
-
107
-
108
-
109
-
110
-
111
-
112
-
113
-
114
-
115
-
116
-
 117
117 -
 118
118 -
 119
119 -
 120
120 -
 121
121 -
 122
122 -
 123
123 -
 124
124 -
 125
125 -
 126
126 -
 127
127 -
128
-
129
-
130
-
131
-
132
-
133
-
134
-
135
-
136
-
137
-
138
-
139
-
140
-
141
-
142
-
143
-
144
-
145
-
146
-
147
-
148
-
149
-
150
-
151
 |
 |
