Yamaha RX-A1010 Owners Manual - Page 31
Connection method 2 HDMI Control-compatible TV
 |
View all Yamaha RX-A1010 manuals
Add to My Manuals
Save this manual to your list of manuals |
Page 31 highlights
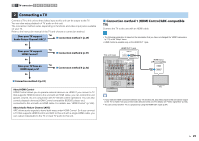
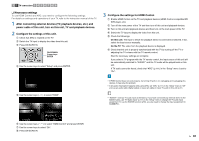
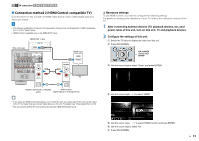
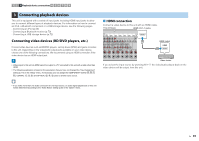
1 2 TV connection 3 4 5 6 7 8 9 ■ Connection method 2 (HDMI Control-compatible TV) Connect the TV to this unit with an HDMI cable and an audio cable (digital optical or stereo pin cable). • The following explanation is based on the assumption that you have not changed the "HDMI" parameters (p.111) in the "Setup" menu. • HDMI Control is available only on the HDMI OUT 1 jack. This unit (rear) HDMI OUT 1 jack HDMI OUT 1 2 ARC HDMI DOCK NETWORK HDMI OUT 1 ARC 2 AV 1 (1 AV 1 (1 BD/DVD) AV 2 PHONO GND L R AV 3 AV 4 AV OUT MONITOR OUT/ ZONE OUT Y PB AV 1 A AV 2 B AUDIO 1 AUDIO 2 AUDIO 3 AUDIO 4 (2 TV) (3 CD) AUDIO 1 (2 TV) 1 COAXIAL 2 COAXIAL 3 OPTICAL 4 OPTICAL 5 OPTICAL 6 COAXIAL FRONT L R SURROUND L ANTENNA (4 RADIO) AM FM 75Ω R 5 OPTICAL O HDMI input HDMI HDMI AUDIO L L R R TV OPTICAL O AUDIO1 (OPTICAL or AUDIO) Audio output jacks (digital optical or analog stereo) ❑ Necessary settings To use HDMI Control, you need to configure the following settings. For details on settings and operations of your TV, refer to the instruction manual of the TV. 1 After connecting external devices (TV, playback devices, etc.) and power cable of this unit, turn on this unit, TV and playback devices. 2 Configure the settings of this unit. a Switch the TV input to display the video from this unit. b Press ON SCREEN. ON SCREEN RETURN ENTER OPTION DISPLAY ON SCREEN Cursor keys ENTER c Use the cursor keys to select "Setup" and press ENTER. d Use the cursor keys ( / ) to select "HDMI". • If you make an HDMI connection between your TV and this unit, any videos input to this unit can be output to the TV no matter how you connect video devices to this unit. For details, see "Video signal flow" (p.143). • You can connect another TV or a projector by using the HDMI OUT 2 jack (p.34). e Use the cursor keys ( / ) to select "HDMI Control" and press ENTER. f Use the cursor keys to select "On". g Press ON SCREEN. En 31
-
 1
1 -
2
-
3
-
4
-
5
-
6
-
7
-
8
-
9
-
10
-
11
-
12
-
13
-
14
-
15
-
16
-
17
-
18
-
19
-
20
-
21
-
22
-
23
-
24
-
25
-
 26
26 -
 27
27 -
 28
28 -
 29
29 -
 30
30 -
 31
31 -
 32
32 -
 33
33 -
 34
34 -
 35
35 -
 36
36 -
37
-
38
-
39
-
40
-
41
-
42
-
43
-
44
-
45
-
46
-
47
-
48
-
49
-
50
-
51
-
52
-
53
-
54
-
55
-
56
-
57
-
58
-
59
-
60
-
61
-
62
-
63
-
64
-
65
-
66
-
67
-
68
-
69
-
70
-
71
-
72
-
73
-
74
-
75
-
76
-
77
-
78
-
79
-
80
-
81
-
82
-
83
-
84
-
85
-
86
-
87
-
88
-
89
-
90
-
91
-
92
-
93
-
94
-
95
-
96
-
97
-
98
-
99
-
100
-
101
-
102
-
103
-
104
-
105
-
106
-
107
-
108
-
109
-
110
-
111
-
112
-
113
-
114
-
115
-
116
-
117
-
118
-
119
-
120
-
121
-
122
-
123
-
124
-
125
-
126
-
127
-
128
-
129
-
130
-
131
-
132
-
133
-
134
-
135
-
136
-
137
-
138
-
139
-
140
-
141
-
142
-
143
-
144
-
145
-
146
-
147
-
148
-
149
-
150
-
151
 |
 |
