Yamaha RX-A1010 Owners Manual - Page 35
Connecting video devices (BD/DVD players, etc.) - bluetooth
 |
View all Yamaha RX-A1010 manuals
Add to My Manuals
Save this manual to your list of manuals |
Page 35 highlights
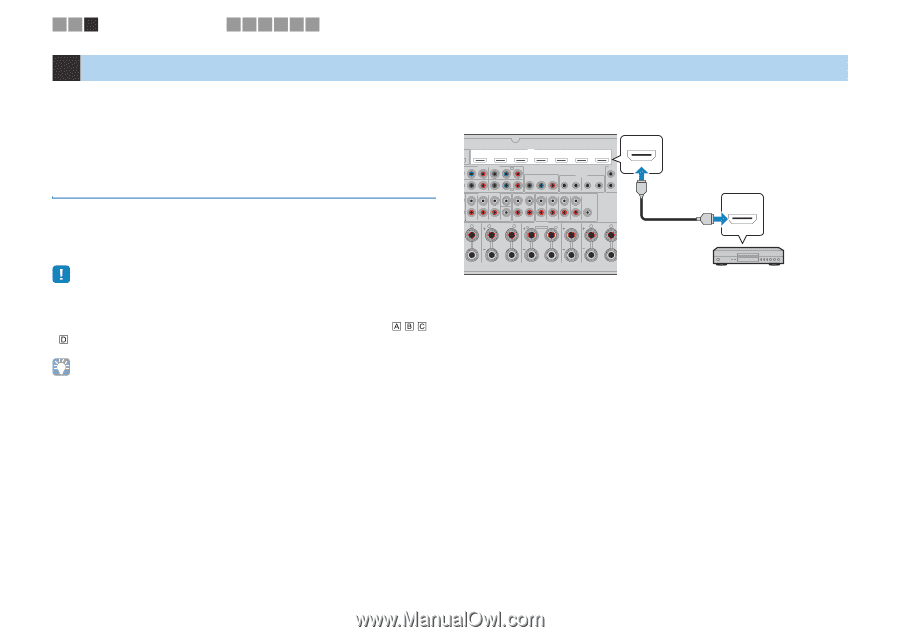
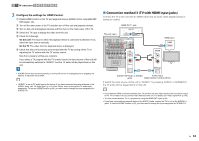
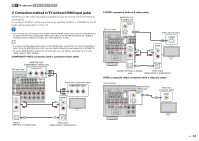
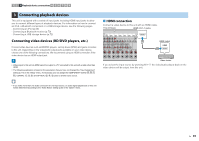
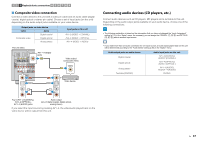
1 2 3 Playback device connections 4 5 6 7 8 9 3 Connecting playback devices This unit is equipped with a variety of input jacks including HDMI input jacks to allow you to connect different types of playback devices. For information on how to connect an iPod, a Bluetooth component or a USB storage device, see the following pages. - Connecting an iPod (p.65) - Connecting a Bluetooth receiver (p.70) - Connecting a USB storage device (p.72) Connecting video devices (BD/DVD players, etc.) Connect video devices such as BD/DVD players, set-top boxes (STBs) and game consoles to this unit. Depending on the video/audio output jacks available on your video device, choose one of the following connections. We recommend using an HDMI connection if the video device has an HDMI output jack. • Videos input to this unit via HDMI cannot be output to a TV connected to this unit with a cable other than HDMI. • The following explanation is based on the assumption that you have not changed the "Input Assignment" setting (p.115) in the "Setup" menu. As necessary, you can assign the COMPONENT VIDEO ( , , , ), COAXIAL (a, b, f) and OPTICAL (c, d, e) jacks to another input source. ■ HDMI connection Connect a video device to this unit with an HDMI cable. This unit (rear) HDMI (AV1~7) jacks 2 AV 1 (1 BD/DVD) AV 2 AV 3 HDMI AV 4 AV 5 AV 6 AV 7 COMPONENT VIDEO PB PR Y AV 3 PB C PR MONITOR OUT/ZONE OUT Y PB PR REMOTE 1 2 IN OUT IN OUT TRIGG OUT 1 AV 4 D MULTI CH INPUT CENTER ZONE OUT PRE OUT (SINGLE) (FRONT) 1 2 +12V 0.1A 2 FRONT SURROUND SUR. BACK SUBWOOFER ZONE 2 ZONE 3 FRONT SURROUND SUR. BACK (REAR) SUBWOOFER CENTER UND L R SURROUND BACK L SPEAKERS ZONE 2/ZONE 3/R.PRESENCE R EXTRA SP2 L CENTER R FRONT L HDMI HDMI output HDMI HDMI SINGLE SPEAKER IMPEDANCE Video device If you select the input source by pressing AV1~7, the video/audio played back on the video device will be output from this unit. • If you make more than one audio connection for one input source, an audio signal played back on this unit will be determined according to the "Audio Select" setting (p.92) in the "Option" menu. En 35
-
 1
1 -
2
-
3
-
4
-
5
-
6
-
7
-
8
-
9
-
10
-
11
-
12
-
13
-
14
-
15
-
16
-
17
-
18
-
19
-
20
-
21
-
22
-
23
-
24
-
25
-
26
-
27
-
28
-
29
-
 30
30 -
 31
31 -
 32
32 -
 33
33 -
 34
34 -
 35
35 -
 36
36 -
 37
37 -
 38
38 -
 39
39 -
 40
40 -
41
-
42
-
43
-
44
-
45
-
46
-
47
-
48
-
49
-
50
-
51
-
52
-
53
-
54
-
55
-
56
-
57
-
58
-
59
-
60
-
61
-
62
-
63
-
64
-
65
-
66
-
67
-
68
-
69
-
70
-
71
-
72
-
73
-
74
-
75
-
76
-
77
-
78
-
79
-
80
-
81
-
82
-
83
-
84
-
85
-
86
-
87
-
88
-
89
-
90
-
91
-
92
-
93
-
94
-
95
-
96
-
97
-
98
-
99
-
100
-
101
-
102
-
103
-
104
-
105
-
106
-
107
-
108
-
109
-
110
-
111
-
112
-
113
-
114
-
115
-
116
-
117
-
118
-
119
-
120
-
121
-
122
-
123
-
124
-
125
-
126
-
127
-
128
-
129
-
130
-
131
-
132
-
133
-
134
-
135
-
136
-
137
-
138
-
139
-
140
-
141
-
142
-
143
-
144
-
145
-
146
-
147
-
148
-
149
-
150
-
151
 |
 |