Yamaha RX-A1010 Owners Manual - Page 88
Control screen, Settings screen, PLAY INFO, TOP MENU, SCENE, POWER, VOLUME, RELOAD, Rename, MAC Filter - specification
 |
View all Yamaha RX-A1010 manuals
Add to My Manuals
Save this manual to your list of manuals |
Page 88 highlights
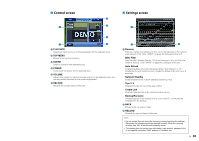
■ Control screen 1 ■ Settings screen 3 4 1 5 2 6 1 PLAY INFO Selects an input source or controls playback for the selected zone. 2 TOP MENU Moves to the top menu screen. 3 SCENE Select a scene for the selected zone. 4 POWER Turns on/off the power for the selected zone. 5 VOLUME Adjusts the volume or mutes the audio output for the selected zone. You can also switch the step for the volume adjustment. 6 RELOAD Reloads the current status of this unit. 2 3 1 Rename Edits the friendly name (name for this unit in the network) or the name of each zone (p.115). Click "APPLY" to apply the changes to this unit. MAC Filter Sets the MAC address filter (p.113) to limit access to this unit from the network devices. Click "APPLY" to apply the changes to this unit. Auto Reload Enables/disables automatic reloading. When "Auto Reload" is "On" (enabled), the web control screen reloads the status of this unit every 5 seconds. Network Standby Enables/disables the network standby function (p.113). Tips 1/ 2 Displays the tips for use of the web control. Create Link Creates a shortcut link to the desired control screen. Backup/Recovery Creates backup of the settings of this unit on the PC, or restores the settings from the backup. 2 BACK Moves to the top menu screen. 3 RELOAD Reloads the current status of this unit. Note • Do not operate this unit during the recovery process (restoring the settings). Otherwise, the settings may not be restored correctly. When the recovery finishes, click "OK" to set this unit to standby mode. • The backup does not contain user information (user account, password, etc.) or unit-specific information (MAC address, IP address, etc). En 88
-
 1
1 -
2
-
3
-
4
-
5
-
6
-
7
-
8
-
9
-
10
-
11
-
12
-
13
-
14
-
15
-
16
-
17
-
18
-
19
-
20
-
21
-
22
-
23
-
24
-
25
-
26
-
27
-
28
-
29
-
30
-
31
-
32
-
33
-
34
-
35
-
36
-
37
-
38
-
39
-
40
-
41
-
42
-
43
-
44
-
45
-
46
-
47
-
48
-
49
-
50
-
51
-
52
-
53
-
54
-
55
-
56
-
57
-
58
-
59
-
60
-
61
-
62
-
63
-
64
-
65
-
66
-
67
-
68
-
69
-
70
-
71
-
72
-
73
-
74
-
75
-
76
-
77
-
78
-
79
-
80
-
81
-
82
-
 83
83 -
 84
84 -
 85
85 -
 86
86 -
 87
87 -
 88
88 -
 89
89 -
 90
90 -
 91
91 -
 92
92 -
 93
93 -
94
-
95
-
96
-
97
-
98
-
99
-
100
-
101
-
102
-
103
-
104
-
105
-
106
-
107
-
108
-
109
-
110
-
111
-
112
-
113
-
114
-
115
-
116
-
117
-
118
-
119
-
120
-
121
-
122
-
123
-
124
-
125
-
126
-
127
-
128
-
129
-
130
-
131
-
132
-
133
-
134
-
135
-
136
-
137
-
138
-
139
-
140
-
141
-
142
-
143
-
144
-
145
-
146
-
147
-
148
-
149
-
150
-
151
 |
 |
