2012 Ford Explorer MyFord Touch/MyLincoln Touch Supplement 3rd Printing - Page 73
2012 Ford Explorer Manual

Page 73 highlights
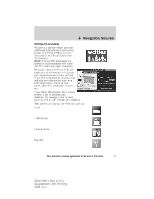
Navigation features NAVIGATION FEATURES (IF EQUIPPED) Note: Your navigation SD card MUST be in the SD card slot in order for you to access the navigation features. Your navigation system is comprised of two main features, destination mode and map mode. To set a destination, press Dest in the upper right hand corner of the touchscreen. Then, refer to Setting a destination which follows. To view the navigation map and the vehicle's current location, touch the green bar in the upper right hand corner of the touchscreen. Or, you can also press Dest > Map. Refer to Map mode later in this section. To order replacement SD navigation cards, see your authorized dealer. Note: Your SD card slot is spring loaded. To remove the SD card, simply press the card in and the system will eject the card. Do not attempt to pull the card to remove it as this could cause damage. SETTING A DESTINATION 1. Press Dest on the top right corner of the screen. 2. Choose to set a destination using any of the following: • My Home • Street Address • Favorites • Intersection • Previous Destinations • City Center • Point of Interest (POI) • Map • Emergency • Previous Starting Point • Freeway Entrance/Exit • Latitude/Longitude 3. Follow the highlighted text fields to enter any necessary information. Note that any order of entry is acceptable. For address destination entry, the Go! button will appear once all the necessary information has been entered. Pressing the Go! button will trigger the display of the address location on the map. 4. Select 'Set as Dest' to make this your destination. You can choose to 'Set as Waypoint' to have the system route to this point on the way to your current destination. You can also choose to save the destination as a Favorite. Note: Any Avoid Areas which have been selected are also considered in route calculation. 73 See End User License Agreement at the end of this book 2012 HMI-1 Gen 2 (fd1) Supplement, 4th Printing USA (fus)
-
 1
1 -
2
-
3
-
4
-
5
-
6
-
7
-
8
-
9
-
10
-
11
-
12
-
13
-
14
-
15
-
16
-
17
-
18
-
19
-
20
-
21
-
22
-
23
-
24
-
25
-
26
-
27
-
28
-
29
-
30
-
31
-
32
-
33
-
34
-
35
-
36
-
37
-
38
-
39
-
40
-
41
-
42
-
43
-
44
-
45
-
46
-
47
-
48
-
49
-
50
-
51
-
52
-
53
-
54
-
55
-
56
-
57
-
58
-
59
-
60
-
61
-
62
-
63
-
64
-
65
-
66
-
67
-
 68
68 -
 69
69 -
 70
70 -
 71
71 -
 72
72 -
 73
73 -
 74
74 -
 75
75 -
 76
76 -
 77
77 -
 78
78 -
79
-
80
-
81
-
82
-
83
-
84
-
85
-
86
-
87
-
88
-
89
-
90
-
91
-
92
-
93
-
94
-
95
-
96
-
97
-
98
-
99
-
100
-
101
-
102
-
103
 |
 |
