Brother International Isodore„ Innov-ís 5000 Users Manual - English - Page 100
Bar Tacks
 |
View all Brother International Isodore„ Innov-ís 5000 manuals
Add to My Manuals
Save this manual to your list of manuals |
Page 100 highlights
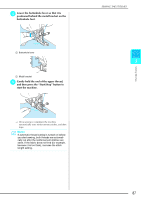
SEWING THE STITCHES Bar Tacks Use bar tacks to reinforce areas that will be subject to strain, such as pocket corners. Stitch Stitch name Bar tack Presser foot Applications Reinforcement at opening of pocket, etc. Stitch width [mm (inch.)] Auto. Manual Stitch length [mm (inch.)] Auto. Manual 2.0 1.0 - 3.0 0.4 0.3 - 1.0 (1/16) (1/16 - 1/8) (1/64) (1/64 - 1/16) Twin needle NO a Select . b Attach buttonhole scale to the length foot "A" and set the of the bar tack you wish to sew. c Set the fabric so that the pocket towards you during sewing. moves a b c a Presser foot scale b Completed length measurement c 5 mm (approx. 3/16 inch) Memo Bar tacks can be between 5 mm (approx. 3/16 inch) and 28 mm (approx. 1-1/16 inches). Bar tacks are usually between 5 mm (approx. 3/16 inch) and 10 mm (approx. 3/8 inch). Note • Pass the thread underneath the presser foot. • Slide the outside frame of the buttonhole foot backward as far as possible as shown in the illustration, making sure that there is no gap behind the part of the foot marked "A". If the buttonhole foot is not slid back as far as possible, the bar tack will not be sewn to the correct size. d Check the first needle the presser foot. drop point and lower a a 2 mm (approx. 1/16 inch) 88
-
 1
1 -
2
-
3
-
4
-
5
-
6
-
7
-
8
-
9
-
10
-
11
-
12
-
13
-
14
-
15
-
16
-
17
-
18
-
19
-
20
-
21
-
22
-
23
-
24
-
25
-
26
-
27
-
28
-
29
-
30
-
31
-
32
-
33
-
34
-
35
-
36
-
37
-
38
-
39
-
40
-
41
-
42
-
43
-
44
-
45
-
46
-
47
-
48
-
49
-
50
-
51
-
52
-
53
-
54
-
55
-
56
-
57
-
58
-
59
-
60
-
61
-
62
-
63
-
64
-
65
-
66
-
67
-
68
-
69
-
70
-
71
-
72
-
73
-
74
-
75
-
76
-
77
-
78
-
79
-
80
-
81
-
82
-
83
-
84
-
85
-
86
-
87
-
88
-
89
-
90
-
91
-
92
-
93
-
94
-
 95
95 -
 96
96 -
 97
97 -
 98
98 -
 99
99 -
 100
100 -
 101
101 -
 102
102 -
 103
103 -
 104
104 -
 105
105 -
106
-
107
-
108
-
109
-
110
-
111
-
112
-
113
-
114
-
115
-
116
-
117
-
118
-
119
-
120
-
121
-
122
-
123
-
124
-
125
-
126
-
127
-
128
-
129
-
130
-
131
-
132
-
133
-
134
-
135
-
136
-
137
-
138
-
139
-
140
-
141
-
142
-
143
-
144
-
145
-
146
-
147
-
148
-
149
-
150
-
151
-
152
-
153
-
154
-
155
-
156
-
157
-
158
-
159
-
160
-
161
-
162
-
163
-
164
-
165
-
166
-
167
-
168
-
169
-
170
-
171
-
172
-
173
-
174
-
175
-
176
-
177
-
178
-
179
-
180
-
181
-
182
-
183
-
184
-
185
-
186
-
187
-
188
-
189
-
190
-
191
-
192
-
193
-
194
-
195
-
196
-
197
-
198
-
199
-
200
-
201
-
202
-
203
-
204
-
205
-
206
-
207
-
208
-
209
-
210
-
211
-
212
-
213
-
214
-
215
-
216
-
217
-
218
-
219
-
220
-
221
-
222
-
223
-
224
-
225
-
226
-
227
-
228
-
229
-
230
-
231
-
232
-
233
-
234
-
235
-
236
-
237
-
238
-
239
-
240
-
241
-
242
-
243
-
244
-
245
-
246
-
247
-
248
-
249
-
250
-
251
-
252
 |
 |
