Brother International Isodore„ Innov-ís 5000 Users Manual - English - Page 21
Lcd Screen
 |
View all Brother International Isodore„ Innov-ís 5000 manuals
Add to My Manuals
Save this manual to your list of manuals |
Page 21 highlights
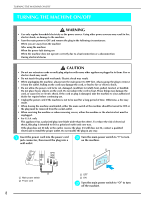
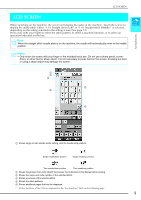
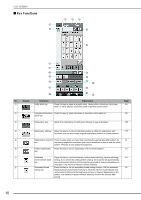
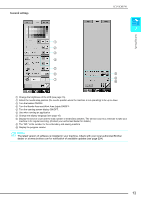
LCD SCREEN LCD SCREEN Getting Ready When switching on the machine, the screen will display the name of the machine. Touch the screen to display the utility stitch. Either "1-01 Straight stitch (Left)" or "1-03 Straight stitch (Middle)" is selected, depending on the setting selected in the setting screen (See page 12). 1 Press a key with your finger to select the stitch pattern, to select a machine function, or to select an operation indicated on the key. Note When the straight stitch needle plate is on the machine, the needle will automatically move to the middle position. Memo • Only touch the screen with your finger or the included touch pen. Do not use a sharp pencil, screwdriver, or other hard or sharp object. It is not necessary to press hard on the screen. Pressing too hard or using a sharp object may damage the screen. a b c e d f a Shows single or twin needle mode setting, and the needle stop position. Single needle/down position Single needle/up position Twin needle/down position Twin needle/up position b Shows the presser foot code. Attach the presser foot indicated in this display before sewing. c Shows the name and code number of the selected stitch. d Shows a preview of the selected stitch. e Shows the stitch patterns. f Shows additional pages that can be displayed. * All key functions of the LCD are explained in the "key functions" table on the following page. 9
-
 1
1 -
2
-
3
-
4
-
5
-
6
-
7
-
8
-
9
-
10
-
11
-
12
-
13
-
14
-
15
-
 16
16 -
 17
17 -
 18
18 -
 19
19 -
 20
20 -
 21
21 -
 22
22 -
 23
23 -
 24
24 -
 25
25 -
 26
26 -
27
-
28
-
29
-
30
-
31
-
32
-
33
-
34
-
35
-
36
-
37
-
38
-
39
-
40
-
41
-
42
-
43
-
44
-
45
-
46
-
47
-
48
-
49
-
50
-
51
-
52
-
53
-
54
-
55
-
56
-
57
-
58
-
59
-
60
-
61
-
62
-
63
-
64
-
65
-
66
-
67
-
68
-
69
-
70
-
71
-
72
-
73
-
74
-
75
-
76
-
77
-
78
-
79
-
80
-
81
-
82
-
83
-
84
-
85
-
86
-
87
-
88
-
89
-
90
-
91
-
92
-
93
-
94
-
95
-
96
-
97
-
98
-
99
-
100
-
101
-
102
-
103
-
104
-
105
-
106
-
107
-
108
-
109
-
110
-
111
-
112
-
113
-
114
-
115
-
116
-
117
-
118
-
119
-
120
-
121
-
122
-
123
-
124
-
125
-
126
-
127
-
128
-
129
-
130
-
131
-
132
-
133
-
134
-
135
-
136
-
137
-
138
-
139
-
140
-
141
-
142
-
143
-
144
-
145
-
146
-
147
-
148
-
149
-
150
-
151
-
152
-
153
-
154
-
155
-
156
-
157
-
158
-
159
-
160
-
161
-
162
-
163
-
164
-
165
-
166
-
167
-
168
-
169
-
170
-
171
-
172
-
173
-
174
-
175
-
176
-
177
-
178
-
179
-
180
-
181
-
182
-
183
-
184
-
185
-
186
-
187
-
188
-
189
-
190
-
191
-
192
-
193
-
194
-
195
-
196
-
197
-
198
-
199
-
200
-
201
-
202
-
203
-
204
-
205
-
206
-
207
-
208
-
209
-
210
-
211
-
212
-
213
-
214
-
215
-
216
-
217
-
218
-
219
-
220
-
221
-
222
-
223
-
224
-
225
-
226
-
227
-
228
-
229
-
230
-
231
-
232
-
233
-
234
-
235
-
236
-
237
-
238
-
239
-
240
-
241
-
242
-
243
-
244
-
245
-
246
-
247
-
248
-
249
-
250
-
251
-
252
 |
 |
