Brother International Isodore„ Innov-ís 5000 Users Manual - English - Page 86
Shelltuck Stitches
 |
View all Brother International Isodore„ Innov-ís 5000 manuals
Add to My Manuals
Save this manual to your list of manuals |
Page 86 highlights
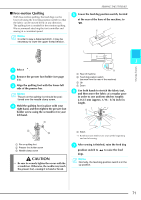
SEWING THE STITCHES ■ Sewing Sharp Curves Stop the machine with the needle in the fabric outside the appliqué. Raise the presser foot and turn the fabric a little bit at a time while sewing for an attractive finish to the seam. c To make fabric in rows of shell tuck stitches, half along the bias. fold the Memo Placing a lightweight tear away stabilizer beneath the stitching area will improve the stitch placement along the edge of the appliqué fabric. Memo Use a thin fabric. d Attach presser foot "J". Set the needle drop point slightly off the edge of the fabric, and start sewing. Shelltuck Stitches Shelltuck stitches give an attractive appearance to shells along the curve of a collar. This stitch pattern can be used for edging the neckline or sleeves of dresses and blouses. a Select . Memo For details on each stitch, refer to the "STITCH SETTING CHART" at the end of this manual. b Increase the upper thread attractive scallop finish to tension for an the shelltuck stitches (see page 43). Memo If the upper thread tension is too weak, the shelltuck stitches will not scallop. a a Needle drop position e Unfold side. the fabric, and iron the tucks to one Memo To make shell tucks at the edge of a collar or neckline, follow the pattern's instructions and then use this stitch to make a decorative finish on the collar or neckline. 74
-
 1
1 -
2
-
3
-
4
-
5
-
6
-
7
-
8
-
9
-
10
-
11
-
12
-
13
-
14
-
15
-
16
-
17
-
18
-
19
-
20
-
21
-
22
-
23
-
24
-
25
-
26
-
27
-
28
-
29
-
30
-
31
-
32
-
33
-
34
-
35
-
36
-
37
-
38
-
39
-
40
-
41
-
42
-
43
-
44
-
45
-
46
-
47
-
48
-
49
-
50
-
51
-
52
-
53
-
54
-
55
-
56
-
57
-
58
-
59
-
60
-
61
-
62
-
63
-
64
-
65
-
66
-
67
-
68
-
69
-
70
-
71
-
72
-
73
-
74
-
75
-
76
-
77
-
78
-
79
-
80
-
 81
81 -
 82
82 -
 83
83 -
 84
84 -
 85
85 -
 86
86 -
 87
87 -
 88
88 -
 89
89 -
 90
90 -
 91
91 -
92
-
93
-
94
-
95
-
96
-
97
-
98
-
99
-
100
-
101
-
102
-
103
-
104
-
105
-
106
-
107
-
108
-
109
-
110
-
111
-
112
-
113
-
114
-
115
-
116
-
117
-
118
-
119
-
120
-
121
-
122
-
123
-
124
-
125
-
126
-
127
-
128
-
129
-
130
-
131
-
132
-
133
-
134
-
135
-
136
-
137
-
138
-
139
-
140
-
141
-
142
-
143
-
144
-
145
-
146
-
147
-
148
-
149
-
150
-
151
-
152
-
153
-
154
-
155
-
156
-
157
-
158
-
159
-
160
-
161
-
162
-
163
-
164
-
165
-
166
-
167
-
168
-
169
-
170
-
171
-
172
-
173
-
174
-
175
-
176
-
177
-
178
-
179
-
180
-
181
-
182
-
183
-
184
-
185
-
186
-
187
-
188
-
189
-
190
-
191
-
192
-
193
-
194
-
195
-
196
-
197
-
198
-
199
-
200
-
201
-
202
-
203
-
204
-
205
-
206
-
207
-
208
-
209
-
210
-
211
-
212
-
213
-
214
-
215
-
216
-
217
-
218
-
219
-
220
-
221
-
222
-
223
-
224
-
225
-
226
-
227
-
228
-
229
-
230
-
231
-
232
-
233
-
234
-
235
-
236
-
237
-
238
-
239
-
240
-
241
-
242
-
243
-
244
-
245
-
246
-
247
-
248
-
249
-
250
-
251
-
252
 |
 |
