Brother International Isodore„ Innov-ís 5000 Users Manual - English - Page 33
Using the Spool Pin
 |
View all Brother International Isodore„ Innov-ís 5000 manuals
Add to My Manuals
Save this manual to your list of manuals |
Page 33 highlights
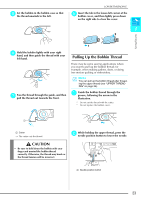
i Set the bobbin holder clicks into place. to the left, until it a LOWER THREADING ■ Using the Spool Pin You can use the main spool pin to wind the bobbin before sewing. You cannot use this spool pin to wind the bobbin while sewing. 6 1 7 2 Getting Ready a Bobbin holder (switch) Memo When the bobbin holder is set to the left, it works as a switch to make the bobbin wind automatically. → The bobbin starts winding automatically and stops rotating when it is done winding. The bobbin holder will return to the original position. j Cut the thread the bobbin. with the cutter and remove 5 43 8 o l 1 a Turn the main power to ON. b Align the groove in the bobbin with the spring on the bobbin winder shaft, and set the bobbin on the shaft. a b Memo • When removing the bobbin, do not pull on the bobbin winder seat. Doing so could loosen or remove the bobbin winder seat, and could result in damage to the machine. CAUTION • Setting the bobbin improperly may cause the thread tension to loosen, breaking the needle and possibly resulting in injury. a Groove of the bobbin b Spring on the shaft c Pivot the spool pin so that it angles upward. Set the thread spool on the spool pin so that the thread unwinds from the front of the spool. a b a b c a Spool pin b Spool cap c Thread spool 21
-
 1
1 -
2
-
3
-
4
-
5
-
6
-
7
-
8
-
9
-
10
-
11
-
12
-
13
-
14
-
15
-
16
-
17
-
18
-
19
-
20
-
21
-
22
-
23
-
24
-
25
-
26
-
27
-
 28
28 -
 29
29 -
 30
30 -
 31
31 -
 32
32 -
 33
33 -
 34
34 -
 35
35 -
 36
36 -
 37
37 -
 38
38 -
39
-
40
-
41
-
42
-
43
-
44
-
45
-
46
-
47
-
48
-
49
-
50
-
51
-
52
-
53
-
54
-
55
-
56
-
57
-
58
-
59
-
60
-
61
-
62
-
63
-
64
-
65
-
66
-
67
-
68
-
69
-
70
-
71
-
72
-
73
-
74
-
75
-
76
-
77
-
78
-
79
-
80
-
81
-
82
-
83
-
84
-
85
-
86
-
87
-
88
-
89
-
90
-
91
-
92
-
93
-
94
-
95
-
96
-
97
-
98
-
99
-
100
-
101
-
102
-
103
-
104
-
105
-
106
-
107
-
108
-
109
-
110
-
111
-
112
-
113
-
114
-
115
-
116
-
117
-
118
-
119
-
120
-
121
-
122
-
123
-
124
-
125
-
126
-
127
-
128
-
129
-
130
-
131
-
132
-
133
-
134
-
135
-
136
-
137
-
138
-
139
-
140
-
141
-
142
-
143
-
144
-
145
-
146
-
147
-
148
-
149
-
150
-
151
-
152
-
153
-
154
-
155
-
156
-
157
-
158
-
159
-
160
-
161
-
162
-
163
-
164
-
165
-
166
-
167
-
168
-
169
-
170
-
171
-
172
-
173
-
174
-
175
-
176
-
177
-
178
-
179
-
180
-
181
-
182
-
183
-
184
-
185
-
186
-
187
-
188
-
189
-
190
-
191
-
192
-
193
-
194
-
195
-
196
-
197
-
198
-
199
-
200
-
201
-
202
-
203
-
204
-
205
-
206
-
207
-
208
-
209
-
210
-
211
-
212
-
213
-
214
-
215
-
216
-
217
-
218
-
219
-
220
-
221
-
222
-
223
-
224
-
225
-
226
-
227
-
228
-
229
-
230
-
231
-
232
-
233
-
234
-
235
-
236
-
237
-
238
-
239
-
240
-
241
-
242
-
243
-
244
-
245
-
246
-
247
-
248
-
249
-
250
-
251
-
252
 |
 |
