Brother International Isodore„ Innov-ís 5000 Users Manual - English - Page 72
Zigzag Stitches
 |
View all Brother International Isodore„ Innov-ís 5000 manuals
Add to My Manuals
Save this manual to your list of manuals |
Page 72 highlights
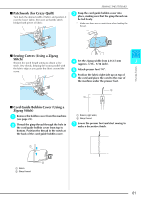
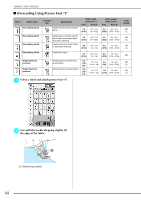
SEWING THE STITCHES Zigzag Stitches Zigzag stitches are useful for overcasting, appliqué, patchwork, and many other applications. Select a stitch, and attach presser foot "J". If the stitch which you select has a double mark " " at the top of the key display, you can sew reverse stitches by holding the "Reverse/Reinforcement Stitch" button. If the stitch which you select has a dot mark " " at the top of the key display, you can sew reinforcement stitches by holding the "Reverse/Reinforcement Stitch" button (see page 40). Stitch Stitch name Zigzag stitch Zigzag stitch Zigzag stitch (right) Zigzag stitch (left) Presser foot Applications For overcasting, mending. Reverse stitch is sewn while pressing "Reverse/ Reinforcement Stitch" button. For overcasting, mending. Reinforcement stitch is sewn while pressing "Reverse/ Reinforcement Stitch" button. Start from right needle position, zigzag sew at left. Stitch width [mm (inch.)] Auto. Manual 3.5 (1/8) 0.0 - 7.0 (0 - 1/4) 3.5 (1/8) 0.0 - 7.0 (0 - 1/4) 3.5 2.5 - 5.0 (1/8) (3/32 - 3/16) Stitch length [mm (inch.)] Auto. Manual 1.4 0.0 - 4.0 (1/16) (0 - 3/16) 1.4 0.0 - 4.0 (1/16) (0 - 3/16) 1.4 0.3 - 4.0 (1/16) (1/64 - 3/16) Start from left needle position, zigzag sew at right. 3.5 2.5 - 5.0 1.4 0.3 - 4.0 (1/8) (3/32 - 3/16) (1/16) (1/64 - 3/16) Twin needle OK ( J ) OK ( J ) OK ( J ) OK ( J ) a Select a stitch. ■ Overcasting (Using a Zigzag Stitch) Sew the overcasting along the edge of the fabric while positioning the right-hand side needle drop point just outside the edge of the fabric. a b Attach presser foot "J". a Needle drop position ■ Appliqué (Using a Zigzag Stitch) Attach the appliqué using a temporary spray adhesive or basting, then sew it. * Sew a zigzag stitch while positioning the right-hand side needle drop point just outside the edge of the fabric. 60
-
 1
1 -
2
-
3
-
4
-
5
-
6
-
7
-
8
-
9
-
10
-
11
-
12
-
13
-
14
-
15
-
16
-
17
-
18
-
19
-
20
-
21
-
22
-
23
-
24
-
25
-
26
-
27
-
28
-
29
-
30
-
31
-
32
-
33
-
34
-
35
-
36
-
37
-
38
-
39
-
40
-
41
-
42
-
43
-
44
-
45
-
46
-
47
-
48
-
49
-
50
-
51
-
52
-
53
-
54
-
55
-
56
-
57
-
58
-
59
-
60
-
61
-
62
-
63
-
64
-
65
-
66
-
 67
67 -
 68
68 -
 69
69 -
 70
70 -
 71
71 -
 72
72 -
 73
73 -
 74
74 -
 75
75 -
 76
76 -
 77
77 -
78
-
79
-
80
-
81
-
82
-
83
-
84
-
85
-
86
-
87
-
88
-
89
-
90
-
91
-
92
-
93
-
94
-
95
-
96
-
97
-
98
-
99
-
100
-
101
-
102
-
103
-
104
-
105
-
106
-
107
-
108
-
109
-
110
-
111
-
112
-
113
-
114
-
115
-
116
-
117
-
118
-
119
-
120
-
121
-
122
-
123
-
124
-
125
-
126
-
127
-
128
-
129
-
130
-
131
-
132
-
133
-
134
-
135
-
136
-
137
-
138
-
139
-
140
-
141
-
142
-
143
-
144
-
145
-
146
-
147
-
148
-
149
-
150
-
151
-
152
-
153
-
154
-
155
-
156
-
157
-
158
-
159
-
160
-
161
-
162
-
163
-
164
-
165
-
166
-
167
-
168
-
169
-
170
-
171
-
172
-
173
-
174
-
175
-
176
-
177
-
178
-
179
-
180
-
181
-
182
-
183
-
184
-
185
-
186
-
187
-
188
-
189
-
190
-
191
-
192
-
193
-
194
-
195
-
196
-
197
-
198
-
199
-
200
-
201
-
202
-
203
-
204
-
205
-
206
-
207
-
208
-
209
-
210
-
211
-
212
-
213
-
214
-
215
-
216
-
217
-
218
-
219
-
220
-
221
-
222
-
223
-
224
-
225
-
226
-
227
-
228
-
229
-
230
-
231
-
232
-
233
-
234
-
235
-
236
-
237
-
238
-
239
-
240
-
241
-
242
-
243
-
244
-
245
-
246
-
247
-
248
-
249
-
250
-
251
-
252
 |
 |
