Brother International Isodore„ Innov-ís 5000 Users Manual - English - Page 51
Using the Foot Controller
 |
View all Brother International Isodore„ Innov-ís 5000 manuals
Add to My Manuals
Save this manual to your list of manuals |
Page 51 highlights
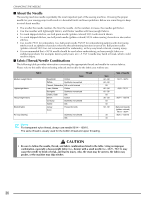
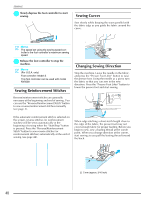
g Press the sewing. "Start/Stop" button to start * Guide the fabric lightly by hand. SEWING Note • When cutting thread thicker than #30, nylon thread, or other decorative threads, use the thread cutter on the side of the machine. j When the needle has stopped moving, raise the presser foot and remove the fabric. 2 Sewing Basics h Press the sewing. "Start/Stop" button again to stop Memo This machine is equipped with a bobbin thread sensor that warns you when the bobbin thread is almost empty. When the bobbin thread is nearly empty, the machine automatically stops. However, if the "Start/Stop" button is pressed, a few stitches can be sewn. If the warning displays, re-thread the machine immediately. i Press the "Thread the threads. Cutter" button to trim ■ Using the Foot Controller You can also use the foot controller to start and stop sewing. CAUTION Do not allow fabric pieces and dust to collect in the foot controller. Doing so could cause a fire or an electric shock. → The needle will return to the up position automatically. CAUTION • Do not press the "Thread Cutter" button after the threads have been cut. Doing so could tangle the thread or break the needle and damage the machine. • Do not press the "Thread Cutter" button when there is no fabric set in the machine or during machine operation. The thread may tangle, possibly resulting in damage. Memo • When the foot controller is being used, the "Start/Stop" button has no effect on sewing. • The foot controller cannot be used when embroidering. • The foot controller can be used for sewing utility and decorative stitches when the embroidery unit is attached. a Insert the foot controller on the machine. plug into its jack b a a Foot controller b Foot controller jack Note Do not pull the retractable cord out beyond the red mark on the cord. 39
-
 1
1 -
2
-
3
-
4
-
5
-
6
-
7
-
8
-
9
-
10
-
11
-
12
-
13
-
14
-
15
-
16
-
17
-
18
-
19
-
20
-
21
-
22
-
23
-
24
-
25
-
26
-
27
-
28
-
29
-
30
-
31
-
32
-
33
-
34
-
35
-
36
-
37
-
38
-
39
-
40
-
41
-
42
-
43
-
44
-
45
-
 46
46 -
 47
47 -
 48
48 -
 49
49 -
 50
50 -
 51
51 -
 52
52 -
 53
53 -
 54
54 -
 55
55 -
 56
56 -
57
-
58
-
59
-
60
-
61
-
62
-
63
-
64
-
65
-
66
-
67
-
68
-
69
-
70
-
71
-
72
-
73
-
74
-
75
-
76
-
77
-
78
-
79
-
80
-
81
-
82
-
83
-
84
-
85
-
86
-
87
-
88
-
89
-
90
-
91
-
92
-
93
-
94
-
95
-
96
-
97
-
98
-
99
-
100
-
101
-
102
-
103
-
104
-
105
-
106
-
107
-
108
-
109
-
110
-
111
-
112
-
113
-
114
-
115
-
116
-
117
-
118
-
119
-
120
-
121
-
122
-
123
-
124
-
125
-
126
-
127
-
128
-
129
-
130
-
131
-
132
-
133
-
134
-
135
-
136
-
137
-
138
-
139
-
140
-
141
-
142
-
143
-
144
-
145
-
146
-
147
-
148
-
149
-
150
-
151
-
152
-
153
-
154
-
155
-
156
-
157
-
158
-
159
-
160
-
161
-
162
-
163
-
164
-
165
-
166
-
167
-
168
-
169
-
170
-
171
-
172
-
173
-
174
-
175
-
176
-
177
-
178
-
179
-
180
-
181
-
182
-
183
-
184
-
185
-
186
-
187
-
188
-
189
-
190
-
191
-
192
-
193
-
194
-
195
-
196
-
197
-
198
-
199
-
200
-
201
-
202
-
203
-
204
-
205
-
206
-
207
-
208
-
209
-
210
-
211
-
212
-
213
-
214
-
215
-
216
-
217
-
218
-
219
-
220
-
221
-
222
-
223
-
224
-
225
-
226
-
227
-
228
-
229
-
230
-
231
-
232
-
233
-
234
-
235
-
236
-
237
-
238
-
239
-
240
-
241
-
242
-
243
-
244
-
245
-
246
-
247
-
248
-
249
-
250
-
251
-
252
 |
 |
