Brother International Isodore„ Innov-ís 5000 Users Manual - English - Page 181
Saving Embroidery Patterns in, the Computer
 |
View all Brother International Isodore„ Innov-ís 5000 manuals
Add to My Manuals
Save this manual to your list of manuals |
Page 181 highlights
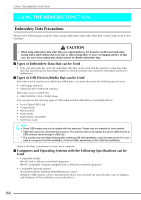
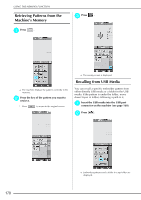
USING THE MEMORY FUNCTION Saving Embroidery Patterns in the Computer b Press when the pattern you want to save is in the sewing screen. Using the included USB cable, the machine can be connected to your computer, and the embroidery patterns can be temporarily retrieved from and saved in your computer. Note • Do not turn the main power to OFF while the "Saving" screen is displayed. You will lose the pattern you are saving. a Plug the USB cable connector into the corresponding USB port connectors for the computer and for the machine. * The USB cable can be plugged into the USB port connectors on the computer and embroidery machine whether or not they are turned on. a c Press . b * Press to return to the original screen without saving. 5 Embroidery a USB port connector for computer b USB cable connector → The "Removable Disk" icon will appear in "My Computer" on the computer. Note • The connectors on the USB cable can only be inserted into a connector in one direction. If it is difficult to insert the connector, do not insert it with force. Check the orientation of the connector. • For details on the position of the USB port on the computer (or USB hub), refer to the instruction manual for the corresponding equipment. → The pattern will be temporarily saved to "Removable Disk" under "My Computer". d Select the pattern's Disk" and copy the .phc file in "Removable file to the computer. 169
-
 1
1 -
2
-
3
-
4
-
5
-
6
-
7
-
8
-
9
-
10
-
11
-
12
-
13
-
14
-
15
-
16
-
17
-
18
-
19
-
20
-
21
-
22
-
23
-
24
-
25
-
26
-
27
-
28
-
29
-
30
-
31
-
32
-
33
-
34
-
35
-
36
-
37
-
38
-
39
-
40
-
41
-
42
-
43
-
44
-
45
-
46
-
47
-
48
-
49
-
50
-
51
-
52
-
53
-
54
-
55
-
56
-
57
-
58
-
59
-
60
-
61
-
62
-
63
-
64
-
65
-
66
-
67
-
68
-
69
-
70
-
71
-
72
-
73
-
74
-
75
-
76
-
77
-
78
-
79
-
80
-
81
-
82
-
83
-
84
-
85
-
86
-
87
-
88
-
89
-
90
-
91
-
92
-
93
-
94
-
95
-
96
-
97
-
98
-
99
-
100
-
101
-
102
-
103
-
104
-
105
-
106
-
107
-
108
-
109
-
110
-
111
-
112
-
113
-
114
-
115
-
116
-
117
-
118
-
119
-
120
-
121
-
122
-
123
-
124
-
125
-
126
-
127
-
128
-
129
-
130
-
131
-
132
-
133
-
134
-
135
-
136
-
137
-
138
-
139
-
140
-
141
-
142
-
143
-
144
-
145
-
146
-
147
-
148
-
149
-
150
-
151
-
152
-
153
-
154
-
155
-
156
-
157
-
158
-
159
-
160
-
161
-
162
-
163
-
164
-
165
-
166
-
167
-
168
-
169
-
170
-
171
-
172
-
173
-
174
-
175
-
 176
176 -
 177
177 -
 178
178 -
 179
179 -
 180
180 -
 181
181 -
 182
182 -
 183
183 -
 184
184 -
 185
185 -
 186
186 -
187
-
188
-
189
-
190
-
191
-
192
-
193
-
194
-
195
-
196
-
197
-
198
-
199
-
200
-
201
-
202
-
203
-
204
-
205
-
206
-
207
-
208
-
209
-
210
-
211
-
212
-
213
-
214
-
215
-
216
-
217
-
218
-
219
-
220
-
221
-
222
-
223
-
224
-
225
-
226
-
227
-
228
-
229
-
230
-
231
-
232
-
233
-
234
-
235
-
236
-
237
-
238
-
239
-
240
-
241
-
242
-
243
-
244
-
245
-
246
-
247
-
248
-
249
-
250
-
251
-
252
 |
 |
