Brother International Isodore„ Innov-ís 5000 Users Manual - English - Page 66
Changing the Needle Position Left, or Middle Needle Position Stitches
 |
View all Brother International Isodore„ Innov-ís 5000 manuals
Add to My Manuals
Save this manual to your list of manuals |
Page 66 highlights
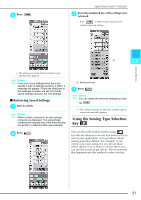
SEWING THE STITCHES a Select a stitch. CAUTION Be sure the needle does not strike a basting pin, or any other objects, during sewing. The thread could tangle or the needle could break, causing injury. f When sewing is completed, hold the "Reverse/Reinforcement Stitch" button to sew 3-4 reverse stitches (or reinforcement stitches) at the end of the seam. b Attach presser foot "J". c Hold the thread tails and fabric with your left hand, and turn the handwheel with your right hand to insert the needle into the fabric. g After sewing, press the "Thread button to trim the threads. Cutter" a a Sewing start position d Lower the presser foot, and hold the "Reverse/Reinforcement Stitch" button to sew 3-4 stitches. → The machine sews reverse stitches (or reinforcement stitches). e Press the forward. "Start/Stop" button to sew a a Reverse stitches → The machine will begin sewing slowly. Memo When the automatic thread cutting and automatic reinforcement stitch keys on the screen are selected, reverse stitches (or reinforcement stitches) will be sewn automatically at the beginning of sewing when the "Start/Stop" button is pressed. Press the "Reverse/Reinforcement Stitch" button to sew reverse stitches (or reinforcement stitches) and trim the thread automatically at the end of sewing. ■ Changing the Needle Position (Left or Middle Needle Position Stitches Only) When you select left or middle needle position stitches, you can use and in the stitch width display to change the position of the needle. Match the distance from the right edge of the presser foot to the needle with the stitch width, then align the edge of the presser foot with the edge of the fabric during sewing for an attractive finish. 54
-
 1
1 -
2
-
3
-
4
-
5
-
6
-
7
-
8
-
9
-
10
-
11
-
12
-
13
-
14
-
15
-
16
-
17
-
18
-
19
-
20
-
21
-
22
-
23
-
24
-
25
-
26
-
27
-
28
-
29
-
30
-
31
-
32
-
33
-
34
-
35
-
36
-
37
-
38
-
39
-
40
-
41
-
42
-
43
-
44
-
45
-
46
-
47
-
48
-
49
-
50
-
51
-
52
-
53
-
54
-
55
-
56
-
57
-
58
-
59
-
60
-
 61
61 -
 62
62 -
 63
63 -
 64
64 -
 65
65 -
 66
66 -
 67
67 -
 68
68 -
 69
69 -
 70
70 -
 71
71 -
72
-
73
-
74
-
75
-
76
-
77
-
78
-
79
-
80
-
81
-
82
-
83
-
84
-
85
-
86
-
87
-
88
-
89
-
90
-
91
-
92
-
93
-
94
-
95
-
96
-
97
-
98
-
99
-
100
-
101
-
102
-
103
-
104
-
105
-
106
-
107
-
108
-
109
-
110
-
111
-
112
-
113
-
114
-
115
-
116
-
117
-
118
-
119
-
120
-
121
-
122
-
123
-
124
-
125
-
126
-
127
-
128
-
129
-
130
-
131
-
132
-
133
-
134
-
135
-
136
-
137
-
138
-
139
-
140
-
141
-
142
-
143
-
144
-
145
-
146
-
147
-
148
-
149
-
150
-
151
-
152
-
153
-
154
-
155
-
156
-
157
-
158
-
159
-
160
-
161
-
162
-
163
-
164
-
165
-
166
-
167
-
168
-
169
-
170
-
171
-
172
-
173
-
174
-
175
-
176
-
177
-
178
-
179
-
180
-
181
-
182
-
183
-
184
-
185
-
186
-
187
-
188
-
189
-
190
-
191
-
192
-
193
-
194
-
195
-
196
-
197
-
198
-
199
-
200
-
201
-
202
-
203
-
204
-
205
-
206
-
207
-
208
-
209
-
210
-
211
-
212
-
213
-
214
-
215
-
216
-
217
-
218
-
219
-
220
-
221
-
222
-
223
-
224
-
225
-
226
-
227
-
228
-
229
-
230
-
231
-
232
-
233
-
234
-
235
-
236
-
237
-
238
-
239
-
240
-
241
-
242
-
243
-
244
-
245
-
246
-
247
-
248
-
249
-
250
-
251
-
252
 |
 |
