Brother International MFC-465CN Users Manual - English - Page 104
Enhance Scenery, Remove Red-Eye, Color Start, PhotoCapture
 |
UPC - 012502618218
View all Brother International MFC-465CN manuals
Add to My Manuals
Save this manual to your list of manuals |
Page 104 highlights
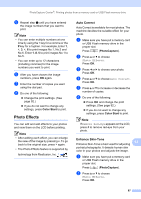
Chapter 13 c Press d or c to choose your photo. Press OK. d Press a or b to choose Enhance Skin-Tone. Press OK. e Do one of the following. „ Press OK if you do not want to change any settings. „ Press a or b to adjust the effect level manually. Press OK when you have finished. f Press a or b to increase or decrease the number of copies. g Do one of the following. „ Press OK and change the print settings. (See page 92.) „ If you do not want to change any settings, press Color Start to print. Enhance Scenery 13 Enhance Scenery is best used for adjusting landscape photographs. It highlights green and blue of your photo, so that the landscape looks more sharp and vivid. a Make sure you have put the memory card or USB Flash memory drive in the proper slot. Press (PhotoCapture). b Press a or b to choose Photo Effects. Press OK. c Press d or c to choose your photo. Press OK. d Press a or b to choose Enhance Scenery. Press OK. e Do one of the following. „ Press OK if you do not want to change any settings. „ Press a or b to adjust the effect level manually. Press OK when you have finished. f Press a or b to increase or decrease the number of copies. g Do one of the following. „ Press OK and change the print settings. (See page 92.) „ If you do not want to change any settings, press Color Start to print. Remove Red-Eye 13 The machine detects eyes in your photos and will remove red-eye from your photo. Note There are some cases when red-eye may not be removed. • When the face is too small. • When the face is turning too far up, down, left or right. a Make sure you have put a memory card or USB Flash memory drive in the proper slot. Press (PhotoCapture). b Press a or b to choose Photo Effects. Press OK. c Press d or c to choose your photo. Press OK. 88
-
 1
1 -
2
-
3
-
4
-
5
-
6
-
7
-
8
-
9
-
10
-
11
-
12
-
13
-
14
-
15
-
16
-
17
-
18
-
19
-
20
-
21
-
22
-
23
-
24
-
25
-
26
-
27
-
28
-
29
-
30
-
31
-
32
-
33
-
34
-
35
-
36
-
37
-
38
-
39
-
40
-
41
-
42
-
43
-
44
-
45
-
46
-
47
-
48
-
49
-
50
-
51
-
52
-
53
-
54
-
55
-
56
-
57
-
58
-
59
-
60
-
61
-
62
-
63
-
64
-
65
-
66
-
67
-
68
-
69
-
70
-
71
-
72
-
73
-
74
-
75
-
76
-
77
-
78
-
79
-
80
-
81
-
82
-
83
-
84
-
85
-
86
-
87
-
88
-
89
-
90
-
91
-
92
-
93
-
94
-
95
-
96
-
97
-
98
-
 99
99 -
 100
100 -
 101
101 -
 102
102 -
 103
103 -
 104
104 -
 105
105 -
 106
106 -
 107
107 -
 108
108 -
 109
109 -
110
-
111
-
112
-
113
-
114
-
115
-
116
-
117
-
118
-
119
-
120
-
121
-
122
-
123
-
124
-
125
-
126
-
127
-
128
-
129
-
130
-
131
-
132
-
133
-
134
-
135
-
136
-
137
-
138
-
139
-
140
-
141
-
142
-
143
-
144
-
145
-
146
-
147
-
148
-
149
-
150
-
151
-
152
-
153
-
154
-
155
-
156
-
157
-
158
-
159
-
160
-
161
-
162
-
163
-
164
-
165
-
166
-
167
-
168
-
169
-
170
-
171
-
172
-
173
-
174
-
175
-
176
-
177
-
178
-
179
-
180
-
181
-
182
-
183
-
184
-
185
-
186
-
187
-
188
-
189
-
190
-
191
-
192
 |
 |