Brother International MFC-465CN Users Manual - English - Page 152
Checking the print quality
 |
UPC - 012502618218
View all Brother International MFC-465CN manuals
Add to My Manuals
Save this manual to your list of manuals |
Page 152 highlights
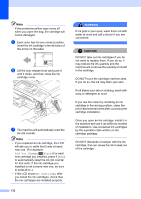
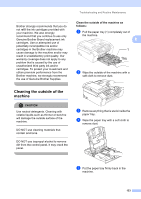
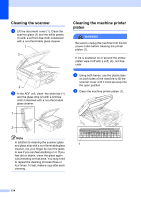
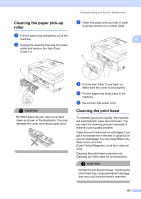
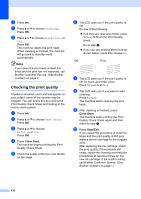
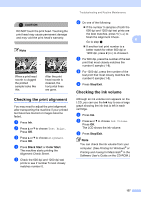
a Press Ink. b Press a or b to choose Cleaning. Press OK. c Press a or b to choose Black, Color or All. Press OK. The machine cleans the print head. When cleaning is finished, the machine will go back to standby mode automatically. Note If you clean the print head at least five times and the print has not improved, call Brother Customer Service. (See Brother numbers on page i.) Checking the print quality B If faded or streaked colors and text appear on your output, some of the nozzles may be clogged. You can check this by printing the Print Quality Check Sheet and looking at the nozzle check pattern. a Press Ink. b Press a or b to choose Test Print. Press OK. c Press a or b to choose Print Quality. Press OK. d Press Color Start. The machine begins printing the Print Quality Check Sheet. e Check the quality of the four color blocks on the sheet. f The LCD asks you if the print quality is OK. Do one of the following: „ If all lines are clear and visible, press 1 (Yes) to finish the Print Quality check. Go to step j. „ If you can see missing short lines as shown below, press 2 to choose No. OK Poor g The LCD asks you if the print quality is OK for black and three colors. Press 1 (Yes) or 2 (No). h The LCD asks you if you want to start cleaning. Press 1 (Yes). The machine starts cleaning the print head. i After cleaning is finished, press Color Start. The machine starts printing the Print Quality Check Sheet again and then return to step e. j Press Stop/Exit. If you repeat this procedure at least five times and the print quality is still poor, replace the ink cartridge for the clogged color. After replacing the ink cartridge, check the print quality. If the problem still exists, repeat the cleaning and test print procedures at least five times for the new ink cartridge. If ink is still missing, call Brother Customer Service. (See Brother numbers on page i.) 136
-
 1
1 -
2
-
3
-
4
-
5
-
6
-
7
-
8
-
9
-
10
-
11
-
12
-
13
-
14
-
15
-
16
-
17
-
18
-
19
-
20
-
21
-
22
-
23
-
24
-
25
-
26
-
27
-
28
-
29
-
30
-
31
-
32
-
33
-
34
-
35
-
36
-
37
-
38
-
39
-
40
-
41
-
42
-
43
-
44
-
45
-
46
-
47
-
48
-
49
-
50
-
51
-
52
-
53
-
54
-
55
-
56
-
57
-
58
-
59
-
60
-
61
-
62
-
63
-
64
-
65
-
66
-
67
-
68
-
69
-
70
-
71
-
72
-
73
-
74
-
75
-
76
-
77
-
78
-
79
-
80
-
81
-
82
-
83
-
84
-
85
-
86
-
87
-
88
-
89
-
90
-
91
-
92
-
93
-
94
-
95
-
96
-
97
-
98
-
99
-
100
-
101
-
102
-
103
-
104
-
105
-
106
-
107
-
108
-
109
-
110
-
111
-
112
-
113
-
114
-
115
-
116
-
117
-
118
-
119
-
120
-
121
-
122
-
123
-
124
-
125
-
126
-
127
-
128
-
129
-
130
-
131
-
132
-
133
-
134
-
135
-
136
-
137
-
138
-
139
-
140
-
141
-
142
-
143
-
144
-
145
-
146
-
 147
147 -
 148
148 -
 149
149 -
 150
150 -
 151
151 -
 152
152 -
 153
153 -
 154
154 -
 155
155 -
 156
156 -
 157
157 -
158
-
159
-
160
-
161
-
162
-
163
-
164
-
165
-
166
-
167
-
168
-
169
-
170
-
171
-
172
-
173
-
174
-
175
-
176
-
177
-
178
-
179
-
180
-
181
-
182
-
183
-
184
-
185
-
186
-
187
-
188
-
189
-
190
-
191
-
192
 |
 |