Brother International MFC-465CN Users Manual - English - Page 110
Adjusting Brightness, Contrast and Color, Brightness, Contrast, Color Enhancement (True2Life®)
 |
UPC - 012502618218
View all Brother International MFC-465CN manuals
Add to My Manuals
Save this manual to your list of manuals |
Page 110 highlights
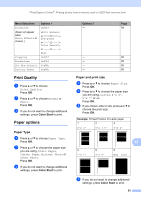
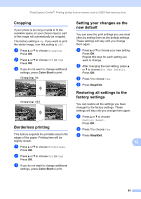
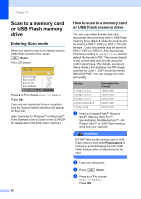
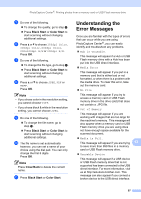
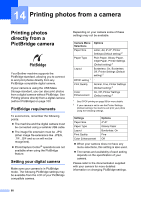
Chapter 13 Adjusting Brightness, Contrast and Color 13 Brightness 13 a Press a or b to choose Brightness. Press OK. b Press d or c to make the copy lighter or darker. Press OK. c If you do not want to change additional settings, press Color Start to print. Contrast 13 You can choose the contrast setting. More contrast will make an image look sharper and more vivid. a Press a or b to choose Contrast. Press OK. b Press d or c to increase or decrease the contrast. Press OK. c If you do not want to change additional settings, press Color Start to print. Color Enhancement (True2Life®) 13 You can turn on the color enhancement (True2Life®) feature to print more vivid images. Printing time will be slower. a Press a or b to choose True2Life. Press OK. b Do one of the following: „ If you want to customize the White Balance, Sharpness or Color Density, press d or c to choose On, and then go to step c. „ If you do not want to customize, press d or c to choose Off. Press OK and then go to step f. c Press a or b to choose White Balance, Sharpness or Color Density. Press OK. d Press d or c to adjust the degree of the setting. Press OK. e Do one of the following: „ If you want to customize another color enhancement, press a or b to choose another option. „ If you want to change other settings, press a or b to choose Exit, and then press OK. f If you do not want to change additional settings, press Color Start to print. Note • White Balance This setting adjusts the hue of the white areas of an image. Lighting, camera settings and other influences will effect the appearance of white. The white areas of a picture may be slightly pink, yellow or some other color. By using this setting, you can correct that effect and bring the white areas back to pure white. • Sharpness This setting enhances the detail of an image, similar to adjusting the fine focus on a camera. If the image is not in true focus and you cannot see the fine details of the picture, then adjust the sharpness. • Color Density This setting adjusts the total amount of color in the image. You can increase or decrease the amount of color in an image to improve a washed out or weak picture. 94
-
 1
1 -
2
-
3
-
4
-
5
-
6
-
7
-
8
-
9
-
10
-
11
-
12
-
13
-
14
-
15
-
16
-
17
-
18
-
19
-
20
-
21
-
22
-
23
-
24
-
25
-
26
-
27
-
28
-
29
-
30
-
31
-
32
-
33
-
34
-
35
-
36
-
37
-
38
-
39
-
40
-
41
-
42
-
43
-
44
-
45
-
46
-
47
-
48
-
49
-
50
-
51
-
52
-
53
-
54
-
55
-
56
-
57
-
58
-
59
-
60
-
61
-
62
-
63
-
64
-
65
-
66
-
67
-
68
-
69
-
70
-
71
-
72
-
73
-
74
-
75
-
76
-
77
-
78
-
79
-
80
-
81
-
82
-
83
-
84
-
85
-
86
-
87
-
88
-
89
-
90
-
91
-
92
-
93
-
94
-
95
-
96
-
97
-
98
-
99
-
100
-
101
-
102
-
103
-
104
-
 105
105 -
 106
106 -
 107
107 -
 108
108 -
 109
109 -
 110
110 -
 111
111 -
 112
112 -
 113
113 -
 114
114 -
 115
115 -
116
-
117
-
118
-
119
-
120
-
121
-
122
-
123
-
124
-
125
-
126
-
127
-
128
-
129
-
130
-
131
-
132
-
133
-
134
-
135
-
136
-
137
-
138
-
139
-
140
-
141
-
142
-
143
-
144
-
145
-
146
-
147
-
148
-
149
-
150
-
151
-
152
-
153
-
154
-
155
-
156
-
157
-
158
-
159
-
160
-
161
-
162
-
163
-
164
-
165
-
166
-
167
-
168
-
169
-
170
-
171
-
172
-
173
-
174
-
175
-
176
-
177
-
178
-
179
-
180
-
181
-
182
-
183
-
184
-
185
-
186
-
187
-
188
-
189
-
190
-
191
-
192
 |
 |