Brother International MFC 7440N Users Manual - English - Page 40
Setting up the public user, Setting up restricted users, h - scanning
 |
UPC - 012502620631
View all Brother International MFC 7440N manuals
Add to My Manuals
Save this manual to your list of manuals |
Page 40 highlights
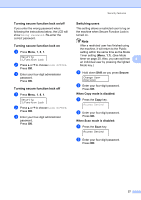
Chapter 4 Setting up the public user 4 You can set up the Public user. Public users do not need to enter a password. Note You must disable at least one function to turn on Secure Function Lock for the Public user. a Press Menu, 1, 8, 1. Security 1.Function Lock b Press a or b to choose Setup User. Press OK. c Enter the administrator password. Press OK. d Press a or b to choose Public. Press OK. e Press a or b to choose Enable or Disable for Fax Tx. Press OK. After you have set Fax Tx, repeat this step for Fax Rx, Copy, Scan and Print. Press OK. Note You can set PC printing for only the Public user. If you disable Print for Public users it will also disable PC printing for all restricted users. f Press Stop/Exit. Setting up restricted users 4 You can set up users with restrictions and a password. a Press Menu, 1, 8, 1. Security 1.Function Lock b Press a or b to choose Setup User. Press OK. c Enter the administrator password. Press OK. d Press a or b to choose User01. Press OK. e Use the numeric keys to enter the user name. (See Entering text on page 150.) Press OK. f Enter a four-digit password for the user. Press OK. g Press a or b to choose Enable or Disable for Fax Tx. Press OK. After you have set Fax Tx, repeat this step for Fax Rx, Copy and Scan. Press OK. h Repeat d to g for entering each additional user and password. i Press Stop/Exit. Note You cannot use the same password as another user's password. 26
-
 1
1 -
2
-
3
-
4
-
5
-
6
-
7
-
8
-
9
-
10
-
11
-
12
-
13
-
14
-
15
-
16
-
17
-
18
-
19
-
20
-
21
-
22
-
23
-
24
-
25
-
26
-
27
-
28
-
29
-
30
-
31
-
32
-
33
-
34
-
 35
35 -
 36
36 -
 37
37 -
 38
38 -
 39
39 -
 40
40 -
 41
41 -
 42
42 -
 43
43 -
 44
44 -
 45
45 -
46
-
47
-
48
-
49
-
50
-
51
-
52
-
53
-
54
-
55
-
56
-
57
-
58
-
59
-
60
-
61
-
62
-
63
-
64
-
65
-
66
-
67
-
68
-
69
-
70
-
71
-
72
-
73
-
74
-
75
-
76
-
77
-
78
-
79
-
80
-
81
-
82
-
83
-
84
-
85
-
86
-
87
-
88
-
89
-
90
-
91
-
92
-
93
-
94
-
95
-
96
-
97
-
98
-
99
-
100
-
101
-
102
-
103
-
104
-
105
-
106
-
107
-
108
-
109
-
110
-
111
-
112
-
113
-
114
-
115
-
116
-
117
-
118
-
119
-
120
-
121
-
122
-
123
-
124
-
125
-
126
-
127
-
128
-
129
-
130
-
131
-
132
-
133
-
134
-
135
-
136
-
137
-
138
-
139
-
140
-
141
-
142
-
143
-
144
-
145
-
146
-
147
-
148
-
149
-
150
-
151
-
152
-
153
-
154
-
155
-
156
-
157
-
158
-
159
-
160
-
161
-
162
-
163
-
164
-
165
-
166
-
167
-
168
-
169
-
170
-
171
-
172
-
173
-
174
-
175
-
176
-
177
-
178
-
179
-
180
-
181
-
182
-
183
-
184
-
185
-
186
-
187
-
188
-
189
-
190
-
191
-
192
 |
 |