Brother International MFC 9120CN Users Manual - English - Page 174
to clean the, Repeat steps
 |
UPC - 012502622390
View all Brother International MFC 9120CN manuals
Add to My Manuals
Save this manual to your list of manuals |
Page 174 highlights
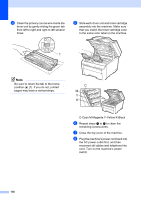
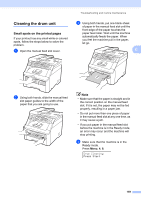
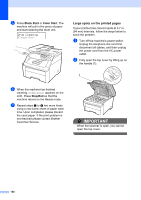
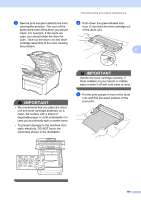
d Clean the primary corona wire inside the drum unit by gently sliding the green tab from left to right and right to left several times. e Slide each drum unit and toner cartridge assembly into the machine. Make sure that you match the toner cartridge color to the same color label on the machine. 1 Note Be sure to return the tab to the home position (a) (1). If you do not, printed pages may have a vertical stripe. C M Y K C-Cyan M-Magenta Y-Yellow K-Black f Repeat steps c to e to clean the remaining corona wires. g Close the top cover of the machine. h Plug the machine's power cord back into the AC power outlet first, and then reconnect all cables and telephone line cord. Turn on the machine's power switch. 158
-
 1
1 -
2
-
3
-
4
-
5
-
6
-
7
-
8
-
9
-
10
-
11
-
12
-
13
-
14
-
15
-
16
-
17
-
18
-
19
-
20
-
21
-
22
-
23
-
24
-
25
-
26
-
27
-
28
-
29
-
30
-
31
-
32
-
33
-
34
-
35
-
36
-
37
-
38
-
39
-
40
-
41
-
42
-
43
-
44
-
45
-
46
-
47
-
48
-
49
-
50
-
51
-
52
-
53
-
54
-
55
-
56
-
57
-
58
-
59
-
60
-
61
-
62
-
63
-
64
-
65
-
66
-
67
-
68
-
69
-
70
-
71
-
72
-
73
-
74
-
75
-
76
-
77
-
78
-
79
-
80
-
81
-
82
-
83
-
84
-
85
-
86
-
87
-
88
-
89
-
90
-
91
-
92
-
93
-
94
-
95
-
96
-
97
-
98
-
99
-
100
-
101
-
102
-
103
-
104
-
105
-
106
-
107
-
108
-
109
-
110
-
111
-
112
-
113
-
114
-
115
-
116
-
117
-
118
-
119
-
120
-
121
-
122
-
123
-
124
-
125
-
126
-
127
-
128
-
129
-
130
-
131
-
132
-
133
-
134
-
135
-
136
-
137
-
138
-
139
-
140
-
141
-
142
-
143
-
144
-
145
-
146
-
147
-
148
-
149
-
150
-
151
-
152
-
153
-
154
-
155
-
156
-
157
-
158
-
159
-
160
-
161
-
162
-
163
-
164
-
165
-
166
-
167
-
168
-
 169
169 -
 170
170 -
 171
171 -
 172
172 -
 173
173 -
 174
174 -
 175
175 -
 176
176 -
 177
177 -
 178
178 -
 179
179 -
180
-
181
-
182
-
183
-
184
-
185
-
186
-
187
-
188
-
189
-
190
-
191
-
192
-
193
-
194
-
195
-
196
-
197
-
198
-
199
-
200
-
201
-
202
-
203
-
204
-
205
-
206
-
207
-
208
-
209
-
210
-
211
-
212
-
213
-
214
-
215
-
216
-
217
-
218
-
219
-
220
-
221
-
222
-
223
-
224
-
225
-
226
-
227
-
228
-
229
-
230
-
231
-
232
-
233
-
234
-
235
-
236
-
237
-
238
-
239
-
240
-
241
-
242
-
243
-
244
-
245
-
246
-
247
-
248
-
249
-
250
-
251
-
252
-
253
-
254
-
255
-
256
-
257
-
258
-
259
-
260
-
261
-
262
-
263
-
264
 |
 |
158
d
Clean the primary corona wire inside the
drum unit by gently sliding the green tab
from left to right and right to left several
times.
Note
Be sure to return the tab to the home
position (
a
) (1). If you do not, printed
pages may have a vertical stripe.
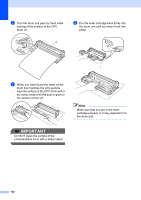
e
Slide each drum unit and toner cartridge
assembly into the machine. Make sure
that you match the toner cartridge color
to the same color label on the machine.
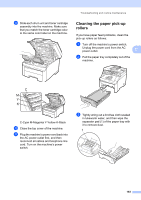
C-Cyan M-Magenta Y-Yellow K-Black
f
Repeat steps
c
to
e
to clean the
remaining corona wires.
g
Close the top cover of the machine.
h
Plug the machine’s power cord back into
the AC power outlet first, and then
reconnect all cables and telephone line
cord. Turn on the machine’s power
switch.
1
K
Y
M
C