Brother International MFC 9120CN Users Manual - English - Page 208
Styrofoam pieces for the drum unit and, side of the machine to the FRONT
 |
UPC - 012502622390
View all Brother International MFC 9120CN manuals
Add to My Manuals
Save this manual to your list of manuals |
Page 208 highlights
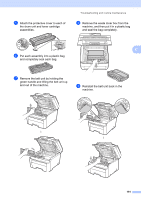
j Reinstall the original packing material in the machine. n Put the machine and the Styrofoam pieces into the carton. Match the front side of the machine to the "FRONT" mark on the Styrofoam pieces. Put the Styrofoam pieces for the drum unit and toner cartridge assemblies on the top of the machine. k Close the top cover. o Put the power cord, and the three remaining drum unit and toner cartridge assemblies into the Styrofoam pieces as shown in the illustration. l Put the waste toner box and one drum unit and toner cartridges assembly in the Styrofoam piece. m Using two people, place the machine into the plastic bag. 192
-
 1
1 -
2
-
3
-
4
-
5
-
6
-
7
-
8
-
9
-
10
-
11
-
12
-
13
-
14
-
15
-
16
-
17
-
18
-
19
-
20
-
21
-
22
-
23
-
24
-
25
-
26
-
27
-
28
-
29
-
30
-
31
-
32
-
33
-
34
-
35
-
36
-
37
-
38
-
39
-
40
-
41
-
42
-
43
-
44
-
45
-
46
-
47
-
48
-
49
-
50
-
51
-
52
-
53
-
54
-
55
-
56
-
57
-
58
-
59
-
60
-
61
-
62
-
63
-
64
-
65
-
66
-
67
-
68
-
69
-
70
-
71
-
72
-
73
-
74
-
75
-
76
-
77
-
78
-
79
-
80
-
81
-
82
-
83
-
84
-
85
-
86
-
87
-
88
-
89
-
90
-
91
-
92
-
93
-
94
-
95
-
96
-
97
-
98
-
99
-
100
-
101
-
102
-
103
-
104
-
105
-
106
-
107
-
108
-
109
-
110
-
111
-
112
-
113
-
114
-
115
-
116
-
117
-
118
-
119
-
120
-
121
-
122
-
123
-
124
-
125
-
126
-
127
-
128
-
129
-
130
-
131
-
132
-
133
-
134
-
135
-
136
-
137
-
138
-
139
-
140
-
141
-
142
-
143
-
144
-
145
-
146
-
147
-
148
-
149
-
150
-
151
-
152
-
153
-
154
-
155
-
156
-
157
-
158
-
159
-
160
-
161
-
162
-
163
-
164
-
165
-
166
-
167
-
168
-
169
-
170
-
171
-
172
-
173
-
174
-
175
-
176
-
177
-
178
-
179
-
180
-
181
-
182
-
183
-
184
-
185
-
186
-
187
-
188
-
189
-
190
-
191
-
192
-
193
-
194
-
195
-
196
-
197
-
198
-
199
-
200
-
201
-
202
-
 203
203 -
 204
204 -
 205
205 -
 206
206 -
 207
207 -
 208
208 -
 209
209 -
 210
210 -
 211
211 -
 212
212 -
 213
213 -
214
-
215
-
216
-
217
-
218
-
219
-
220
-
221
-
222
-
223
-
224
-
225
-
226
-
227
-
228
-
229
-
230
-
231
-
232
-
233
-
234
-
235
-
236
-
237
-
238
-
239
-
240
-
241
-
242
-
243
-
244
-
245
-
246
-
247
-
248
-
249
-
250
-
251
-
252
-
253
-
254
-
255
-
256
-
257
-
258
-
259
-
260
-
261
-
262
-
263
-
264
 |
 |

192
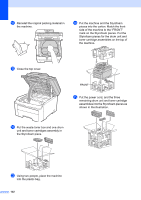
j
Reinstall the original packing material in
the machine.
k
Close the top cover.
l
Put the waste toner box and one drum
unit and toner cartridges assembly in
the Styrofoam piece.
m
Using two people, place the machine
into the plastic bag.
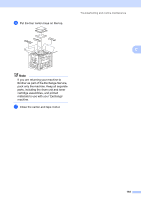
n
Put the machine and the Styrofoam
pieces into the carton. Match the front
side of the machine to the “FRONT”
mark on the Styrofoam pieces. Put the
Styrofoam pieces for the drum unit and
toner cartridge assemblies on the top of
the machine.
o
Put the power cord, and the three
remaining drum unit and toner cartridge
assemblies into the Styrofoam pieces as
shown in the illustration.